> For the complete documentation index, see [llms.txt](https://docs.viverse.com/llms.txt). Markdown versions of documentation pages are available by appending `.md` to page URLs; this page is available as [Markdown](https://docs.viverse.com/examples/pet-rescue-template-project.md).
# Pet Rescue Template Project
This document provides a guide for creating a Pet Rescue replica project.
***
The Pet Rescue game is a treasure hunt style game in which the avatar is placed in a 3D environment and has to search for multiple cats. The user navigates the world with their avatar and uses the mouse button to click on the cats to capture them. The game includes a quest system, scoreboard, timer and many other features that can be useful for creating games in VIVERSE. Read up on Pet Rescue [here](https://www.news.viverse.com/post/cat-adventure-a-cozy-virtual-world-to-soothe-your-soul). Download the project and import the zip file into PlayCanvas.
## Pet Rescue Sample Scenes Project
The Pet Rescue Sample Scene Project includes 2 scenes.
**Original\_Scene** - The original Pet Rescue which can be found by searching in VIVERSE Worlds. [Link](https://create.viverse.com/MMuLWbE)
**Tutorial\_Scene** - This scene contains a different iteration of the Pet Rescue. This is the scene that was created using the guides provided below.
## Pet Rescue Template Project
**Template\_Scene -** A stripped down version of Pet Rescue. The 3D environment and colliders have been removed and all the Pet Rescue core game mechanics have been left in the scene to help creators do what they do best, BUT FASTER! Read through the checklist below. The components listed as Required will need to be created and/or configured. The components marked as Optional are already added and configured in the project, but only need to be modified if the creator wants to customize.
## Using The Pet Rescue Template Checklist
{% stepper %}
{% step %}
#### Required: A 3D environment needs to be added with collider(s).
{% endstep %}
{% step %}
#### Required: Spawn point is prebuilt, but requires customization of position and rotation for different environments.
{% endstep %}
{% step %}
#### Optional: 4 cat groups are prebuilt (GroupA - GroupD), but can be customized by adding or removing groups.
{% endstep %}
{% step %}
#### Required: 17 cat hiding positions are prebuilt (A1-A8, B1-B3, C1-C3, D1-D3), but require customization of position and rotation for different environments. Hiding positions can be added or removed.
{% endstep %}
{% step %}
#### Optional: 9 cat models are prebuilt and have been added to hiding positions. Cat models can be customized by adjusting the scale of the models and cats can be added or removed.
{% endstep %}
{% step %}
#### Required: Catbox is prebuilt, but requires customization of position, rotation and scale for different environments. Cat collect objects and cat models can be added or removed.
{% endstep %}
{% step %}
#### Optional: Random waypoint assignment object is prebuilt. Can be customized if cats or cat groups are added or removed.
{% endstep %}
{% step %}
#### Required: Instructions board and start button are prebuilt, but require customization of position, rotation and scale for different environments.
{% endstep %}
{% step %}
#### Optional: Countdown is prebuilt.
{% endstep %}
{% step %}
#### Optional: Scoreboard is prebuilt.
{% endstep %}
{% step %}
#### Optional: GameOver user interface is prebuilt.
{% endstep %}
{% step %}
#### Optional: GameManager object is prebuilt.
{% endstep %}
{% step %}
#### Optional: Quest system is configured for finding 9 cats, but can be customized if cats are added or removed.
{% endstep %}
{% step %}
#### Optional: Cat animations are prebuilt.
{% endstep %}
{% step %}
#### Optional: Audio including cat sounds, background music and celebration music are prebuilt.
{% endstep %}
{% step %}
#### Optional: Cat particle effects are prebuilt.
{% endstep %}
{% endstepper %}
## Setup 3D Environment
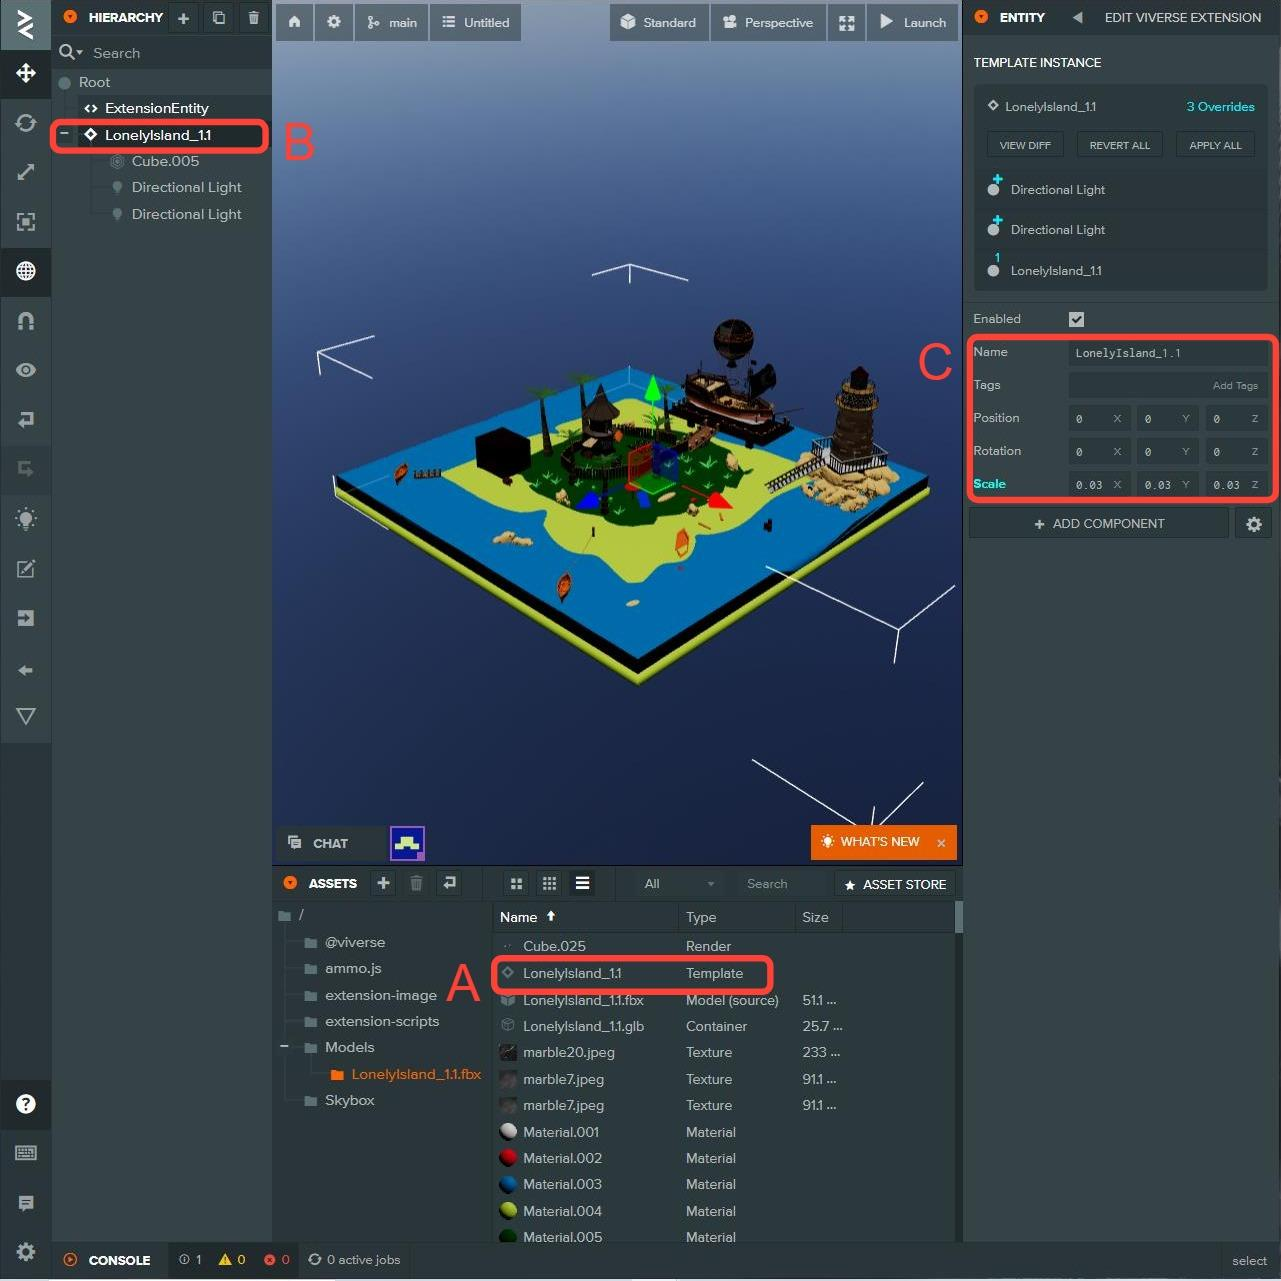
A 3D environment needs to be added to the template project. The basic process is in the following guide, but the process can differ based on projects.
{% stepper %}
{% step %}
#### Add the 3D model to the project
A. In the **Assets** window, create a new folder called **Models**.
B. Drag your 3D model into the **Assets** window.
{% endstep %}
{% step %}
#### Add the 3D model to the scene
A. Locate the 3D model's **Template** file inside the folder that was generated by the 3D model that was added to the **Assets** window.
B. Drag the **Template** file to the Hierarchy. In the sample project, lights were added to the model.
C. Update **Position, Rotation** and **Scale** of the model.
{% endstep %}
{% step %}
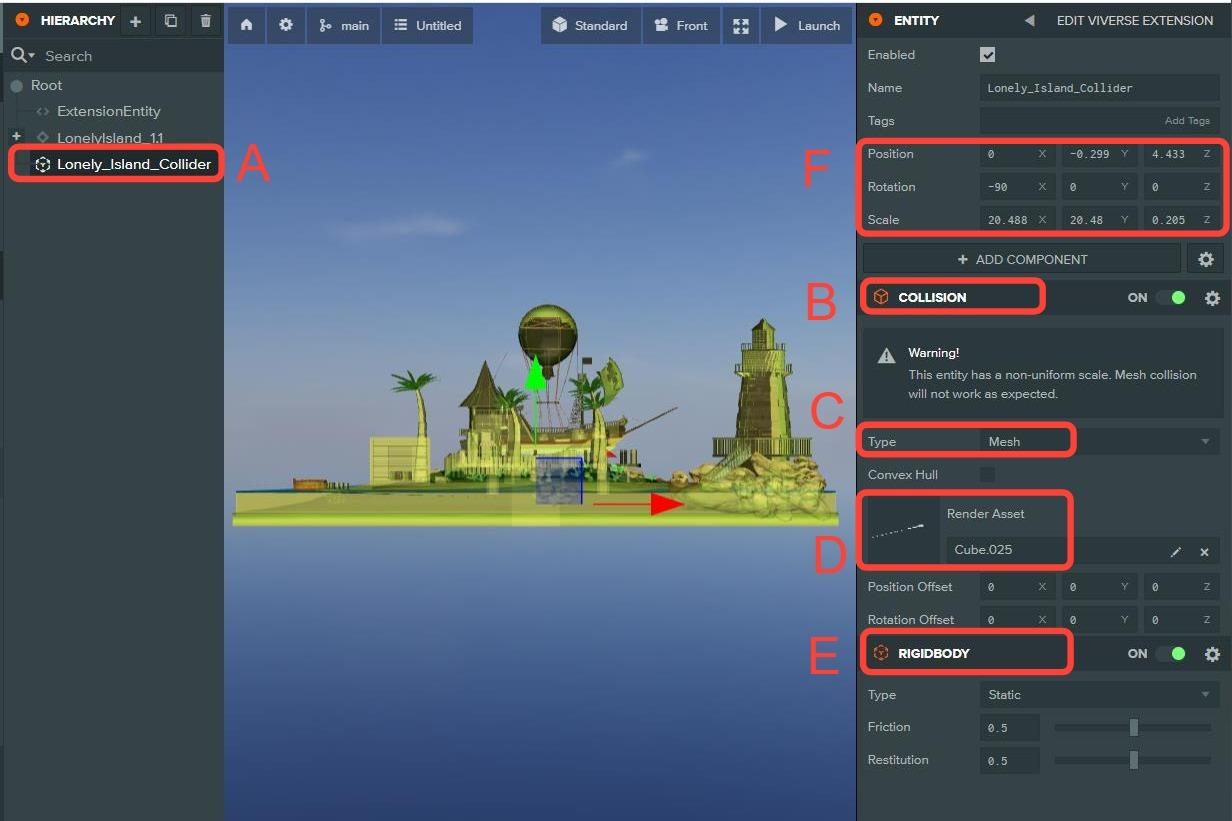
#### Add and configure the collider
A. In the Hierarchy, create a new entity for the collider.
B. Add a **Collision** component.
C. Change the collision type to **Mesh**.
D. Add the **Render** file to the **Render Asset**.
E. Add a **Rigidbody** component.
F. Update the **Position, Rotation** and **Scale** in order to match up the collider with the model.
{% endstep %}
{% endstepper %}
## Setup Spawn Point
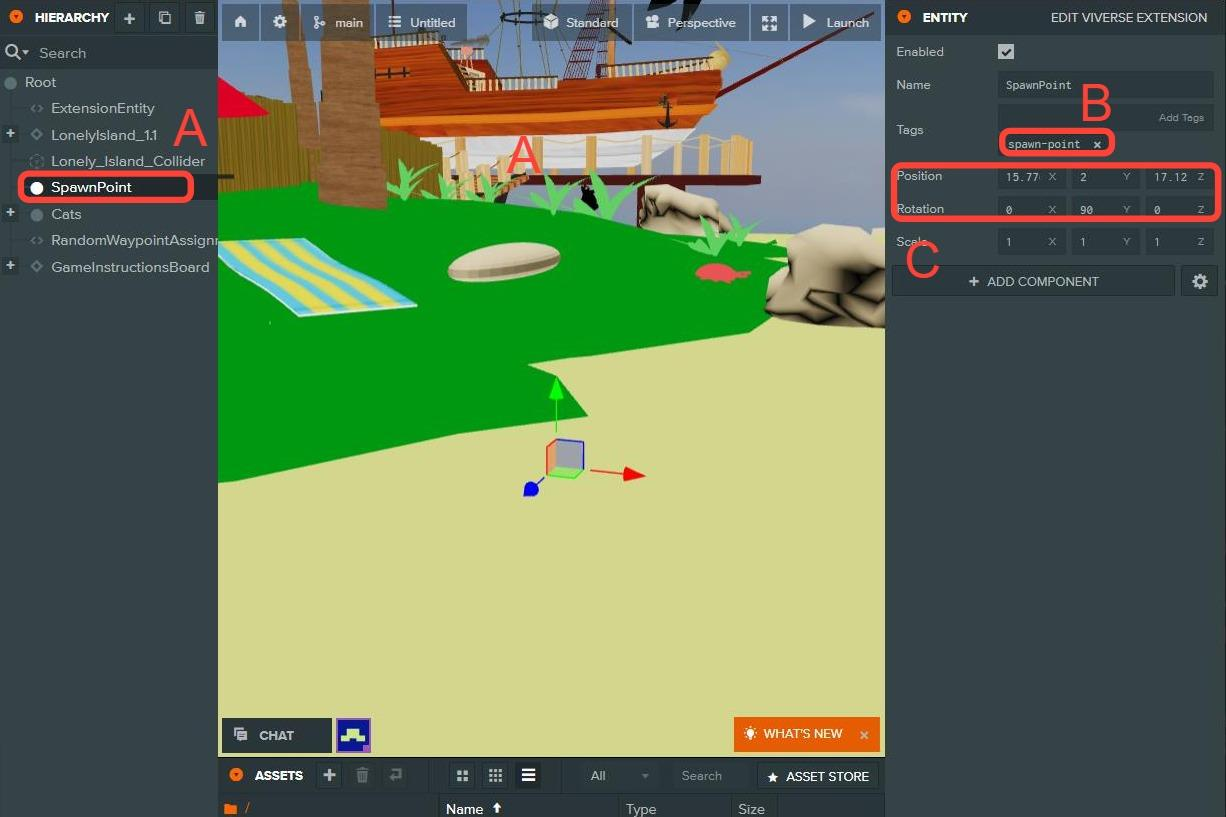
The spawn point is already added to the template project, but needs to be configured for a desired Position and Rotation. The following steps show how it was setup and configured.
{% stepper %}
{% step %}
#### Create a spawn point
A. In the **Hierarchy**, add a new entity.
B. The spawn point's name is arbitrary, but the **spawn-point** tag needs to be added.
C. Update the **Position** and **Rotation** so that the location is above the ground.
D. At this point, the game can be published to VIVERSE for testing, ensuring that the avatar can traverse the environment.
{% endstep %}
{% endstepper %}
## Setup Cat Groups
The cat groups are already added to the template project, but groups can be added or removed as needed. The following steps show how they were setup and configured.
{% stepper %}
{% step %}
#### Configure cat groups
A. A parent entity called Cats which holds the cats and hiding positions.
B. **GroupA**, **GroupB**, **GroupC** and **GroupD** have been created. Cats are grouped based on poses. Groups can be added or removed.
{% endstep %}
{% endstepper %}
## Setup Cat Hiding Positions
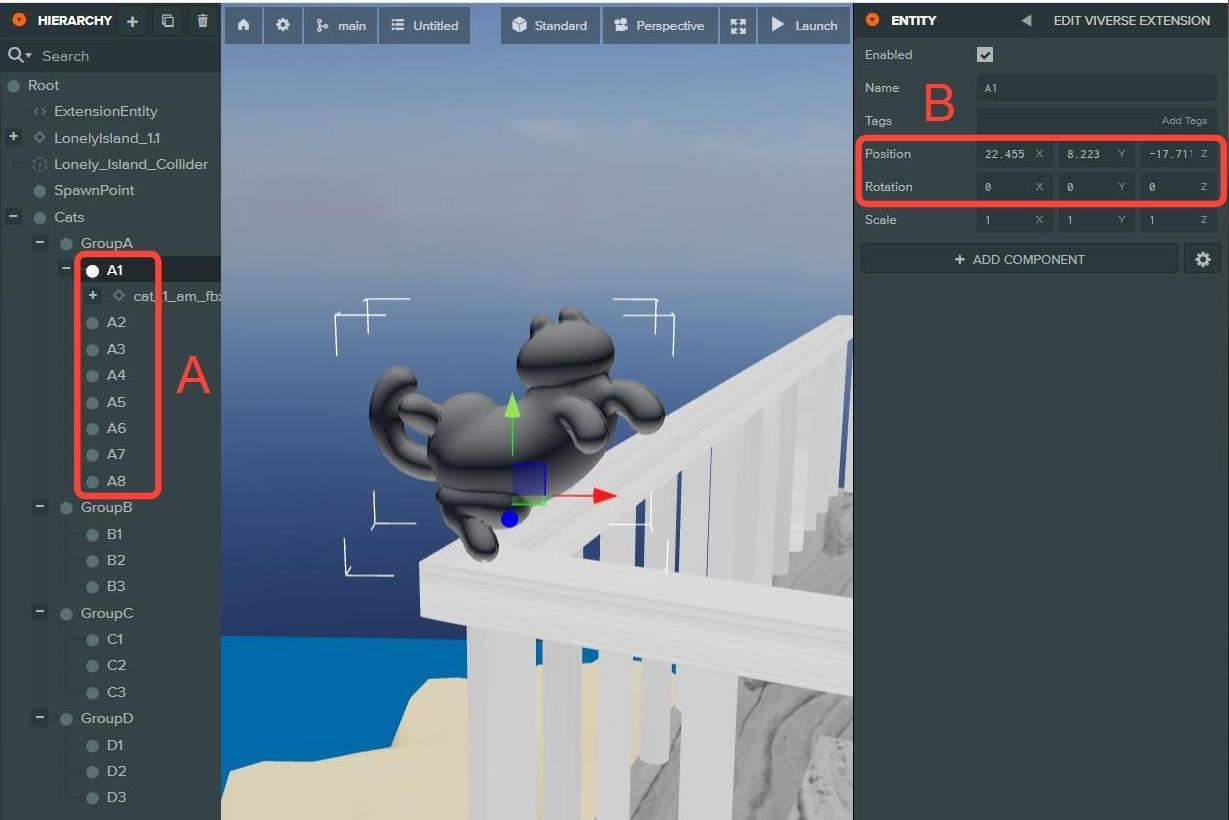
The cat hiding positions are already added to the template project, but hiding positions can be added or removed as needed. Moving and rotating the cat hiding positions is recommended as opposed to moving and rotating the cat models.
{% stepper %}
{% step %}
#### Configure cat hiding positions
A. Each group has several hiding positions. In the sample, the positions under **GroupA** are named **A1, A2, A3,** etc.
B. Update the **Position** and **Rotation** for each hiding spot. Adding a cat model under the position can help with visually placing the position.
{% endstep %}
{% endstepper %}
## Setup Cat Models
The cat models are already added to the template project, but cat models can be added or removed as needed. The following steps show how they were setup and configured.
{% stepper %}
{% step %}
#### Cat models
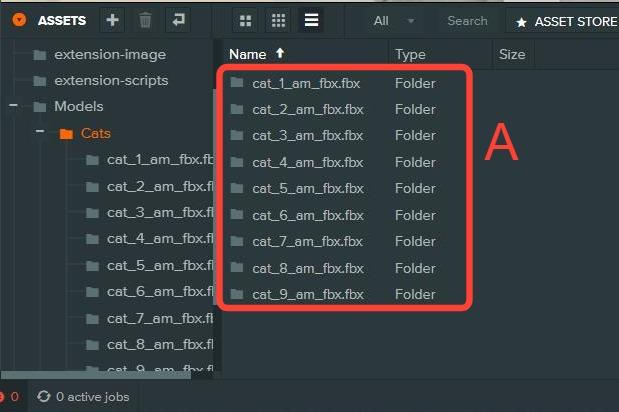
A. Cat models are located in the **Models/Cats** directory.
{% endstep %}
{% step %}
#### Adding cat models in the scene
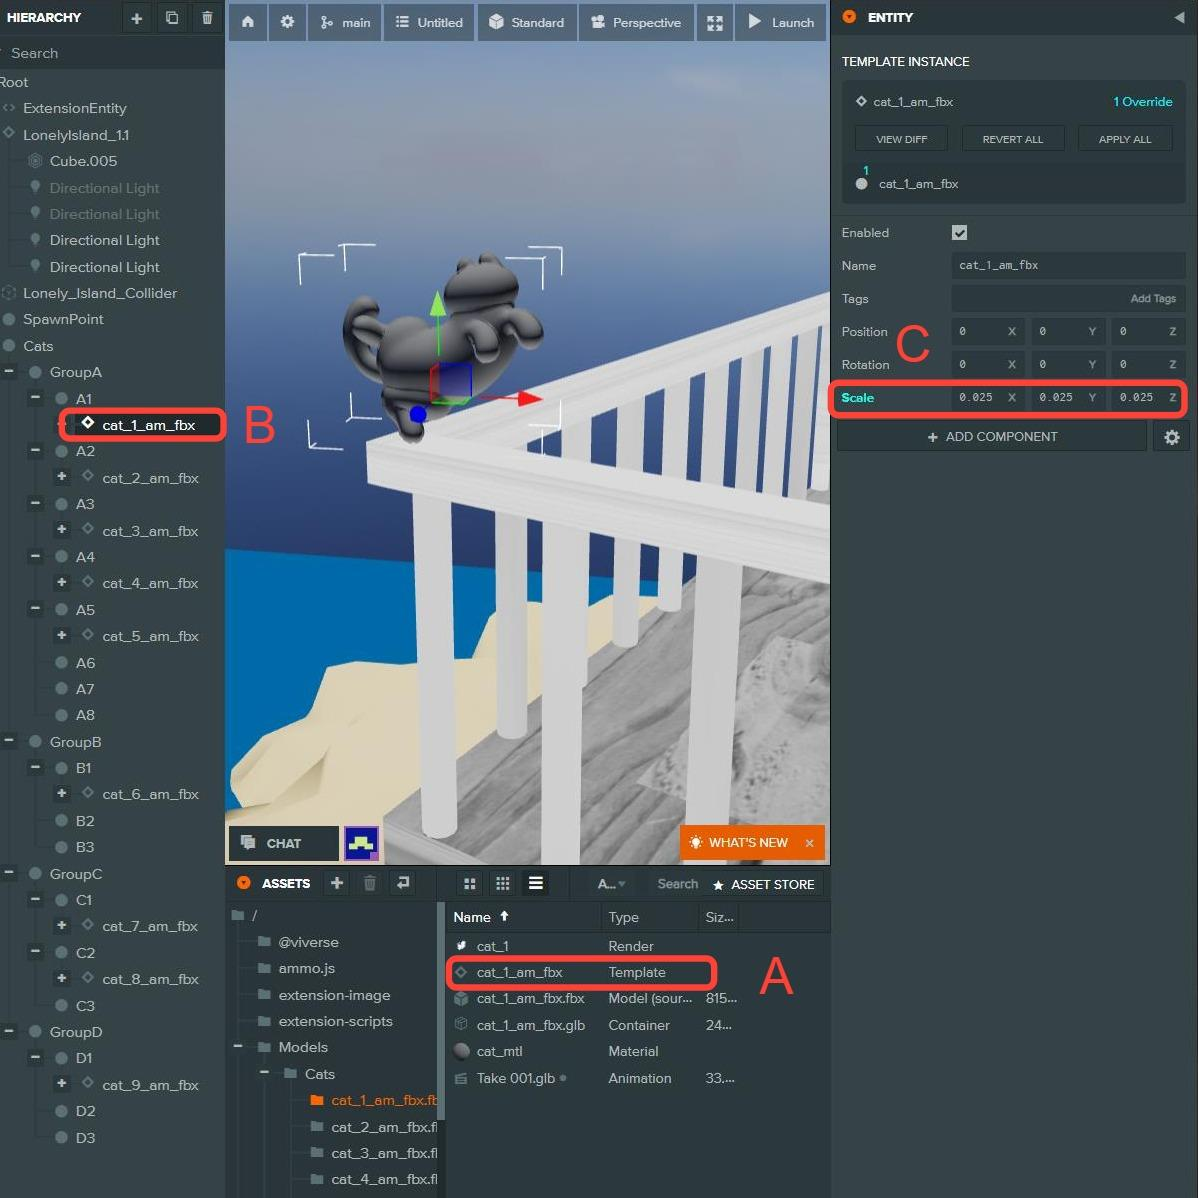
A. For each cat, drag the **Template** from the **Assets** window to a hiding position in the **Hierarchy**.
B. Select the cat in the **Hierarchy**.
C. Update the **Scale** for the cat model so the size is appropriate for the environment.
{% endstep %}
{% step %}
#### Add material
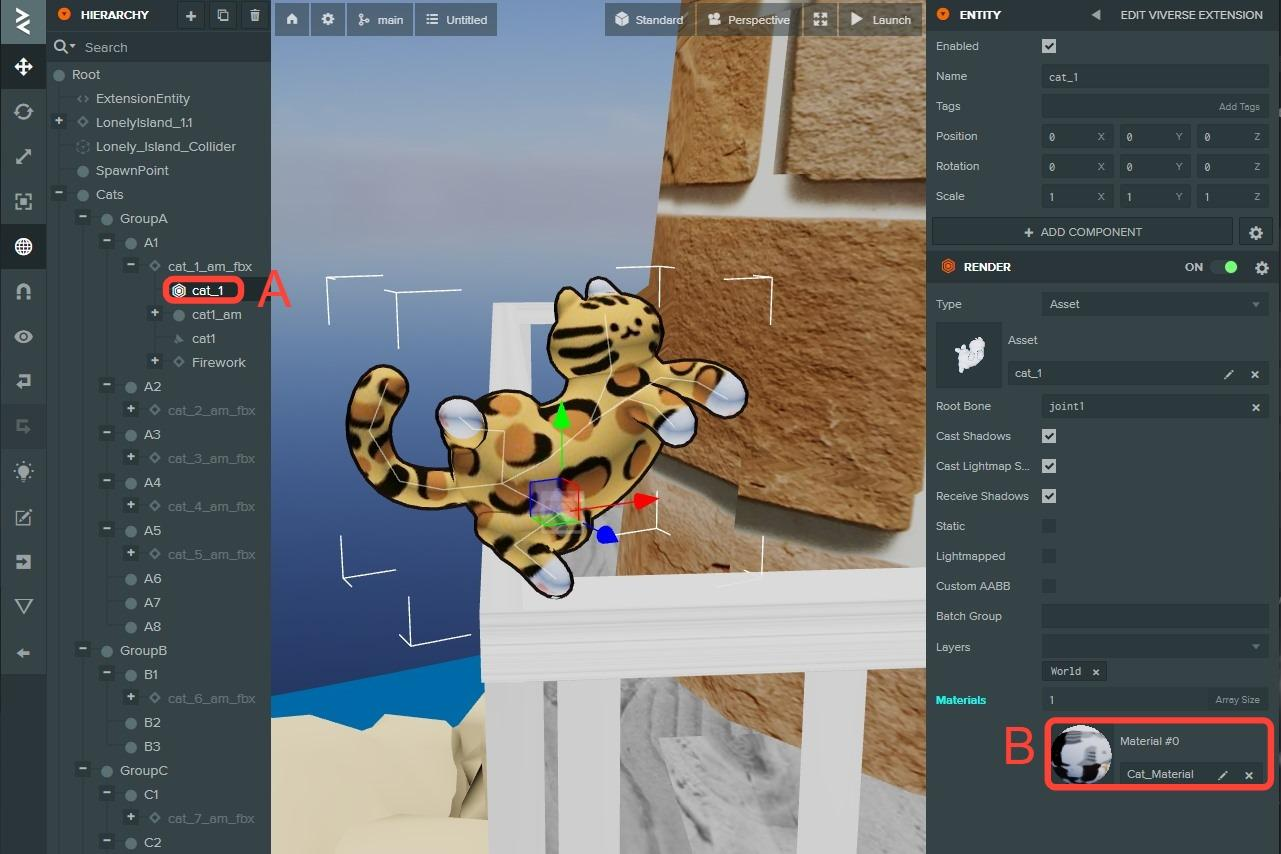
A. Select the first child object each cat.
B. Add the **Cat\_Material** to the **Materials** slot.
{% endstep %}
{% step %}
#### Disable the cats
A. Select all the cats in the groups and **disable** them so that they are disabled by default.
{% endstep %}
{% step %}
#### Add the cat script to the project
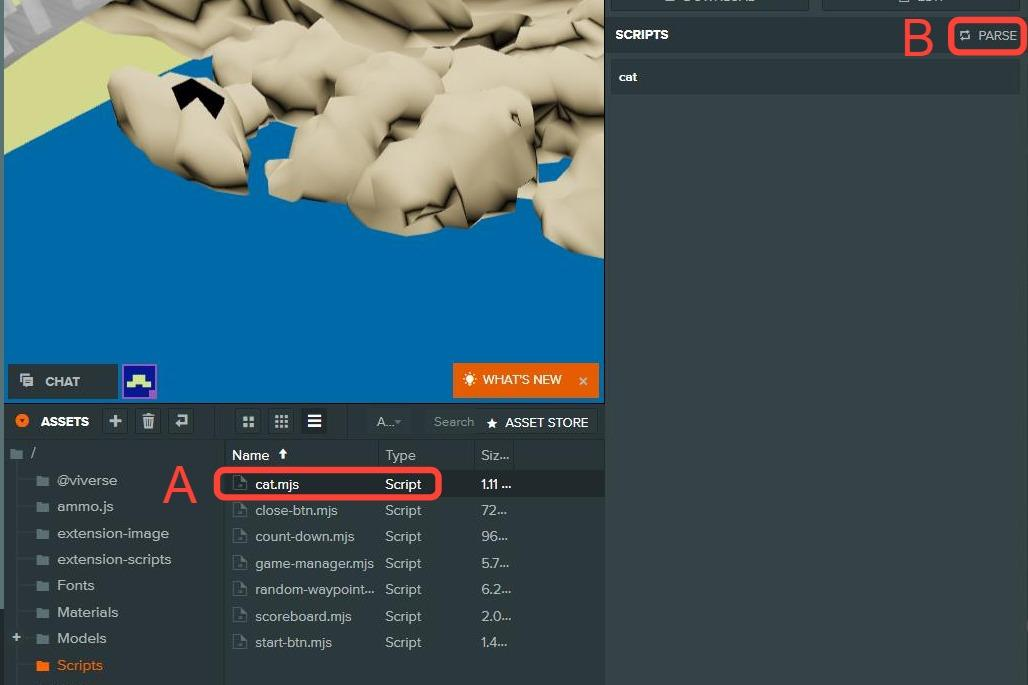
A. Drag the **cat.mjs** script to the **Assets** window.
B. Click the **parse** button.
{% endstep %}
{% step %}
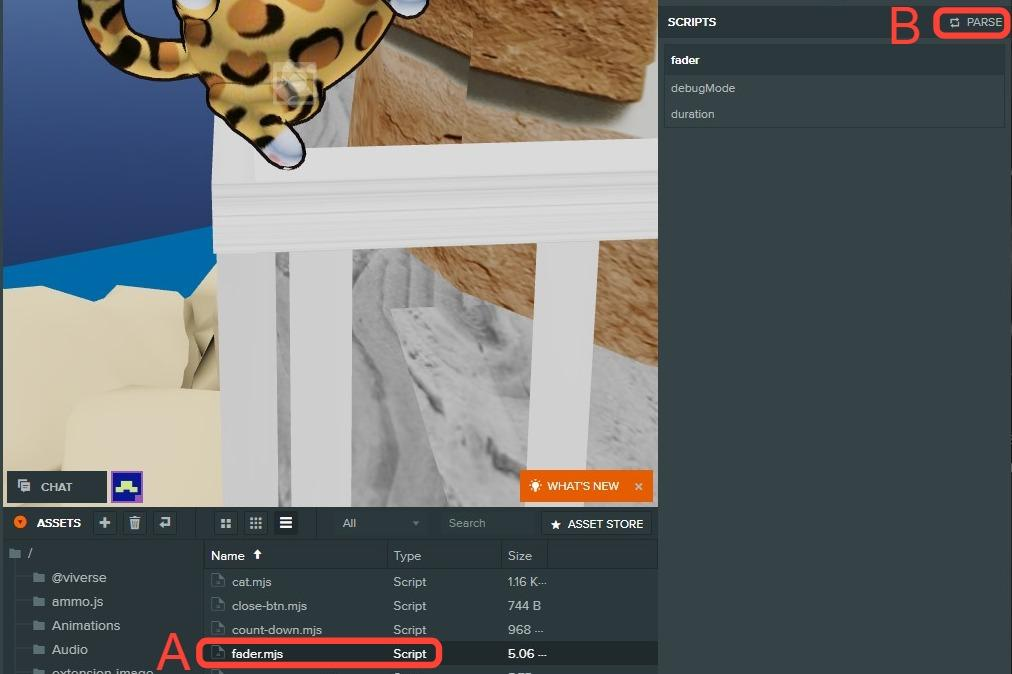
#### Add the fader script to the project
A. Drag the **fader.mjs** script to the **Assets** window.
B. Click the **parse** button.
{% endstep %}
{% step %}
#### Configure the cat models
A. Add the **cat** tag in the **Tags** field.
B. Add a **Sphere Collider** with **Radius .5** and **Position Offset** **(0, .23, 0)**.
C. Add the **cat.mjs** script.
D. Add the **fader.mjs** script.
E. Click the **Edit Viverse Extension** button.
{% endstep %}
{% step %}
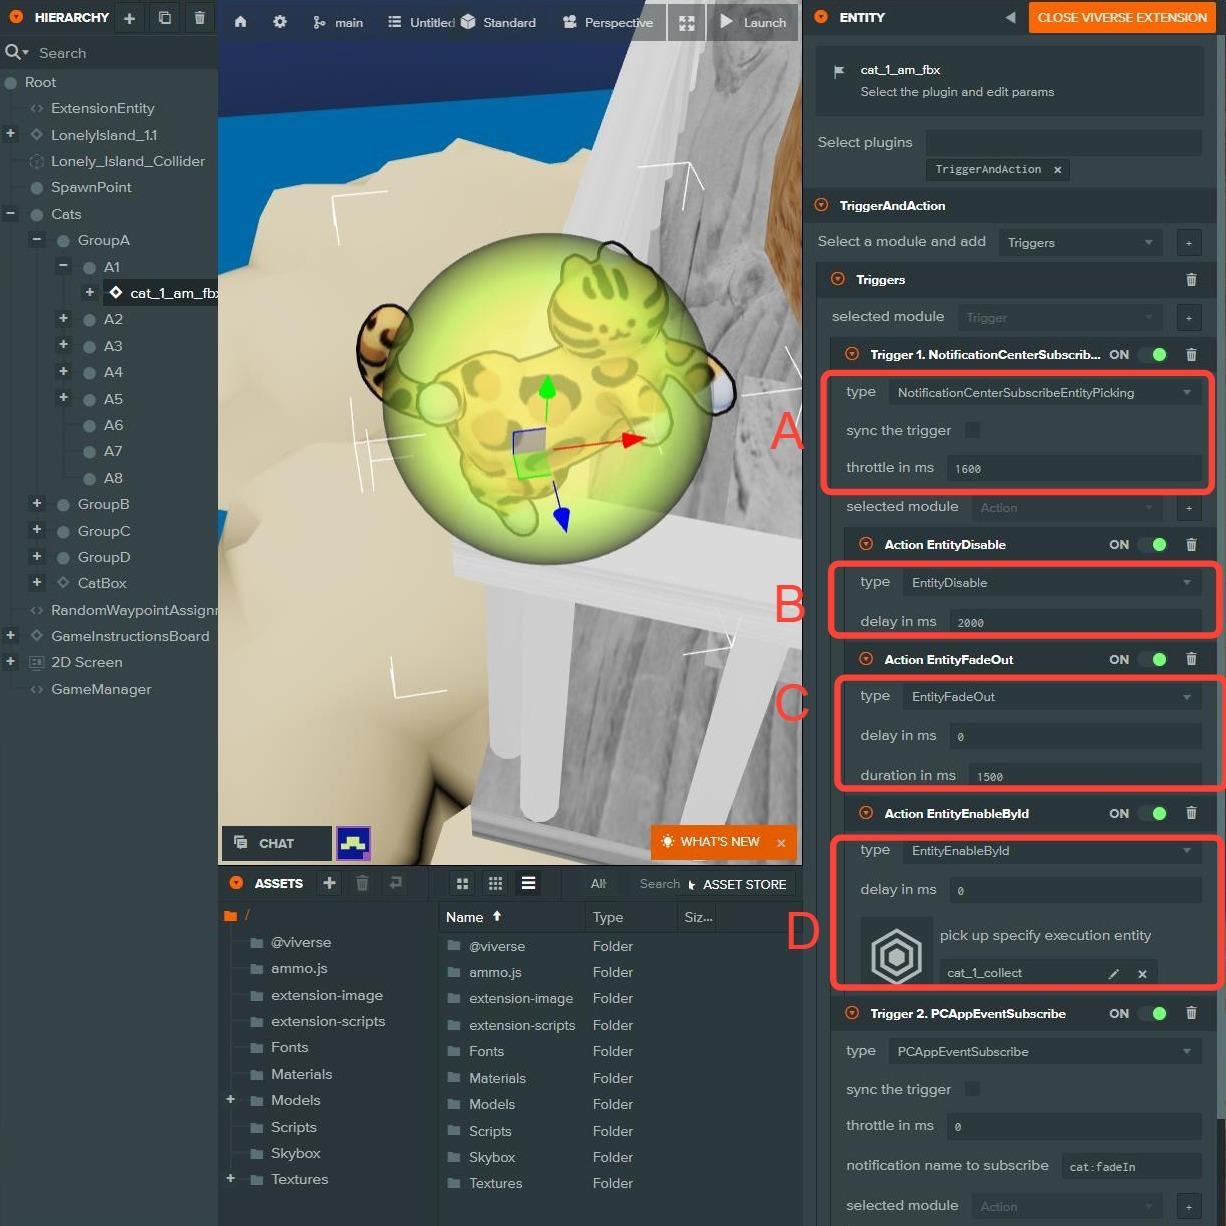
#### Add the Viverse functionality
A. For each cat, add a **NotificationCenterSubscribeEntityPicking** trigger with **throttle in ms** set to **1600**.
B. Add a **EntityDisable** action with **delay in ms** set to **2000**.
C. **Add a EntityEnableById** action with the **pick up specify execution entity** set to the corresponding cat in the cat box. For cat 1, select **cat\_1\_collect**, for cat 2, select **cat\_2\_collect**, etc.
{% endstep %}
{% endstepper %}
## Setup Catbox
The Catbox is already added to the template project, but needs to be configured for a desired Position, Rotation and Scale. The following steps show how it was setup and configured.
{% stepper %}
{% step %}
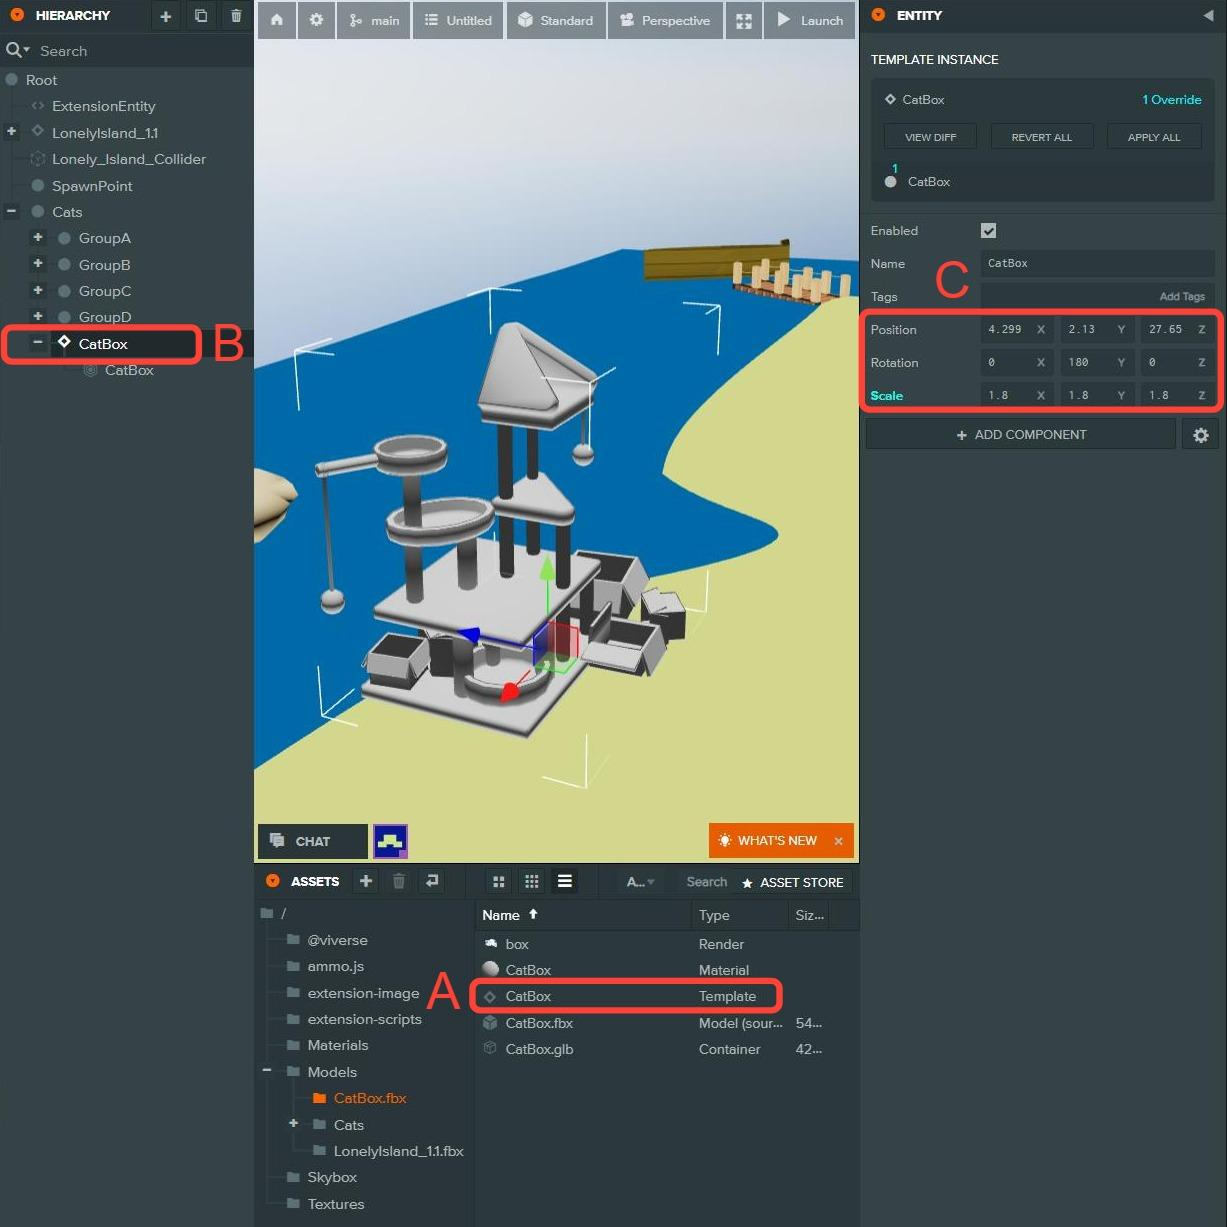
#### Add the catbox to the scene
A. Drag the **Catbox** **Template** to the Hierarchy.
B. Place the **Catbox** under the **Cats** object.
C. Update the **Position, Rotation** and **Scale** of the **Catbox** to the appropriate parameters for the environment.
{% endstep %}
{% step %}
#### Add cat collect positions to the Catbox
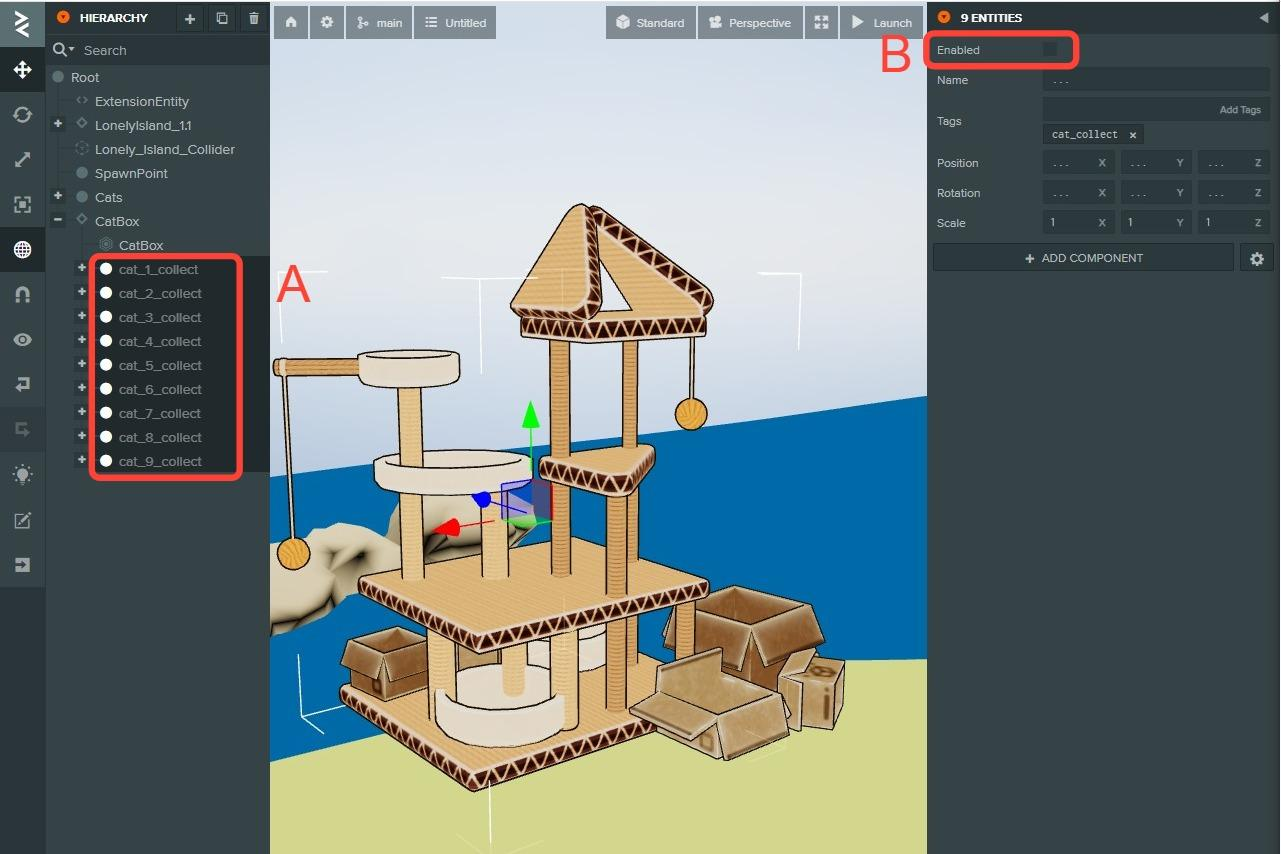
A. Create a new entity for each cat under the **CatBox** entity. In the sample, the entities are **cat\_1\_collect, cat\_2\_collect**, etc.
{% endstep %}
{% step %}
#### Configure cat collect positions
A. Add the **cat\_collect** tag to each cat collect position.
B. Update the **Position, Rotation** and **Scale** of the cat collect positions to place the cats in the appropriate locations.
{% endstep %}
{% step %}
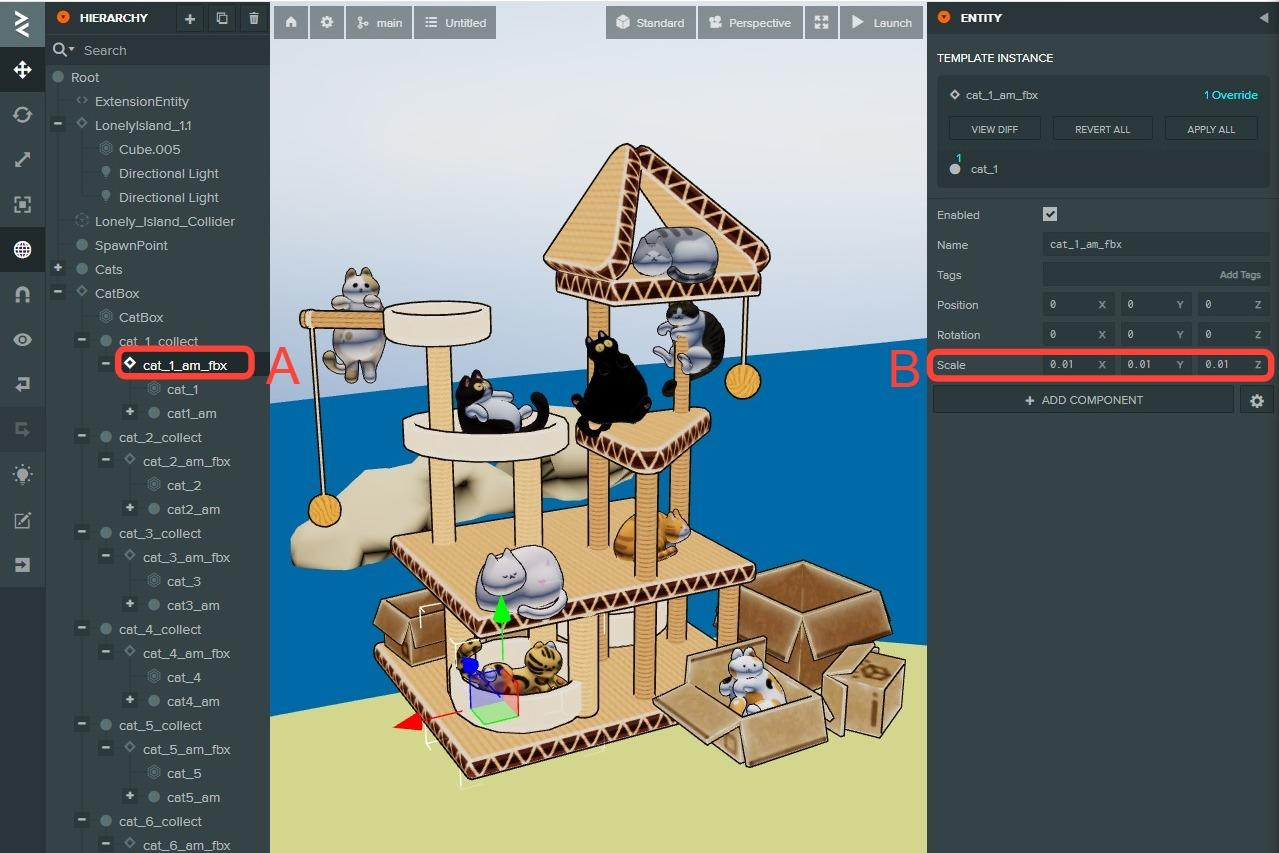
#### Add the cat models to the cat collect positions
A. Add the cat models and paste them under their respective cat collect positions.
B. Update the **Scale** of each cat model to **(.01,.0 1, .01)**.
{% endstep %}
{% step %}
#### Disable the cat collect positions
A. Select all the cat collect positions under the **CatBox** entity.
B. Disable all the cat collect positions so that the cats are hidden.
{% endstep %}
{% endstepper %}
## Setup Random Waypoint Assignment
The random waypoint assignment object is already added to the project and configured. It can be customized if cats or cat groups are added or removed. The following steps show how it was setup and configured.
{% stepper %}
{% step %}
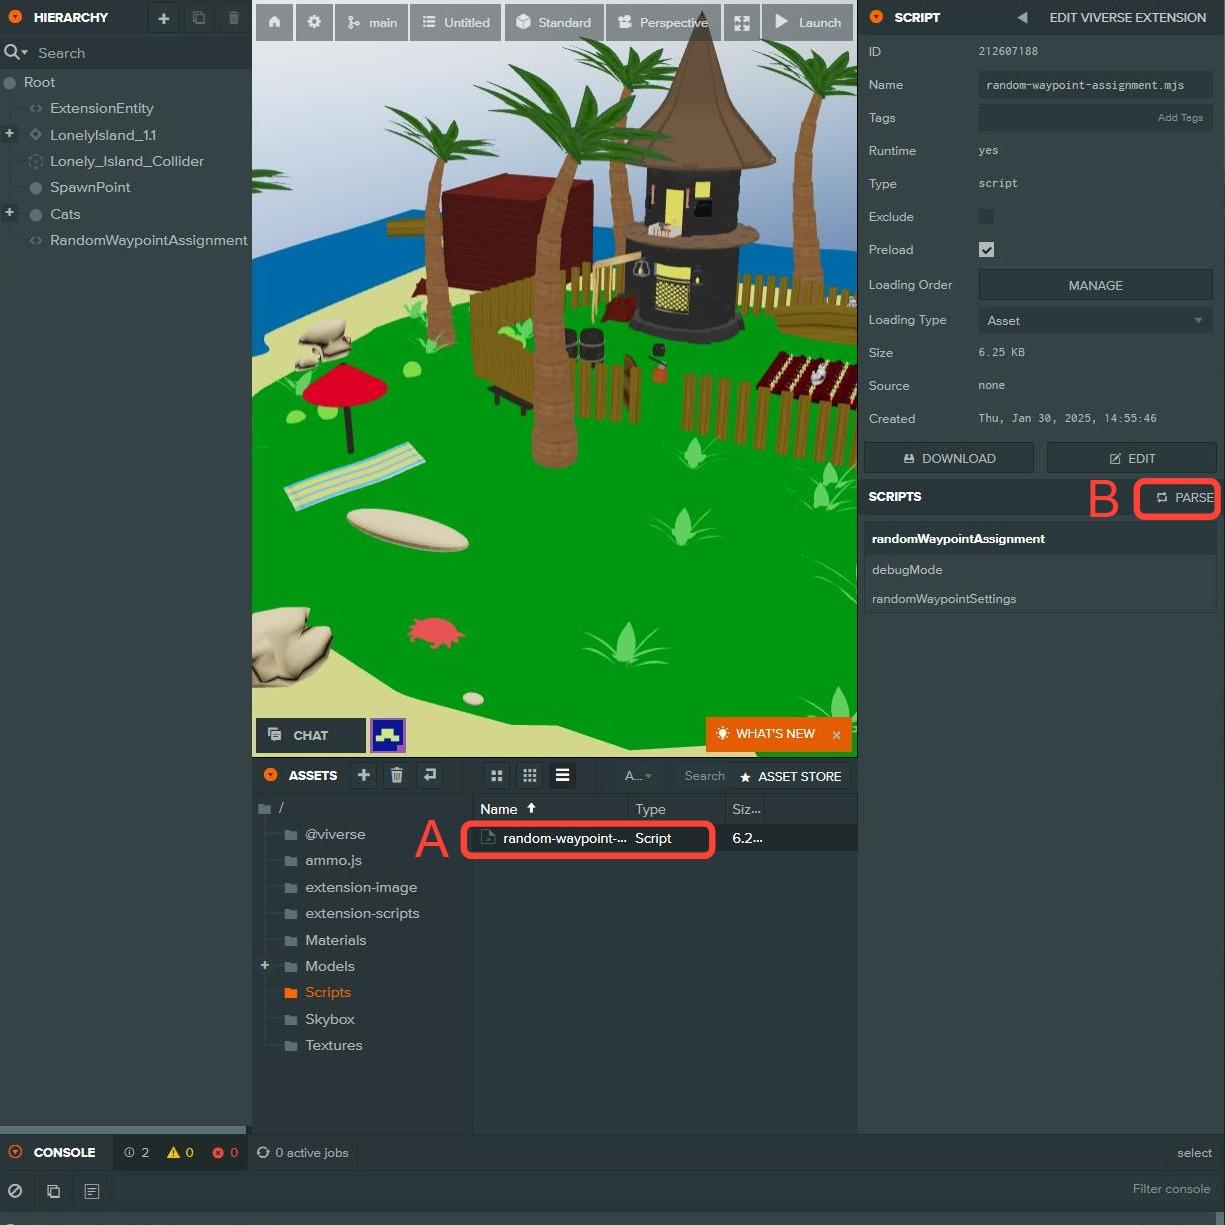
#### Add the **RandomWaypointAssignment** script to the project
A. Drag the **RandomWaypointAssignment** script to the **Assets** window.
B. Select the **RandomWaypointAssignment** script and click the **Parse** button.
{% endstep %}
{% step %}
#### Configure the **RandomWaypointAssignment** entity
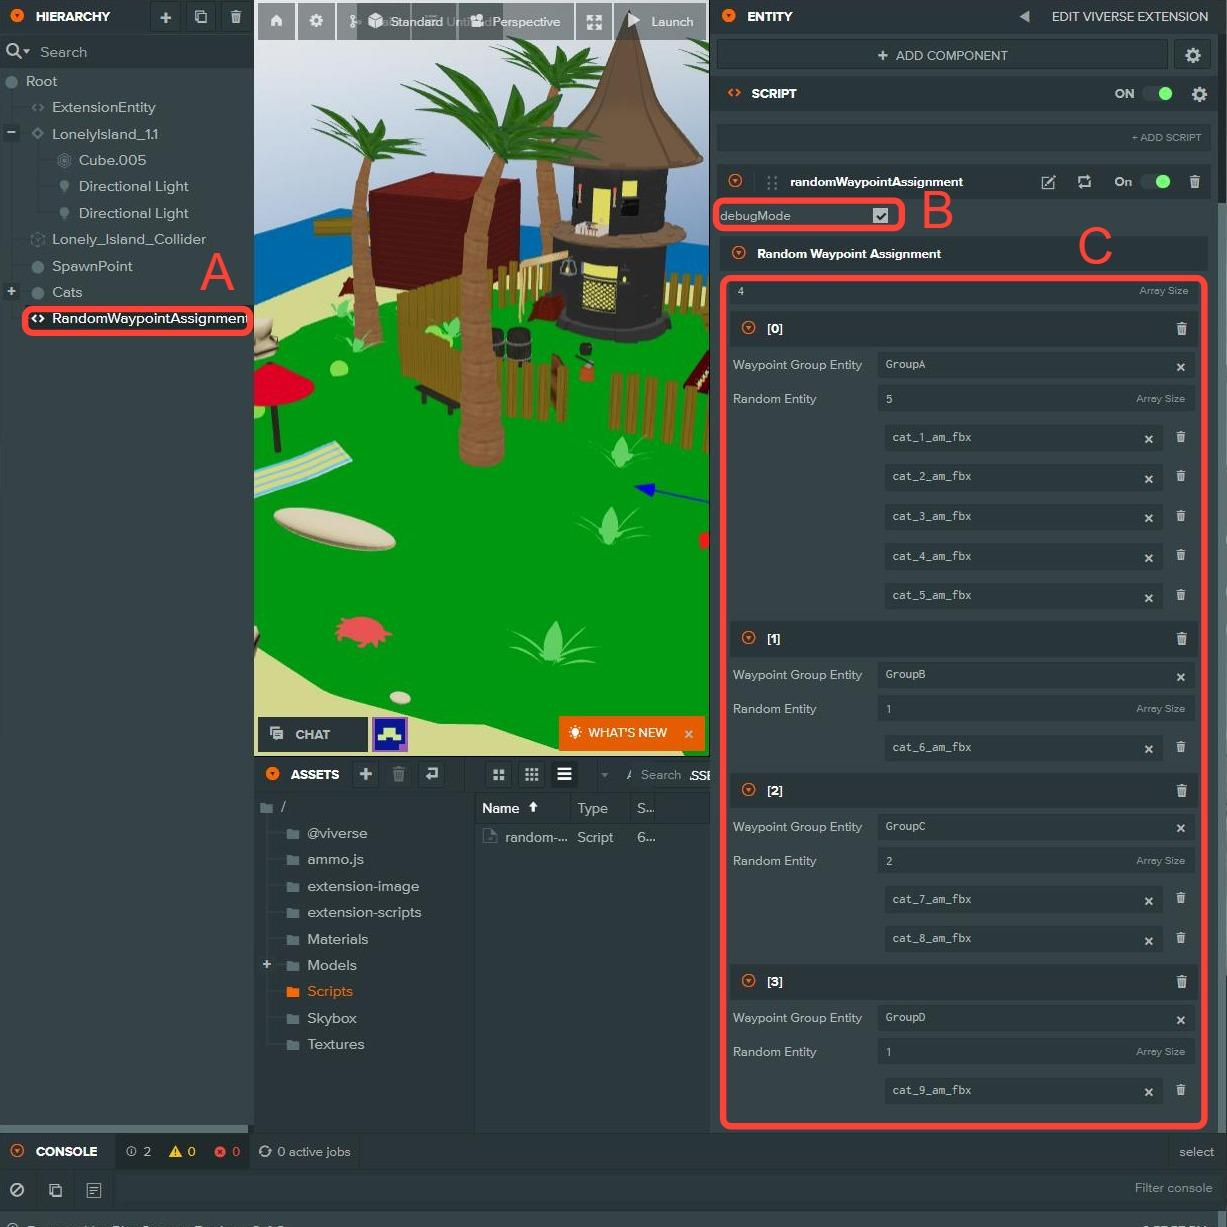
A. Create a new entity called **RandomWaypointAssignment** and add the RandomWaypointAssignment script to it.
B. Place a checkmark on the DebugMode checkbox for testing.
C. Add the number of groups to the **Array Size** box. In the sample, there are 4 groups. Add each of the 4 groups to the **Waypoint Group Entity** boxes. Add the number of cats in each group to the **Random Entity** box. Add each cat from the **Cats** entity to the boxes below the **Random Entity** box.
{% endstep %}
{% step %}
#### Test the RandomWaypointAssignment script
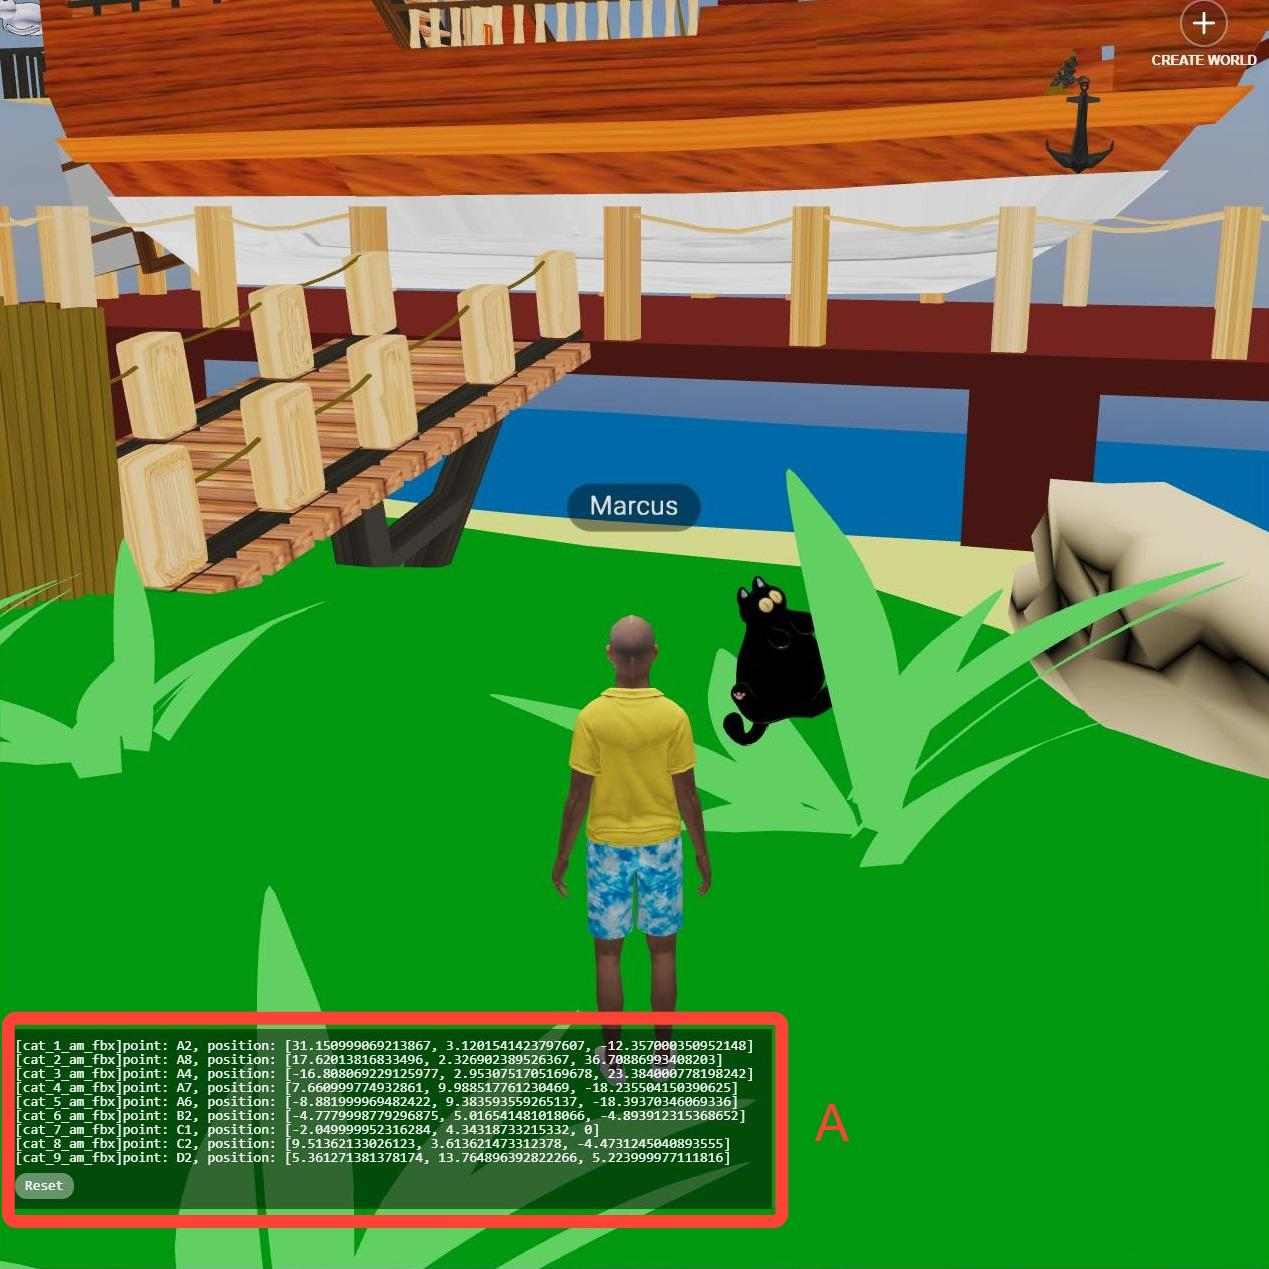
A. Publish the project to **VIVERSE** to test the script. Click the **Reset** button to confirm the cats are being placed in the appropriate locations. Remove the checkmark placed on the **DebugMode** checkbox on the **RandomWaypointAssignment** script to prevent the dialog box from showing in-game.
{% endstep %}
{% endstepper %}
## Setup Instructions Board With Start Button
The instructions board with start button object is already added to the project and configured. The following steps show how it was setup and configured.
{% stepper %}
{% step %}
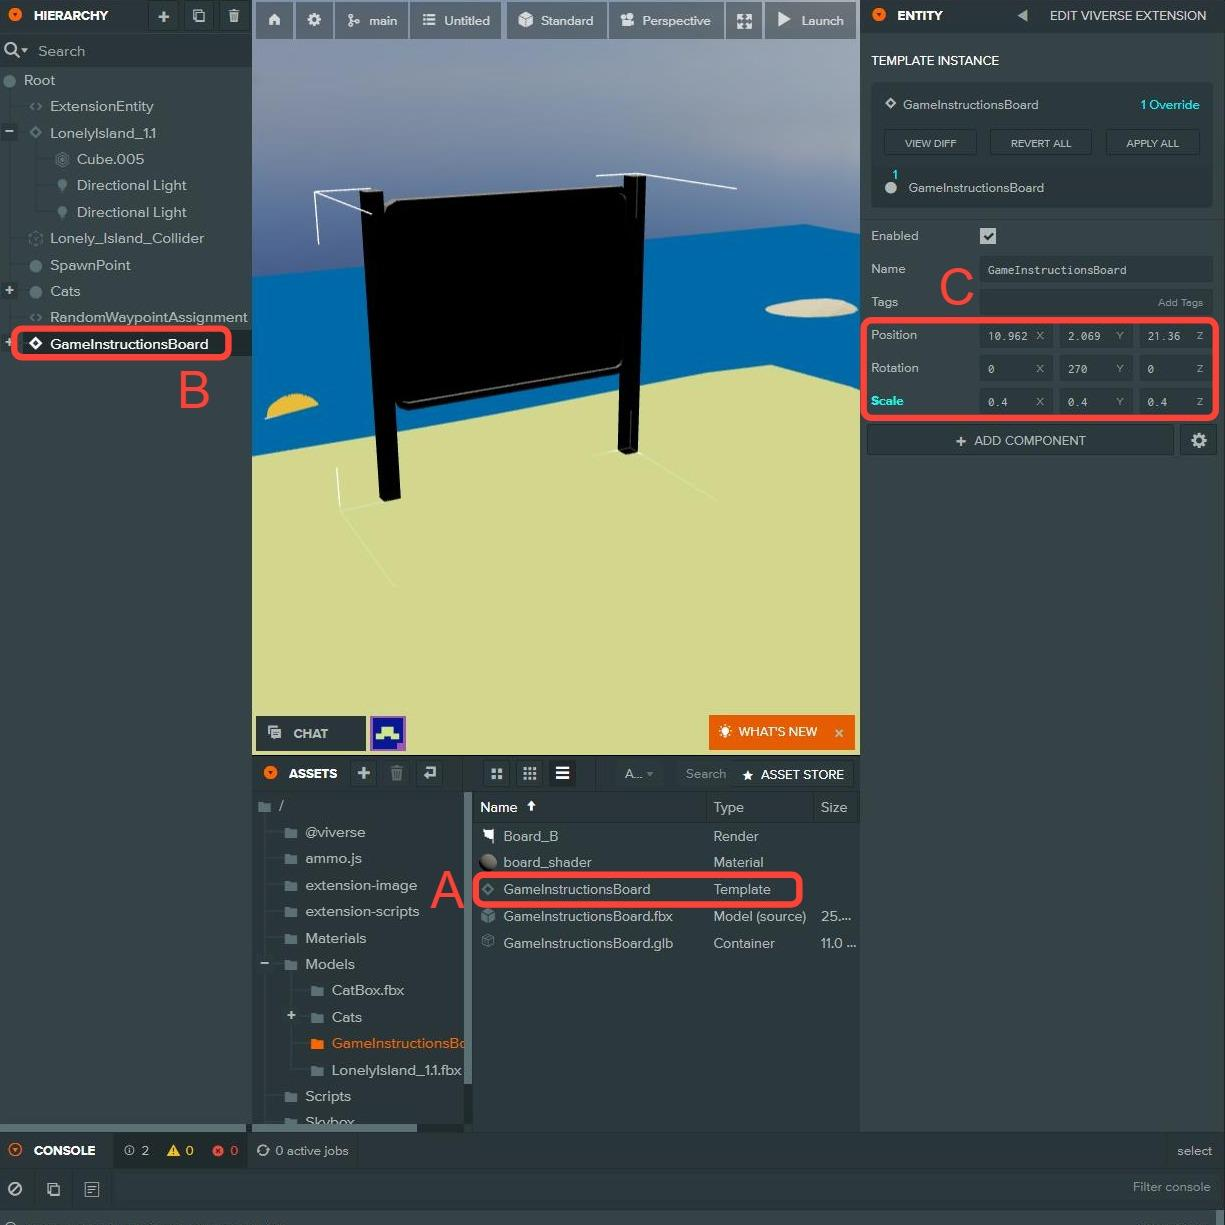
#### Add the GameInstructionsBoard to the project
A. Drag the **GameInstructionsBoard.fbx** to the **Assets** window.
{% endstep %}
{% step %}
#### Add the **GameInstructionsBoard** to the scene
A. Drag the **GameInstructionsBoard** Template to the **Hierarchy**.
B. Select the **GameInstructionsBoard** in the **Hierarchy**.
C. Update the **Position, Rotation** and **Scale** of the **GameInstructionsBoard** to fit appropriately in the scene.
{% endstep %}
{% step %}
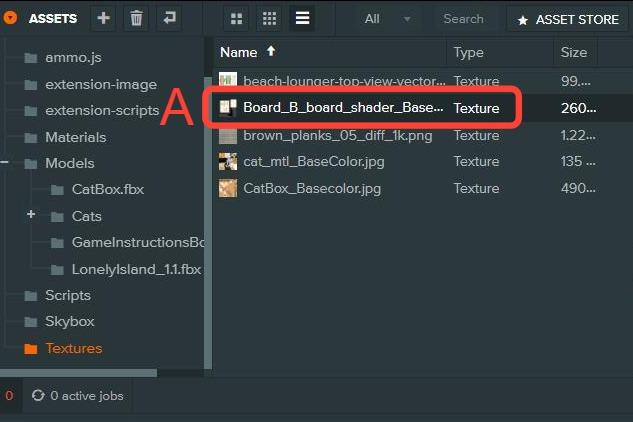
#### Add the GameInstructionsBoard texture to the project
A. Drag the **Board\_B\_board\_shader\_BaseColor.jpg** texture to the Assets window.
{% endstep %}
{% step %}
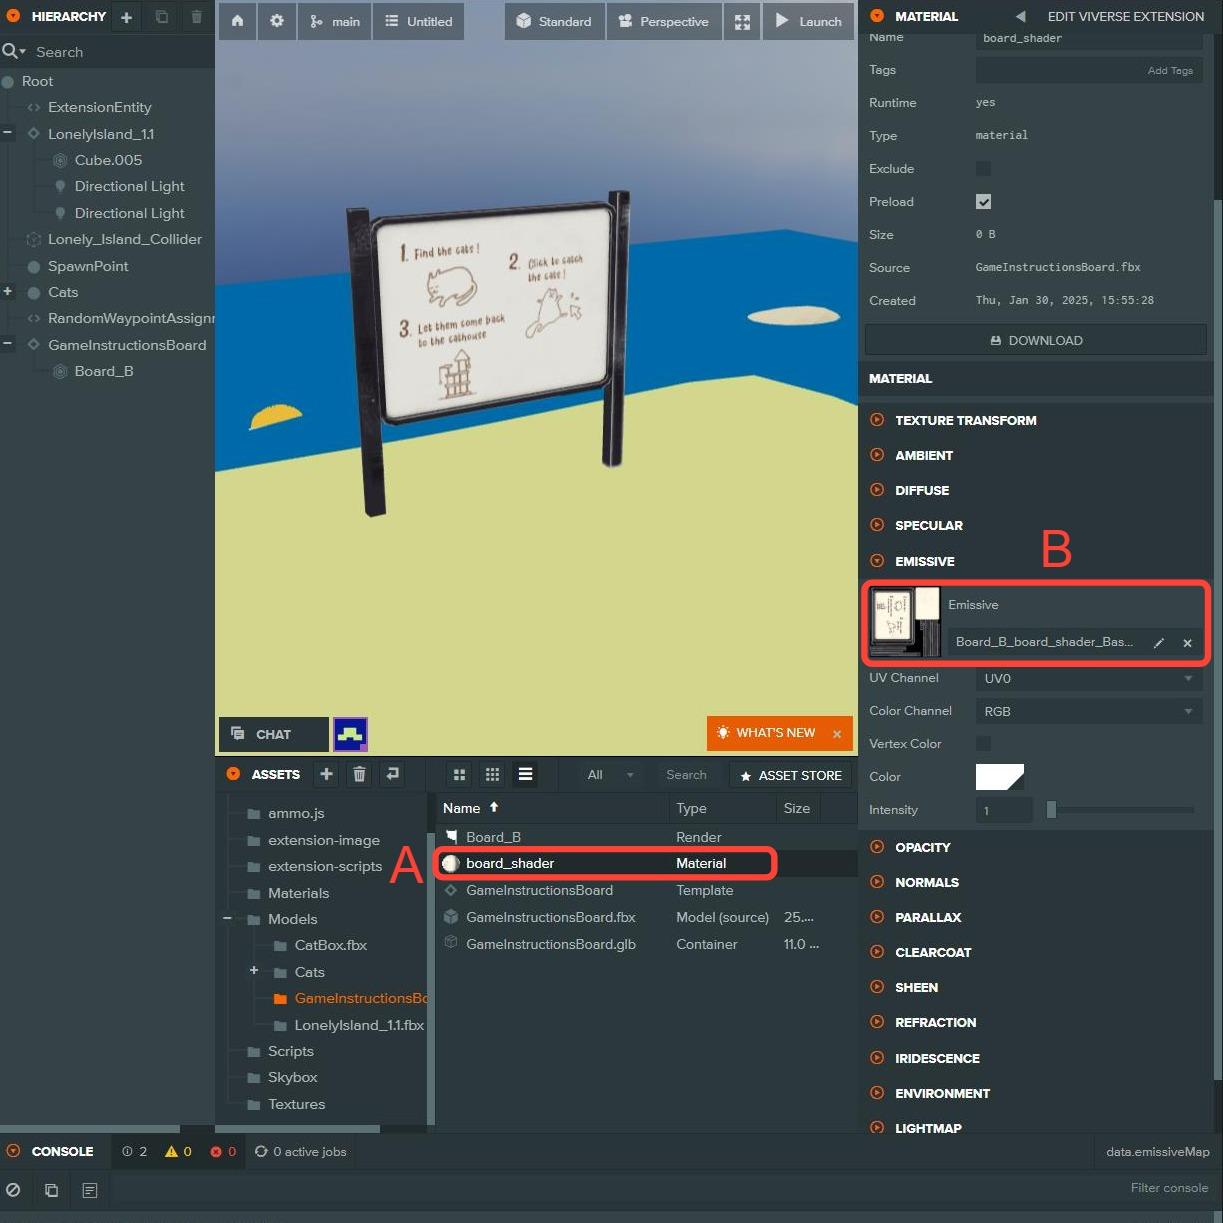
#### Update the GameInstructionsBoard material
A. Select the **board\_shader** material inside the **GameInstructionsBoard.fbx**
B. Add the **Board\_B\_board\_shader\_BaseColor.jpg** texture to the Emissive texture slot.
{% endstep %}
{% step %}
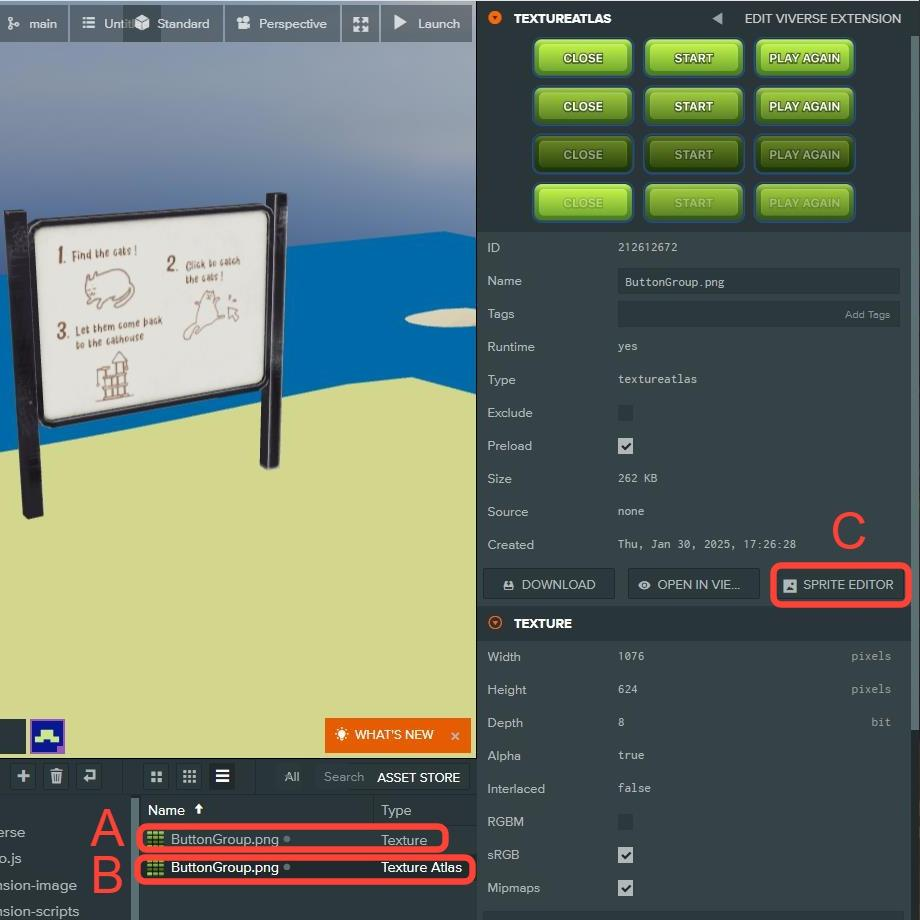
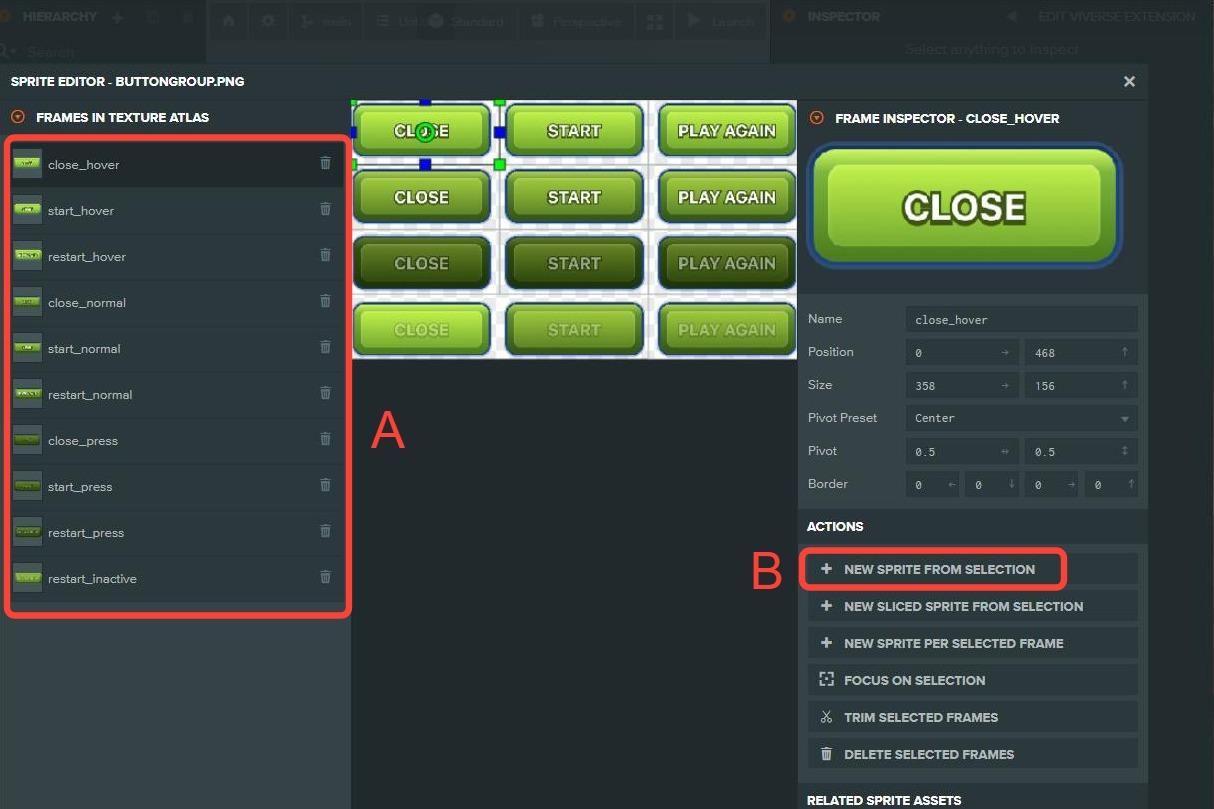
#### Add the ButtonGroup texture to the project
A. Drag the **ButtonGroup.png** texture to the **Assets** window.
B. Right-click on the **ButtonGroup.png** and select **Create Texture Atlas**.
C. Select the **Texture Atlas** and click the **Sprite Editor** button.
{% endstep %}
{% step %}
#### Cutting the sprite sheet
A. For the **Frame Count,** add **3** to the **Cols** box and **4** to the **Rows** box.
B. Click the **Generate Frames** button.
C. Delete frames 10 and 11.
{% endstep %}
{% step %}
#### Generate the sprites
A. Rename each frame based on the button style.
B. Select each frame and click **New Sprite From Selection** to generate each sprite.
{% endstep %}
{% step %}
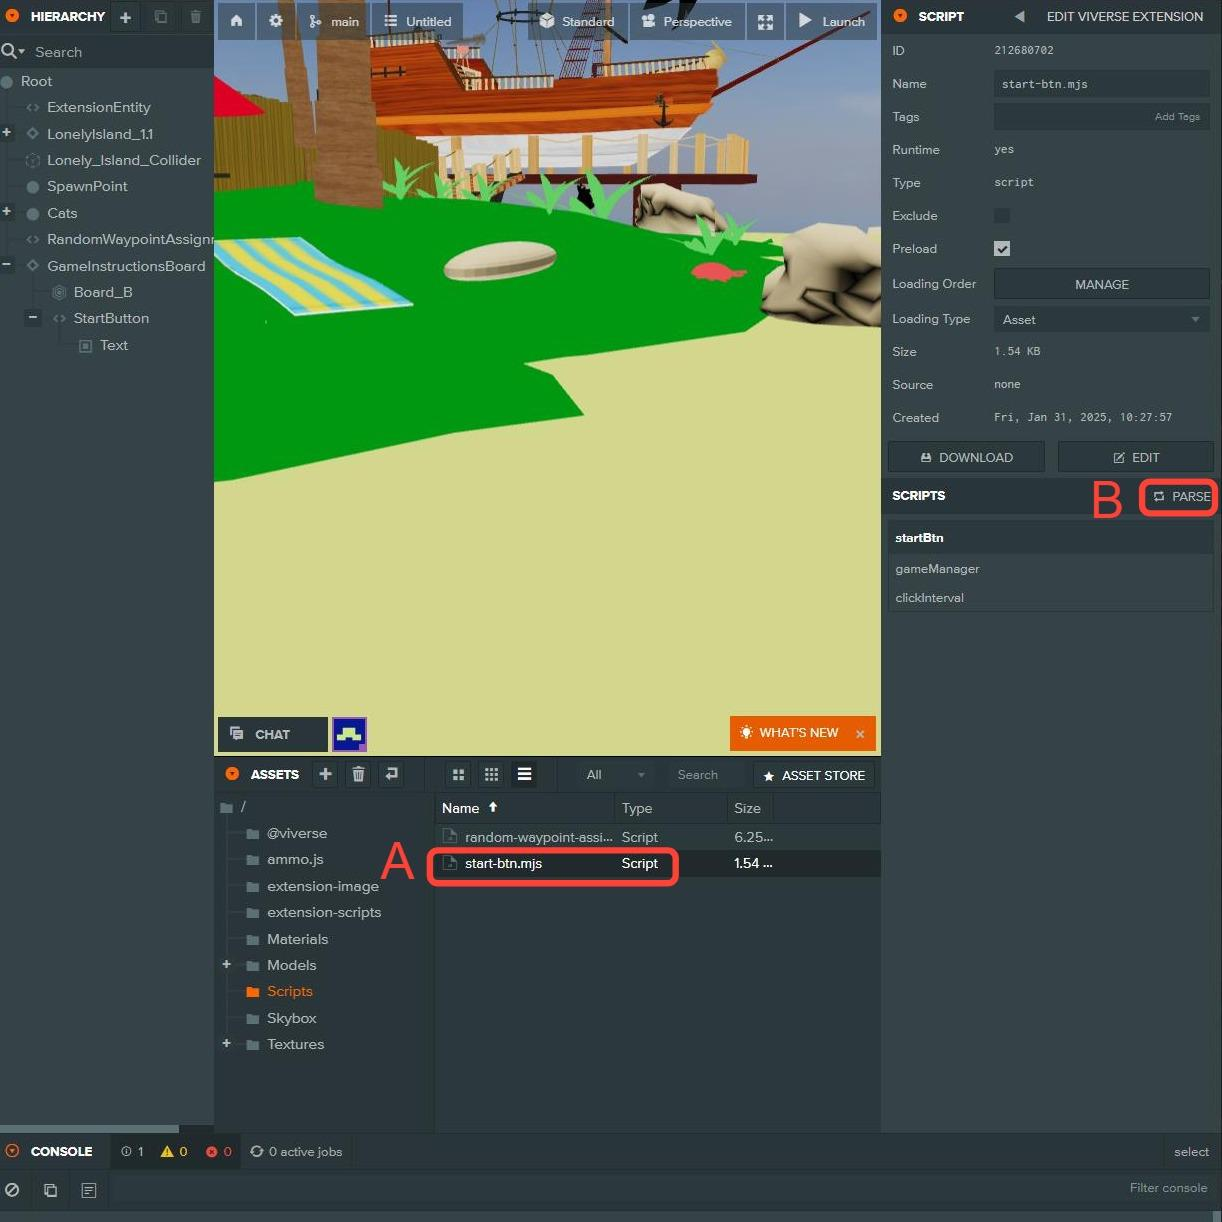
#### Add the **Start-Btn.mjs** script to the project
A. Drag the **Start-Btn.mjs** script to the **Assets** window.
B. Select the **Start-Btn.mjs** script and click the **Parse** button.
{% endstep %}
{% step %}
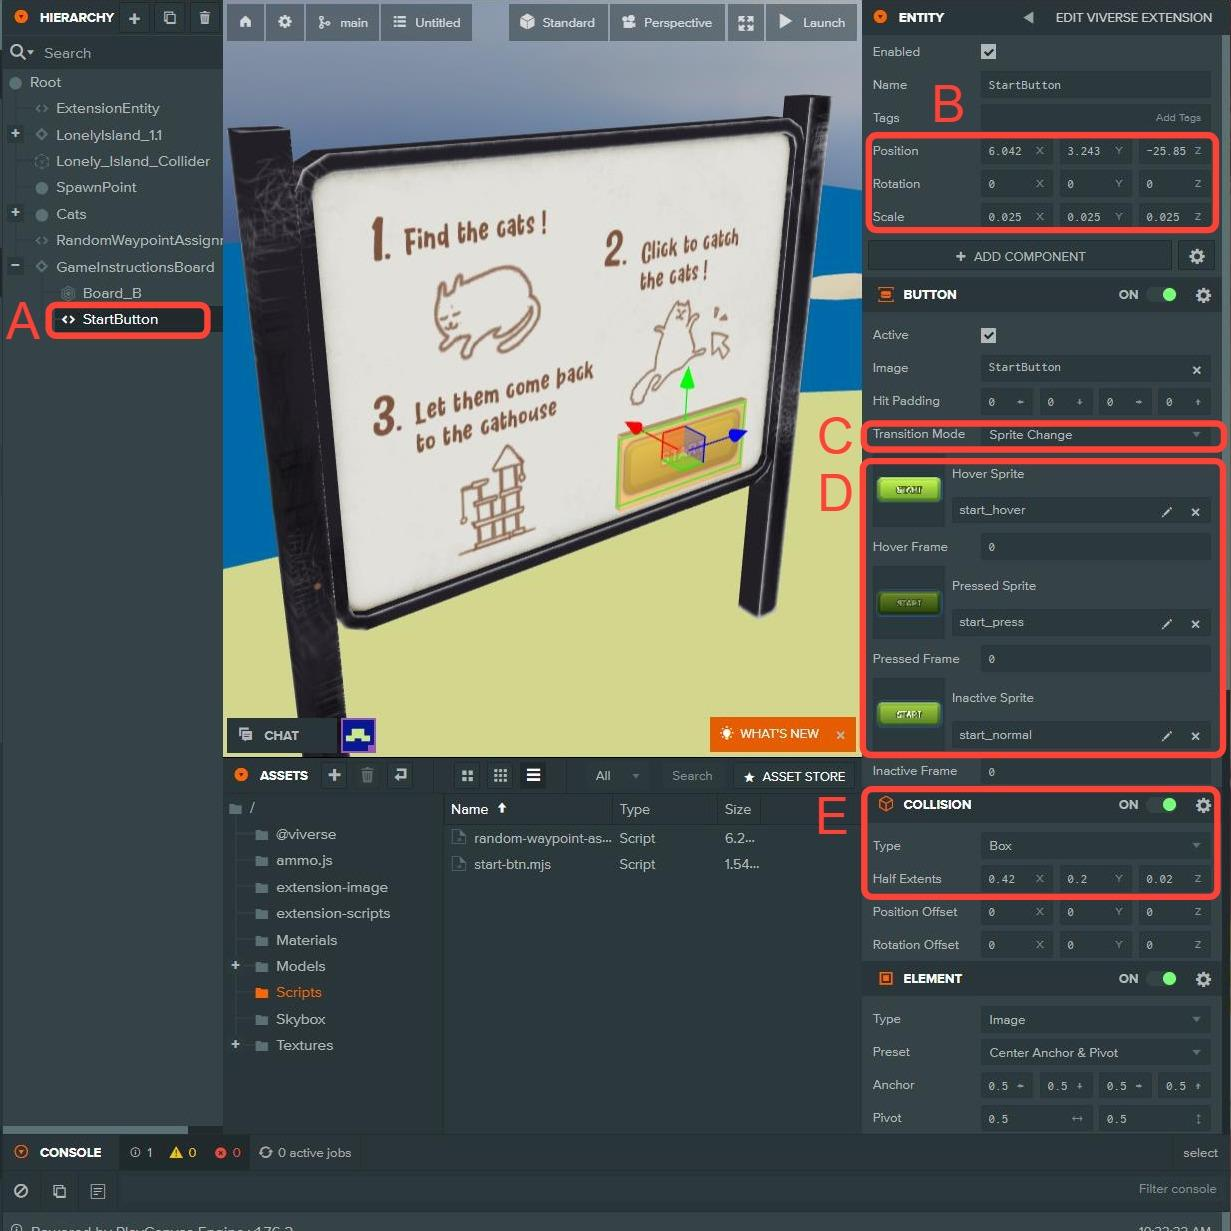
#### Create the start button
A. Under the **GameInstructionsBoard** entity, create a new button called **StartButton.** Remove the Text entity that is created under the button.
B. Update the Position, Rotation and Scale so the button fits appropriately on the board.
C. On the **Button** component, change **Transition Mode** to **Sprite Change**.
D. Add the 3 button sprites.
E. Add a Collision component and resize it using **Half Extents**.
{% endstep %}
{% step %}
#### Continue creating the start button
A. Update the **Width** and **Height** on the **Element** component
B. Add the **start\_normal** sprite to the **Sprite** slot.
C. Add the **start-btn.mjs** script.
{% endstep %}
{% endstepper %}
## Setup Countdown UI
The countdown user interface is already added to the project and configured. The following steps show it was setup and configured.
{% stepper %}
{% step %}
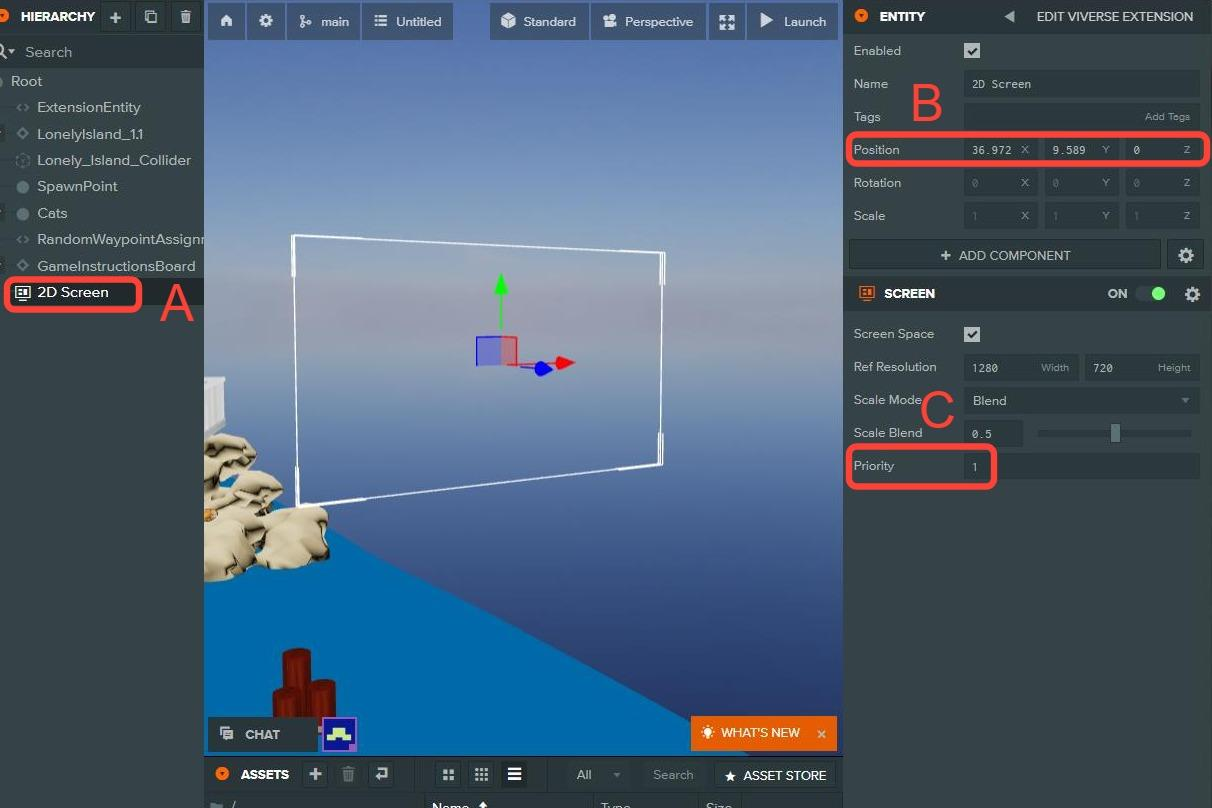
#### Create a 2D Countdown
A. Create a new **2D Screen** entity.
B. The **Position** is arbitrary because it's 2D, but moving it's position so that it's visible in the editor is helpful.
C. Set **Priority** to **1**.
{% endstep %}
{% step %}
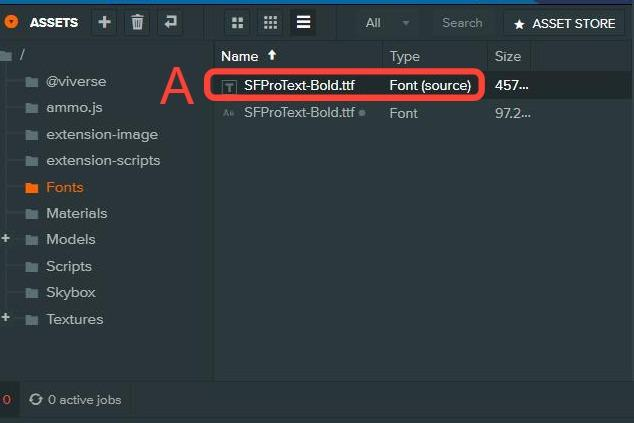
#### Add the font for the countdown
A. Drag the **SFProText-Bold.ttf** font to the **Assets** window.
{% endstep %}
{% step %}
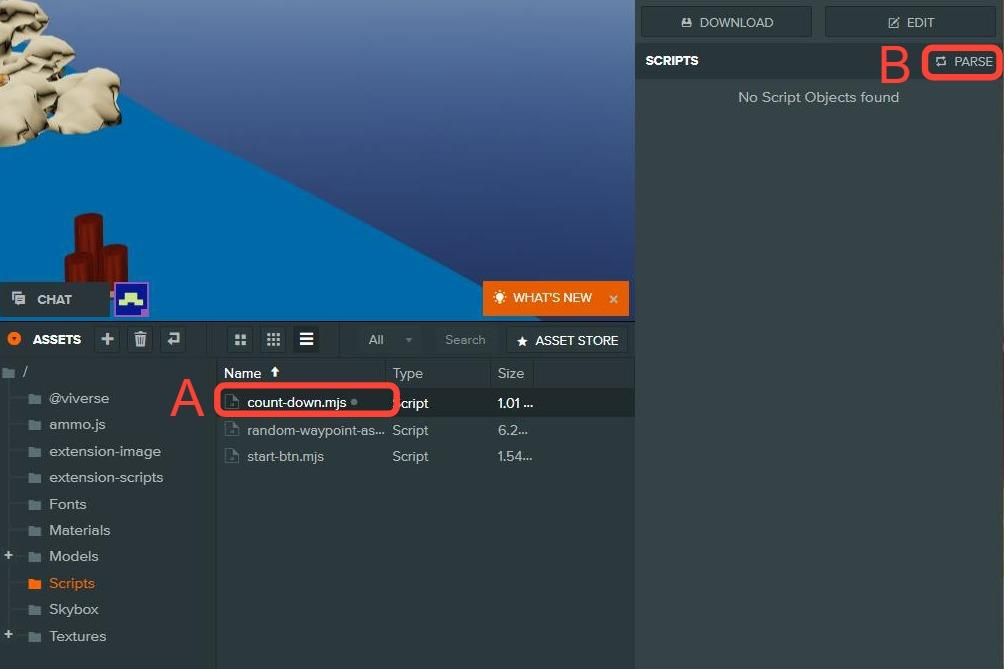
Add the **CountDown.mjs** script to the project
A. Drag the **CountDown.mjs** script to the **Assets** window.
B. Select the **CountDown.mjs** script and click the **Parse** button.
{% endstep %}
{% step %}
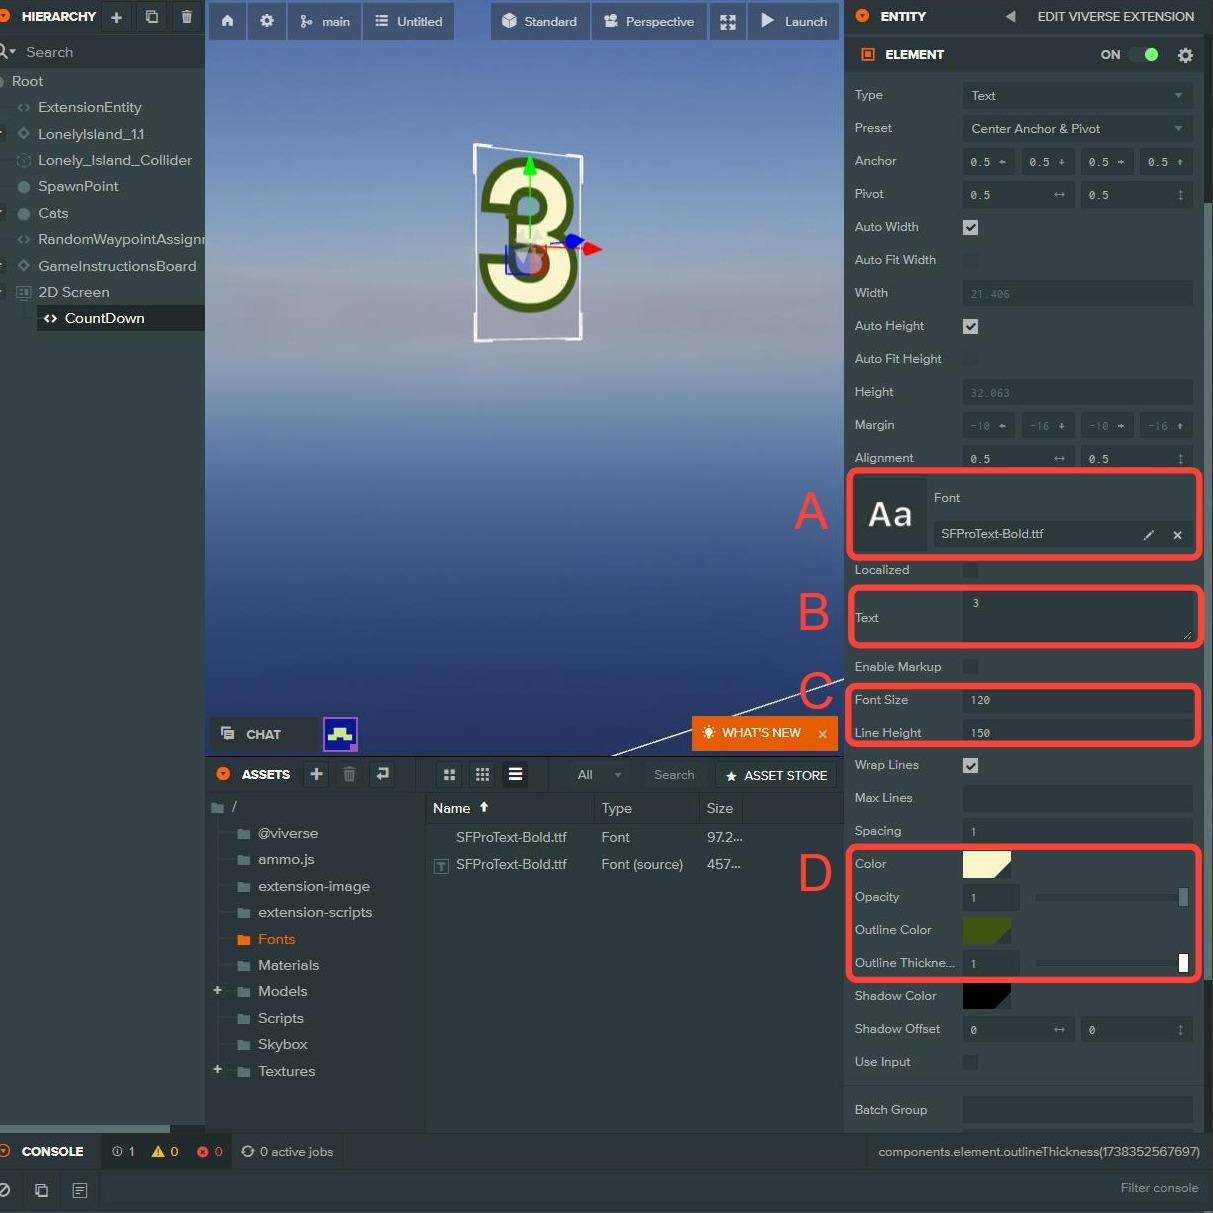
#### Configure the countdown entity
A. Add the **SFProText-Bold.ttf** font to the **Font** slot.
B. Change the **Text** field to **3**.
C. Update the **Font Size** and Line **Height**.
D. Change the **Color** to **FAF5CD**, the **Outline Color** to **3C5511FF** and the **Outline Thickness** to **1**.
{% endstep %}
{% step %}
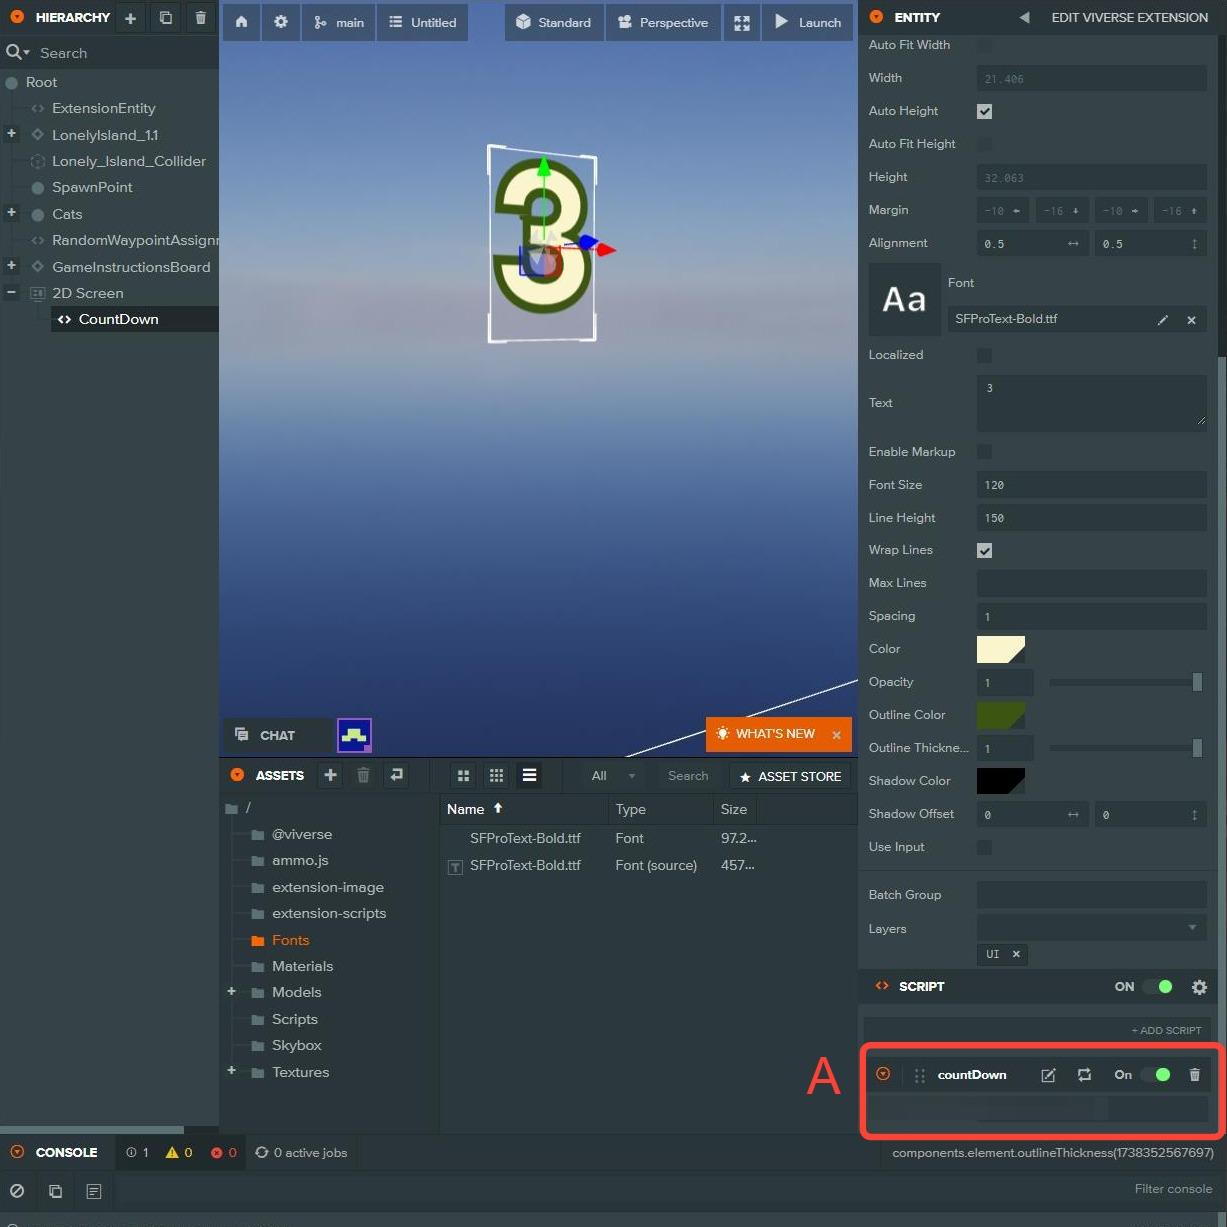
#### Add the countdown script
A. Add the **CountDown.mjs** script to the **CountDown** entity.
{% endstep %}
{% step %}
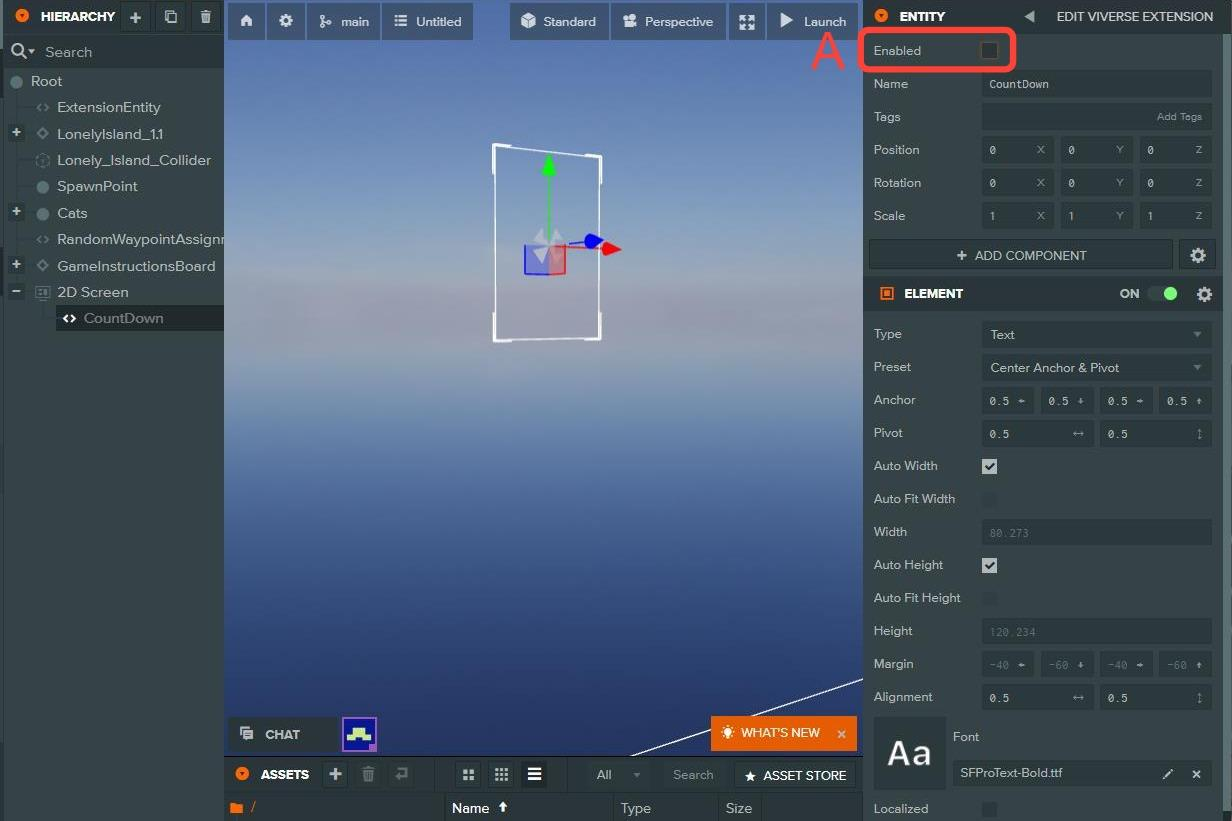
#### Disable the countdown entity
{% endstep %}
{% endstepper %}
## Setup Scoreboard UI
The scoreboard user interface is already added to the project and configured. The following steps show it was setup and configured.
{% stepper %}
{% step %}
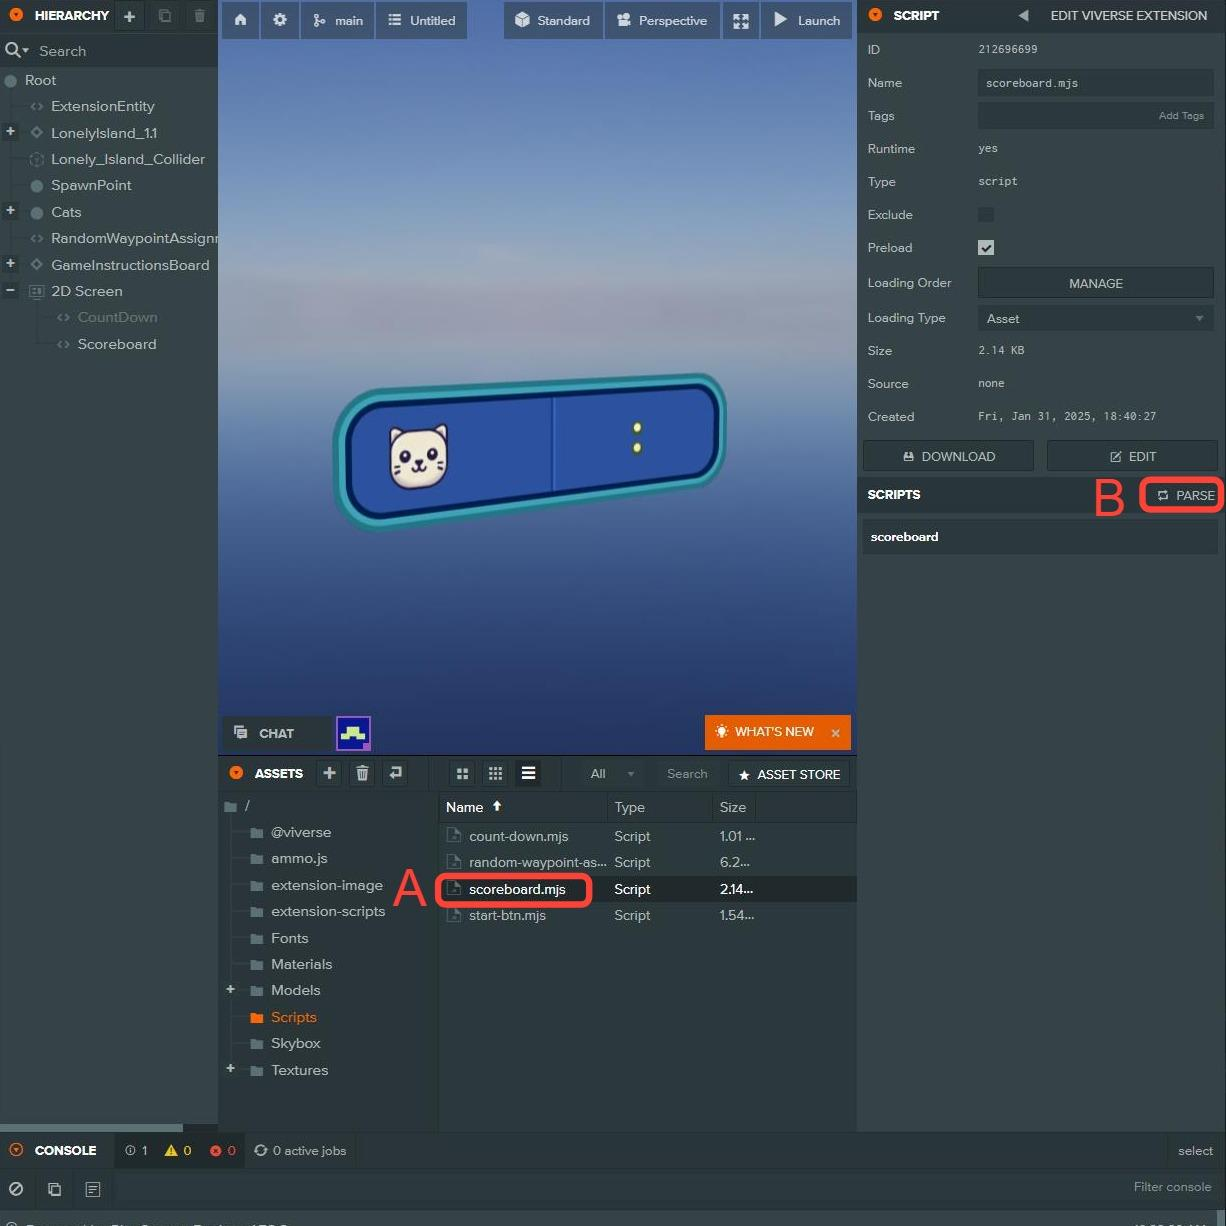
#### Add the Scoreboard.mjs script to the project
A. Drag the **Scoreboard.mjs** script to the **Assets** window.
B. Select the **Scoreboard.mjs** script and click the **Parse** button.
{% endstep %}
{% step %}
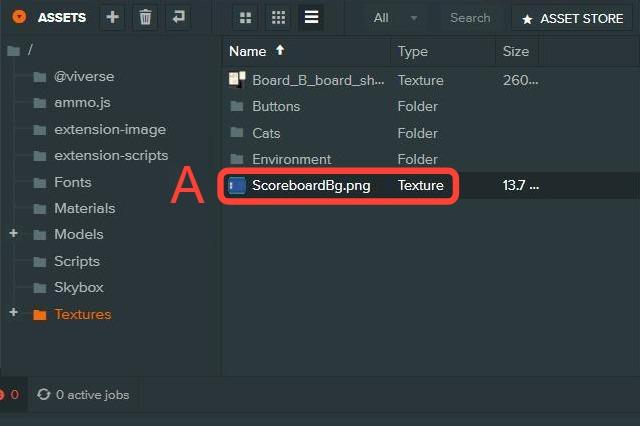
#### Add the scoreboard texture to the project
A. Drag the **ScoreboardBg.png** texture to the **Assets** window.
{% endstep %}
{% step %}
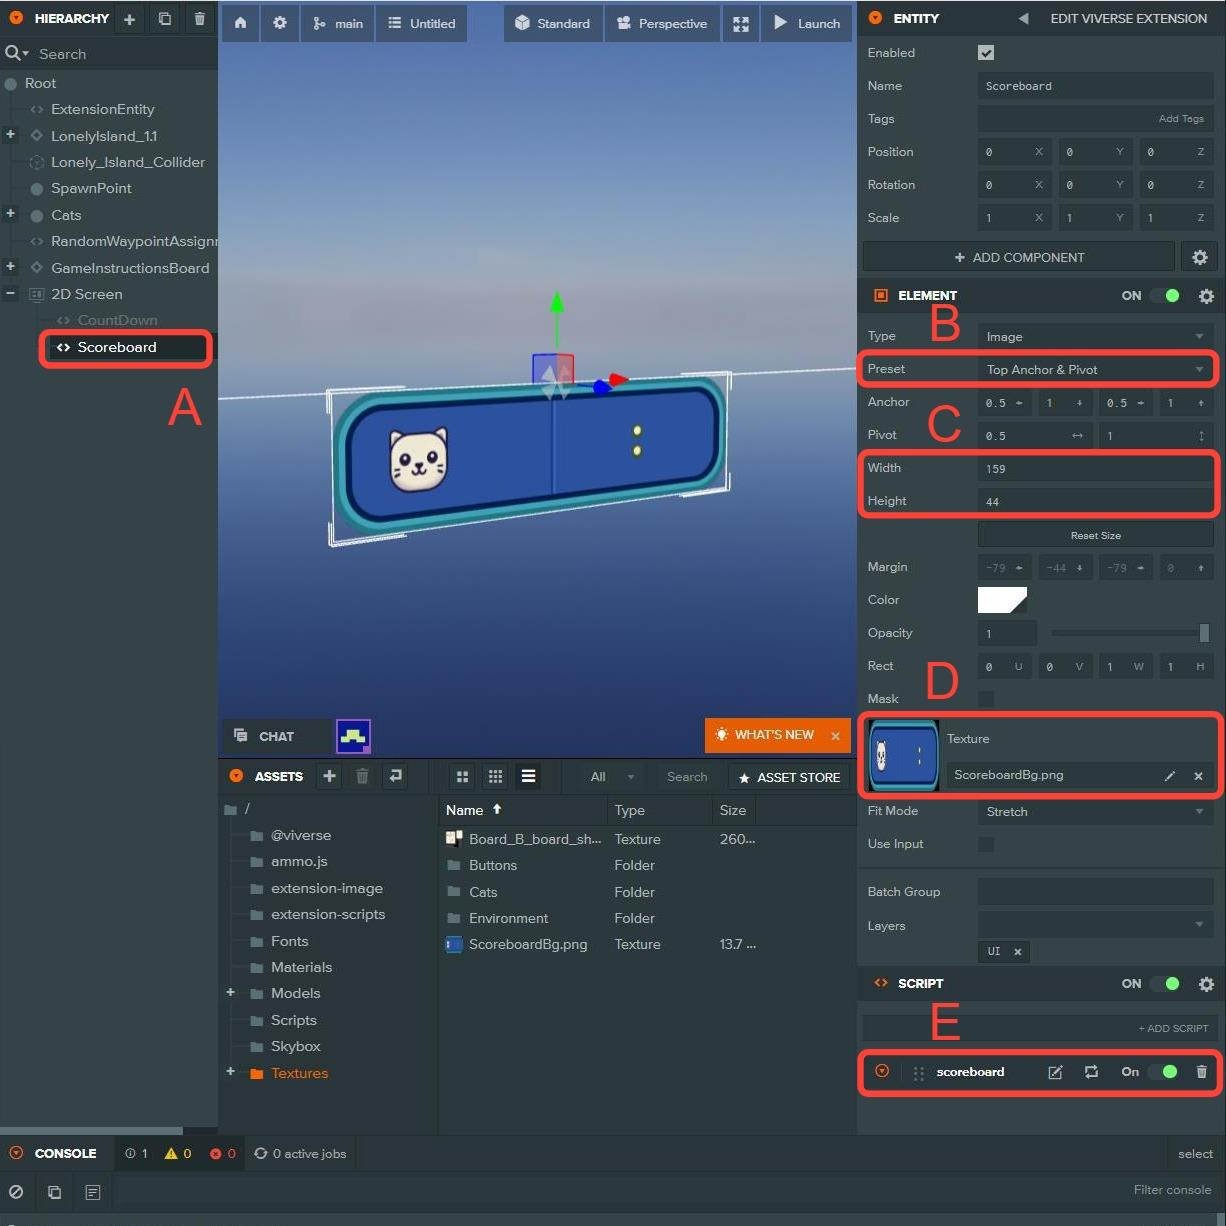
#### Create the scoreboard
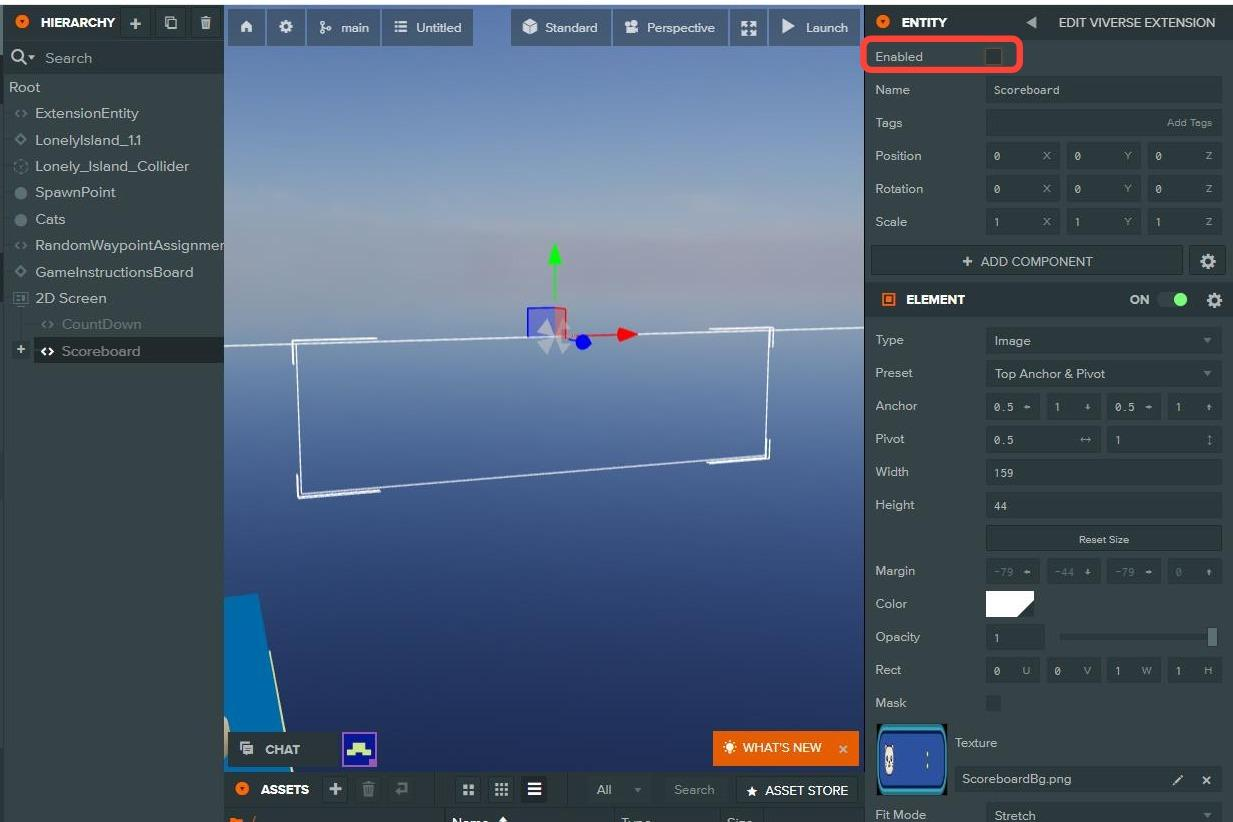
A. Add an **Image Element** under the **2D Screen** entity called **Scoreboard**.
B. Change **Preset** to **Top Anchor & Pivot**.
C. Change the **Width** and **Height** to **159** and **44**.
D. Add the **ScoreboardBg.png** texture to the **Texture** slot.
E. Add the **Scoreboard.mjs** script to the **Scoreboard** entity.
{% endstep %}
{% step %}
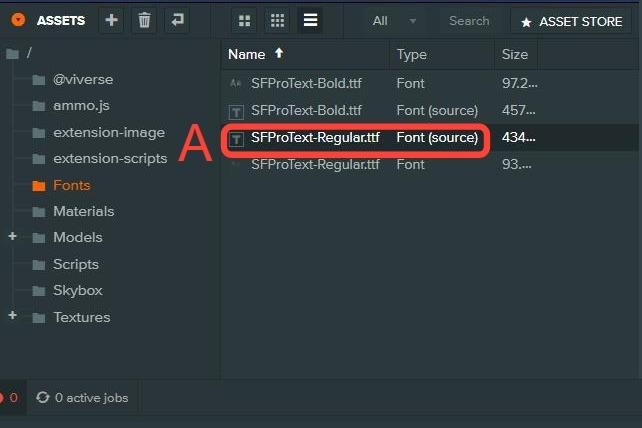
#### Add the font for the CatCount
A. Drag the **SFProText-Regular.ttf** font to the **Assets** window.
{% endstep %}
{% step %}
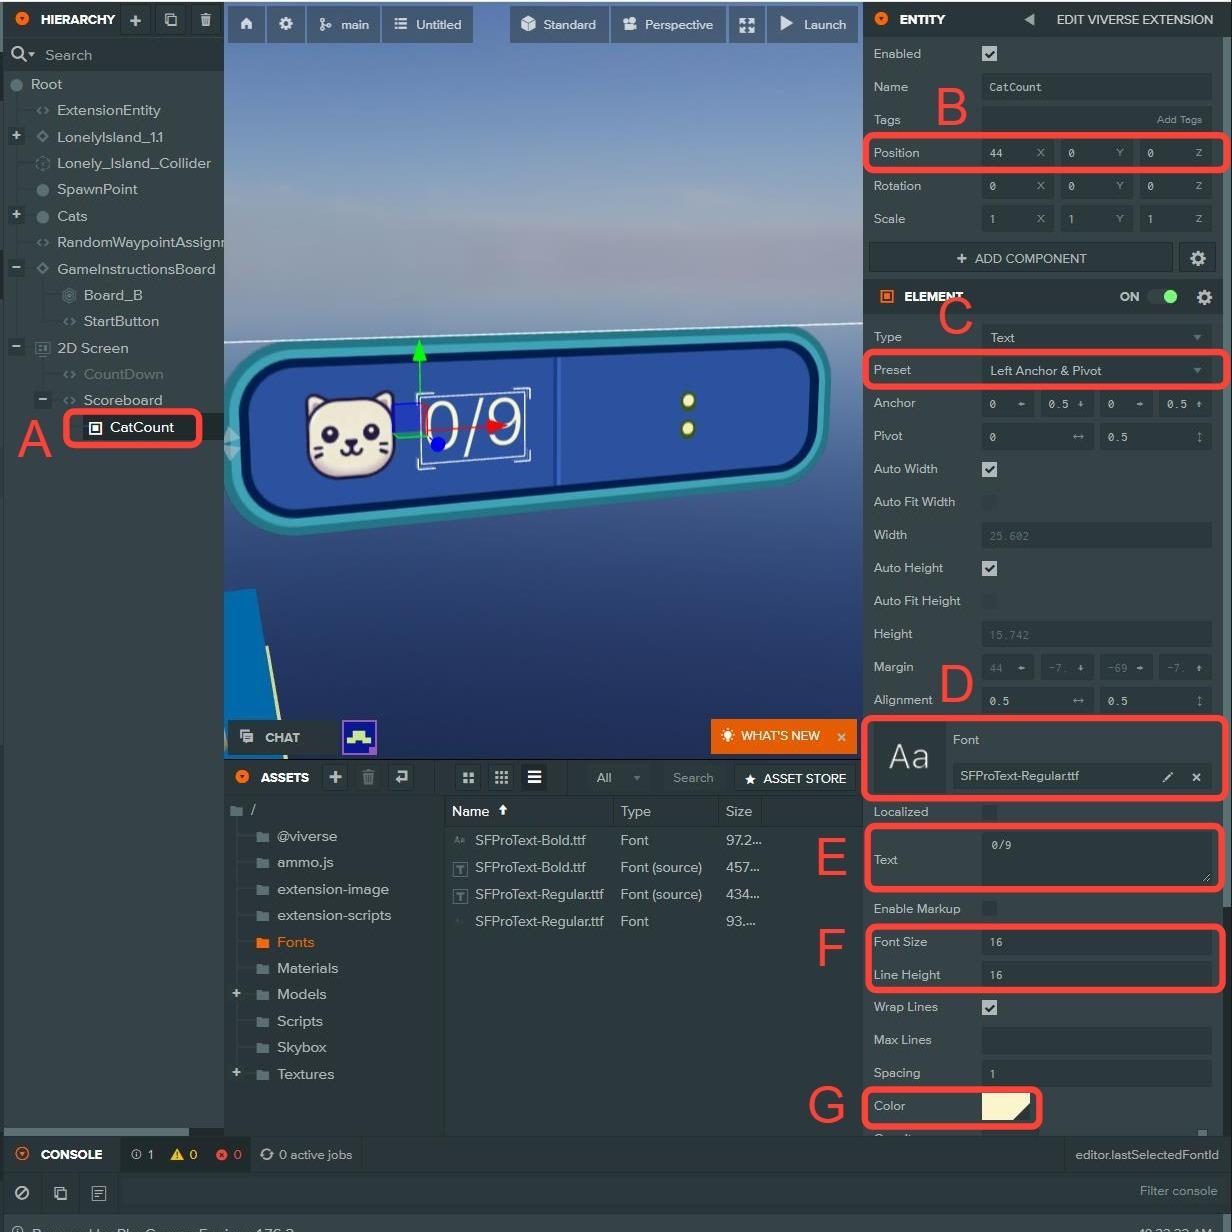
#### Create the CatCount
A. Create a **Text Element** entity under the **Scoreboard** entity and name it **CatCount**.
B. Change the **Position** to **(44, 0, 0)** for **X, Y** and **Z**.
C. Update the **Preset** to **Left Anchor & Pivot**.
D. Add the **SFProText-Regular.ttf** font to the **Font** slot.
E. Change the **Text** field to **0/9**.
F. Change **Font Size** and **Line Height** to **16**.
G. Change the **Color** to **FAF5CD**.
{% endstep %}
{% step %}
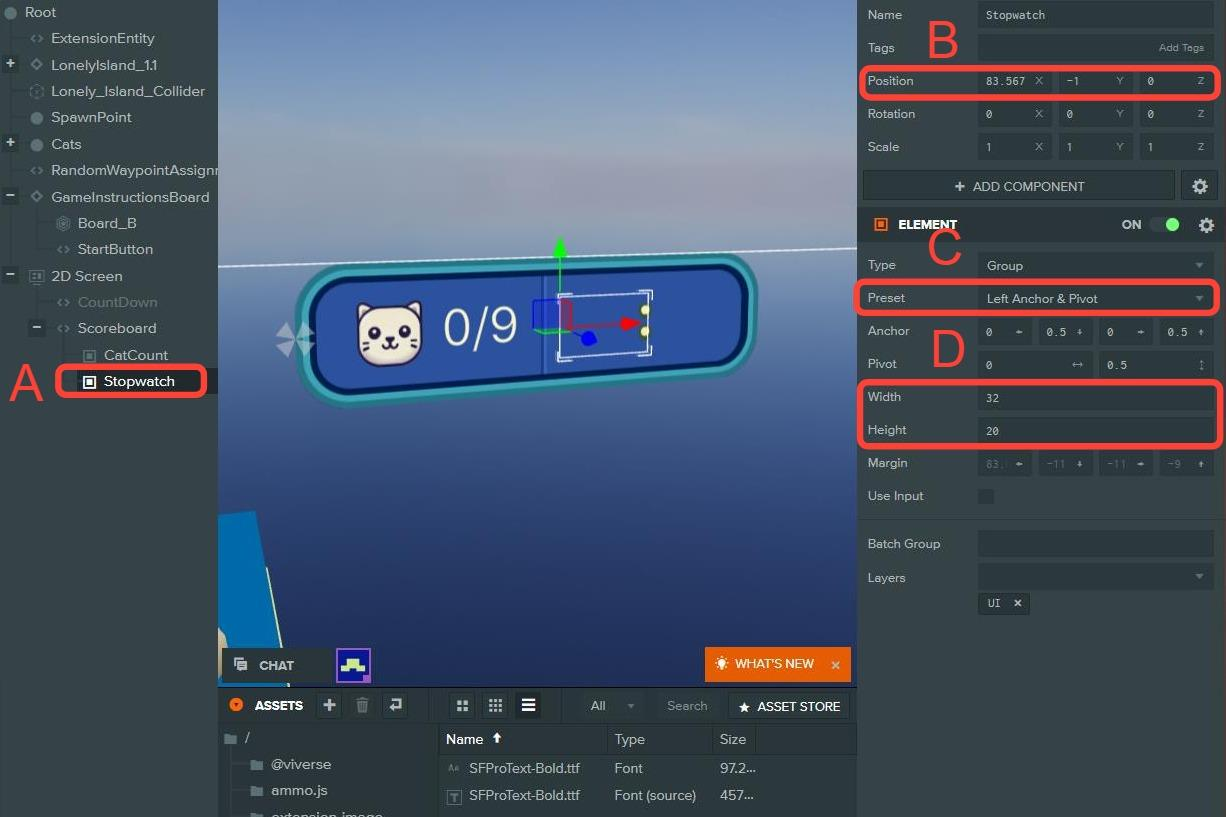
#### Create the stopwatch
A. Create a **Group Element** entity under the **Scoreboard** entity and name it **Stopwatch**.
B. Change the **Position** to **(83.567, -1, 0)**.
C. Update the **Preset** to **Left Anchor & Pivot**.
D. Change the **Width** and **Height** to **32** and **20**.
{% endstep %}
{% step %}
#### Create the minutes text
A. Create a **Text Element** under the **Stopwatch** entity and name it **Min**.
B. Update the **Preset** to **Left Anchor & Pivot**.
C. Add **SFProText-Bold.ttf** font to the **Font** slot.
D. Change the **Text** field to **00**.
E. Change **Font Size** and **Line Height** to **20**.
F. Change the **Color** to **FAF5CD**.
{% endstep %}
{% step %}
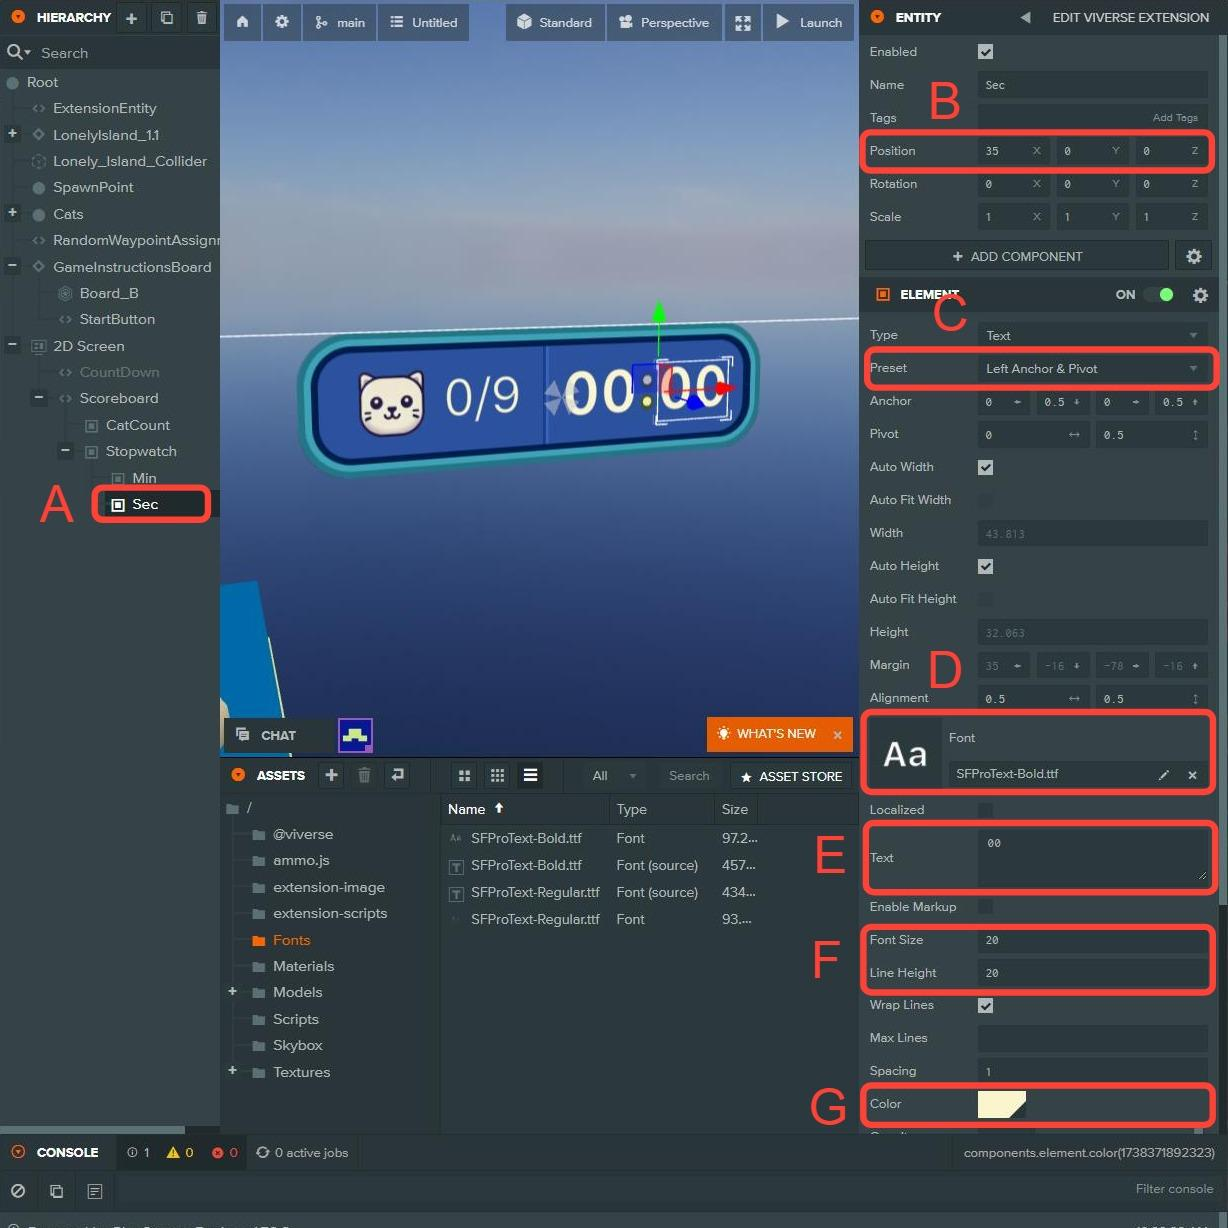
#### Create the seconds text
A. Create a **Text Element** under the **Stopwatch** entity and name it **Sec**.
B. Update the **Position** to **(35, 0, 0)** for **X, Y** and **Z.**
C. Update the **Preset** to **Left Anchor & Pivot**.
D. Add **SFProText-Bold.ttf** font to the **Font** slot.
E. Change the **Text** field to **00**.
F. Change **Font Size** and **Line Height** to **20**.
G. Change the **Color** to **FAF5CD**.
{% endstep %}
{% step %}
#### Disable the scoreboard entity
{% endstep %}
{% endstepper %}
## Setup GameOver UI
The game over user interface is already added to the project and configured. The following steps show how it was setup and configured.
{% stepper %}
{% step %}
#### Add the game over texture to the project
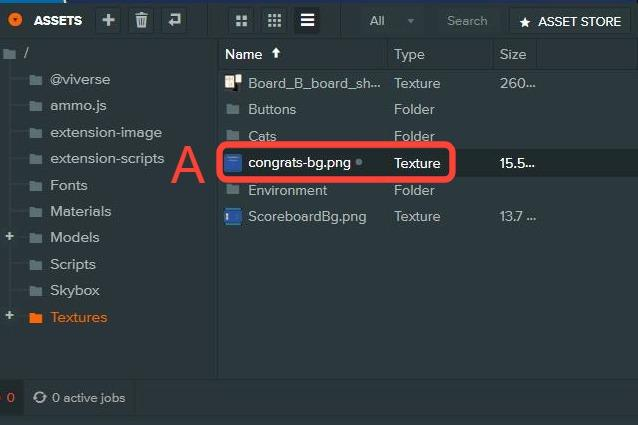
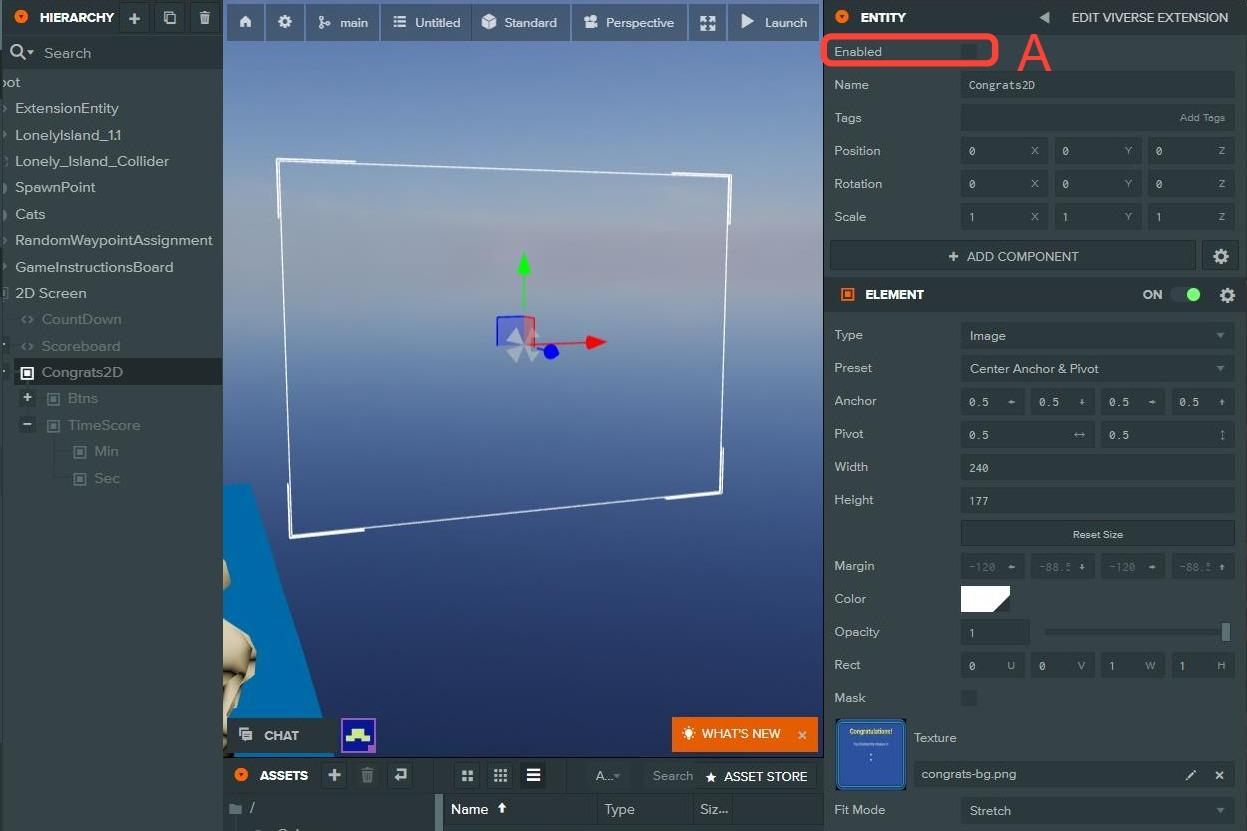
A. Drag the **congrats-bg.png** texture to the **Assets** window.
{% endstep %}
{% step %}
#### Create a game over user interface
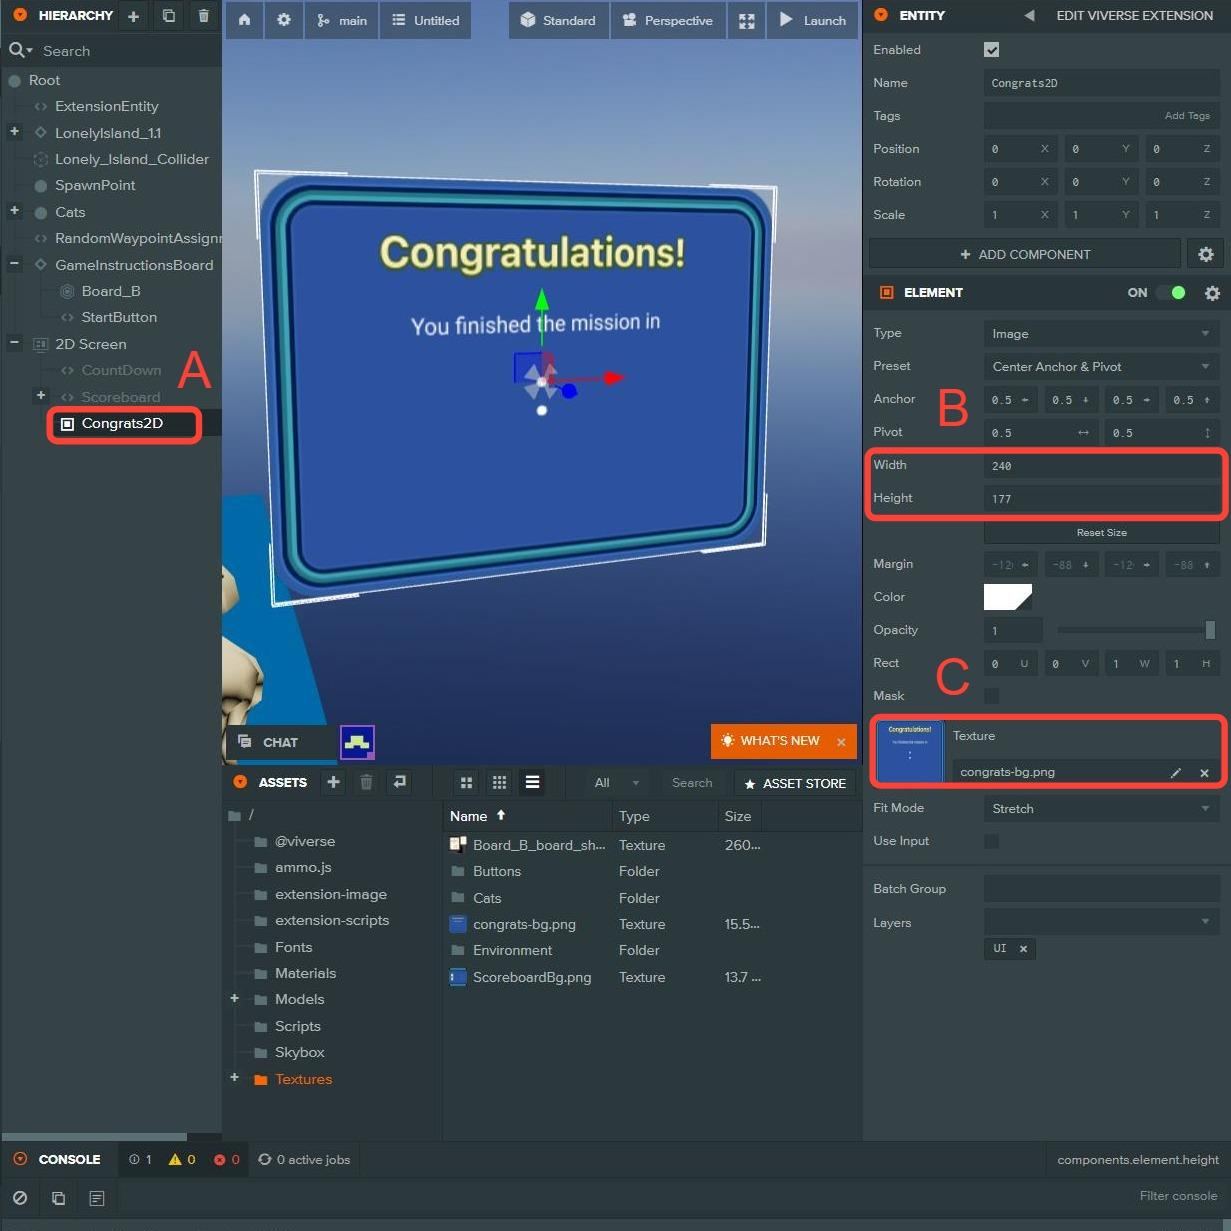
A. Create a new **Image Element** entity under **2D Screen**.
B. Change the **Width** to **240** and **Height** to **177**.
C. Add the **congrats-bg.png** texture to the **Texture** slot.
{% endstep %}
{% step %}
#### Add button container
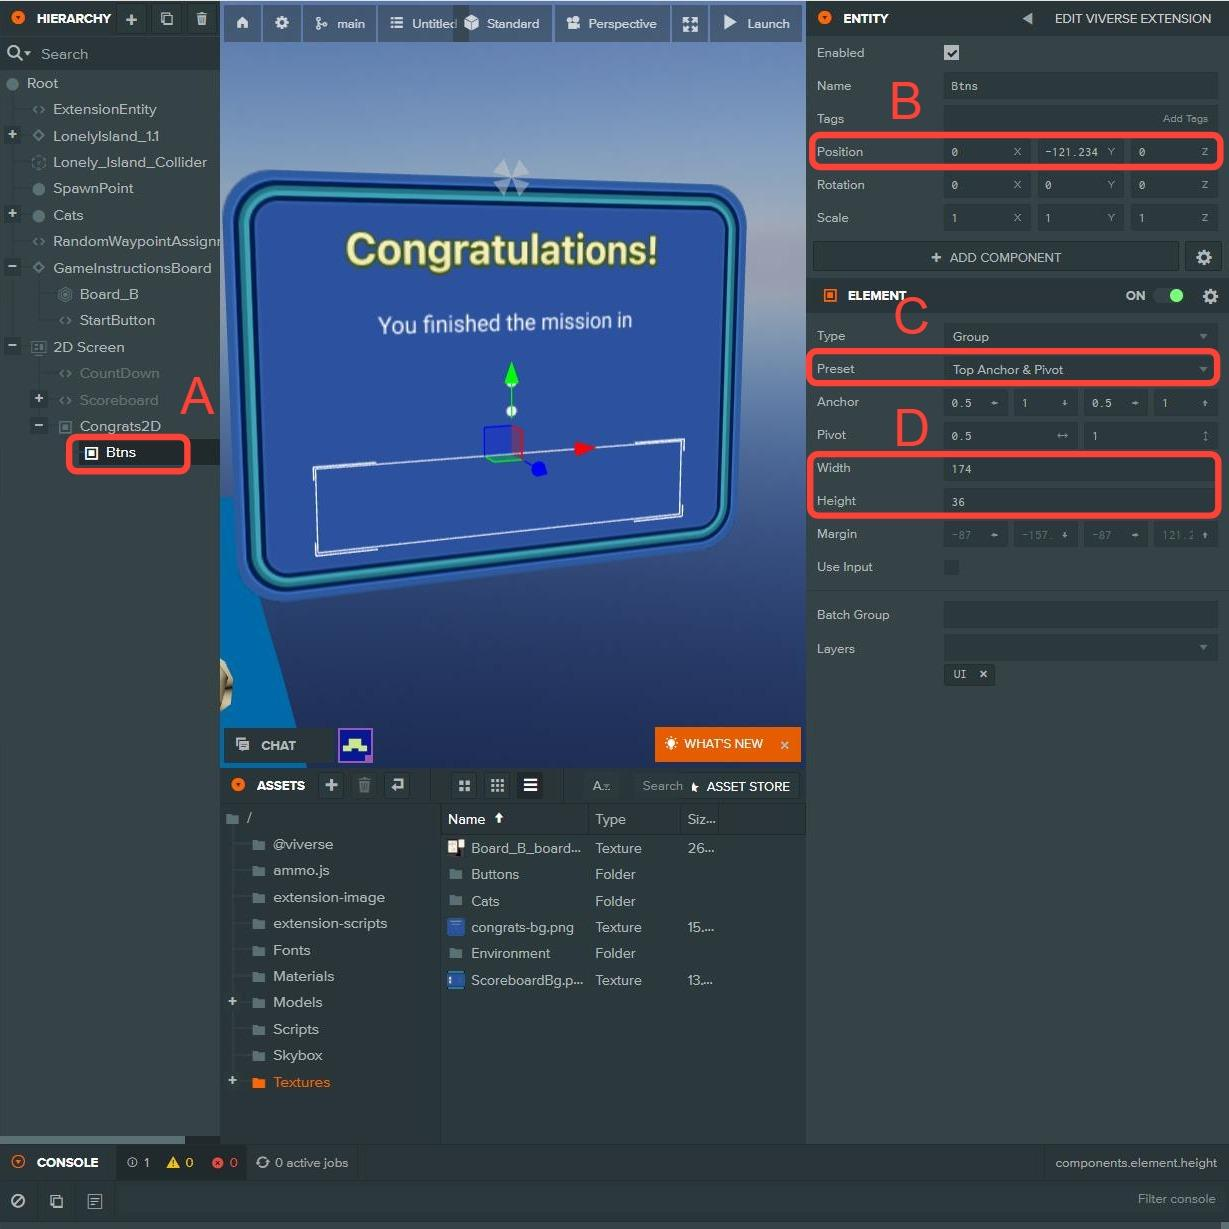
A. Create a **Group Element** under the **Congrats2D** entity and name it **Btns**.
B. Change the **Y Position** to **-121.234.**
C. Change to the **Preset** to **Top Anchor & Pivot**.
D. Change the **Width** to **174** and **Height** **36**.
{% endstep %}
{% step %}
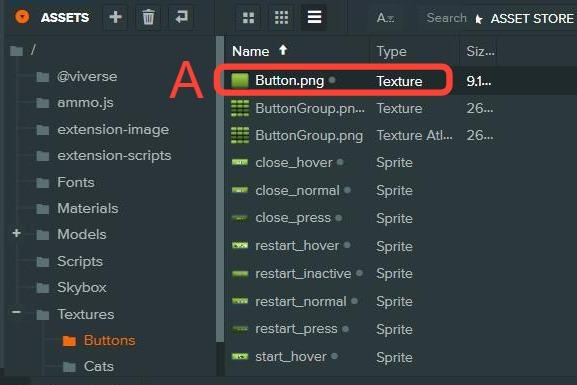
#### Add the button texture to the project
A. Drag the **Button.png** to the **Assets** window.
{% endstep %}
{% step %}
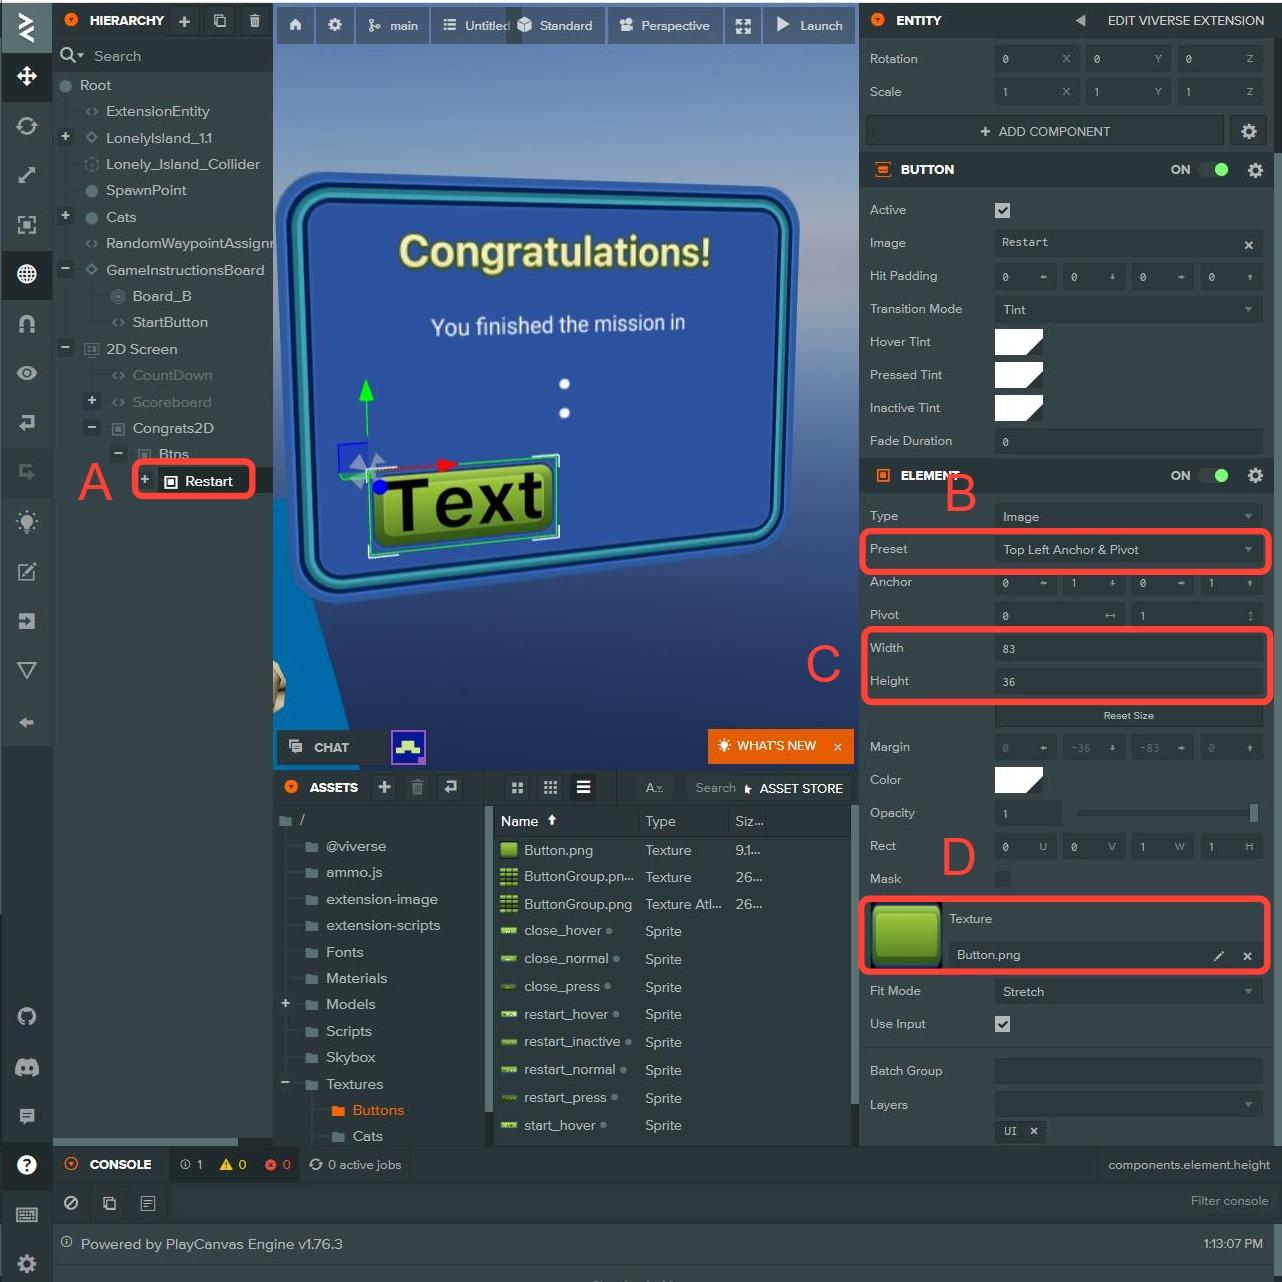
#### Create the restart button
A. Create a new **Button** under the **Btns** entity and name it **Restart**.
B. Change **Preset** to **Top Left Anchor & Pivot**.
C. Change the **Width** to **83** and **Height** to **36**.
D. Add the **Button.png** texture to the **Texture** slot.
{% endstep %}
{% step %}
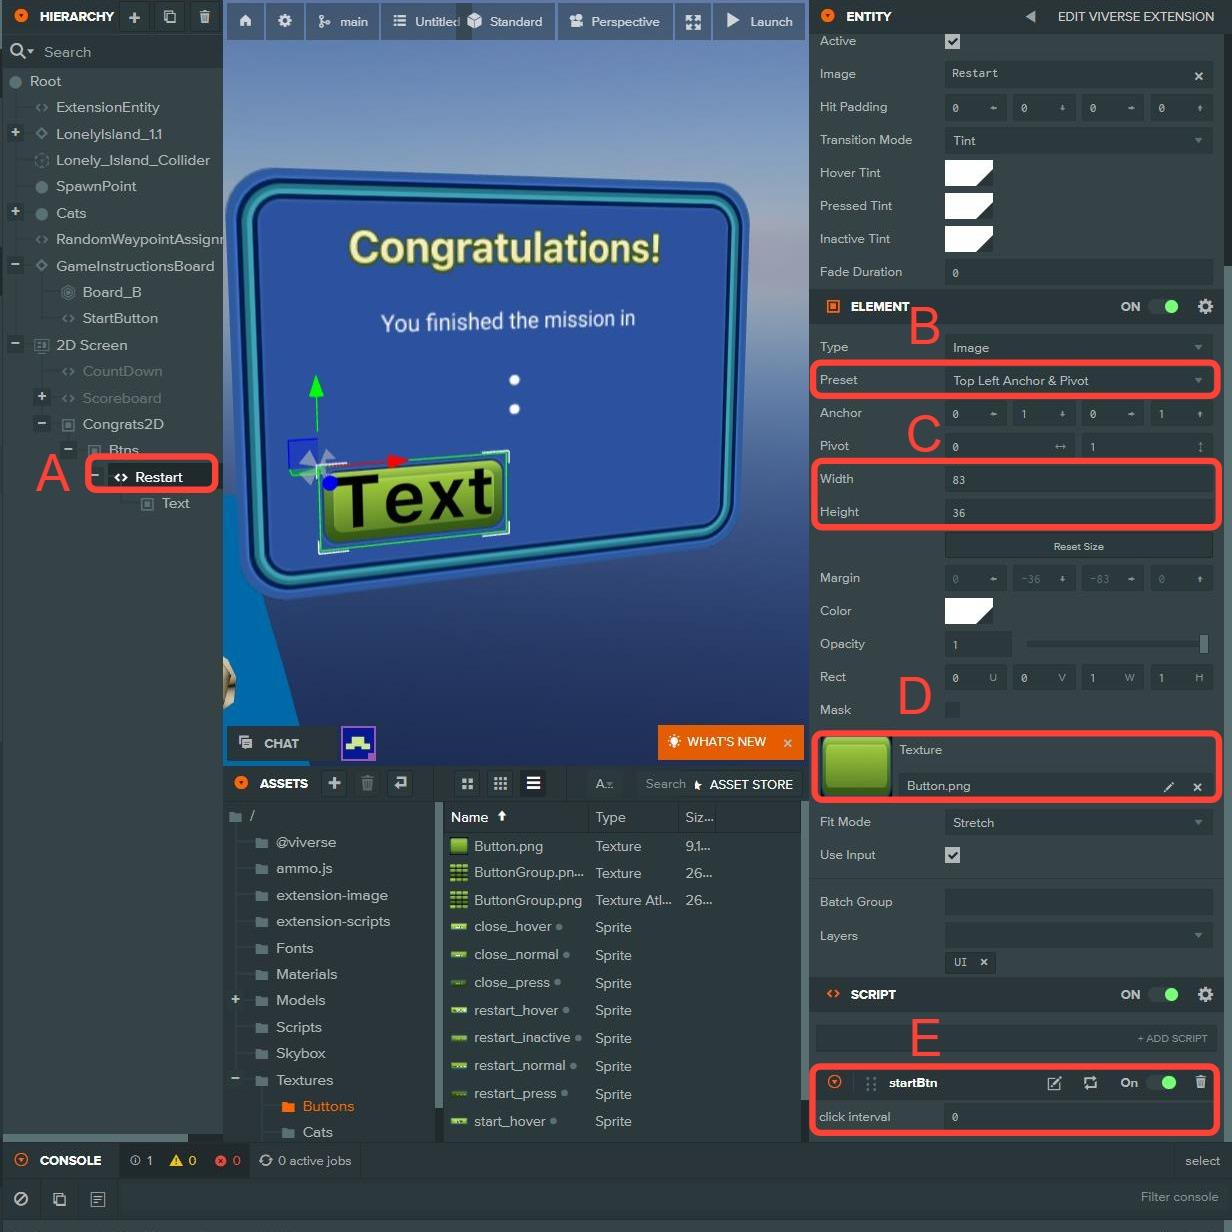
#### Create the restart button
A. Create a new **Button** under the **Btns** entity and name it **Restart**.
B. Change **Preset** to **Top Left Anchor & Pivot**.
C. Change the **Width** to **83** and **Height** to **36**.
D. Add the **Button.png** texture to the **Texture** slot.
E. Add the **startBtn.mjs** script to the **Restart** button entity.
{% endstep %}
{% step %}
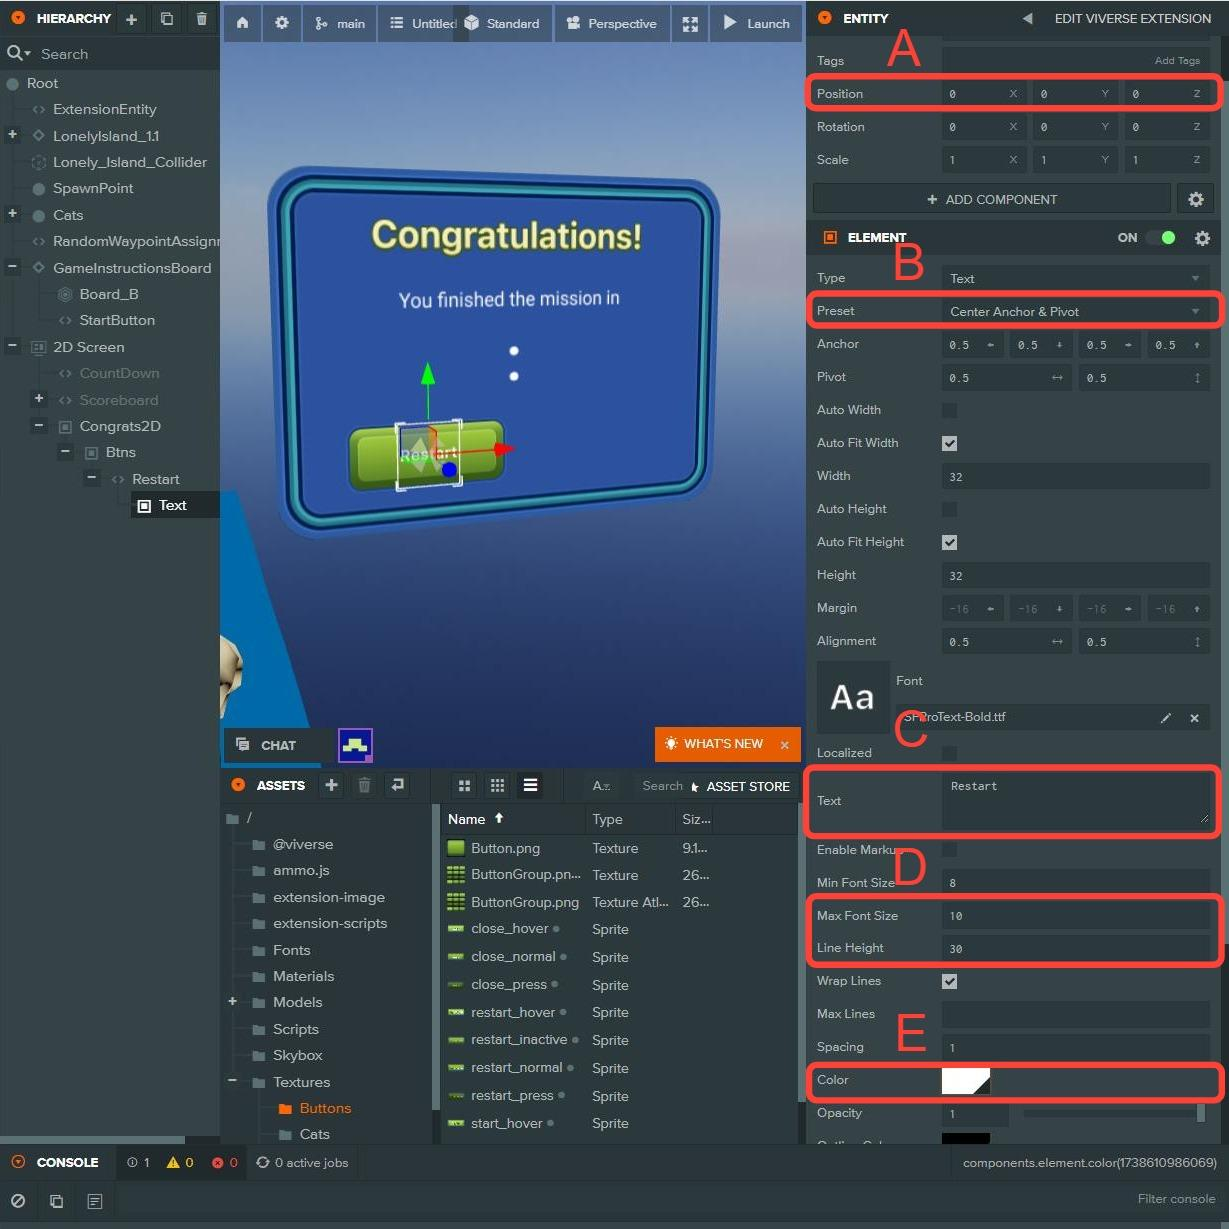
#### Update the restart button text
A. Change the **Position** to **(0, 0, 0)**.
B. Change the **Preset** to **Center Anchor & Pivot**.
C. Update the **Text** field to **Restart**.
D. Change **Max** **Font Size** to **10** and **Line Height** to **30**.
E. Change to Color to **FFFFFF**.
{% endstep %}
{% step %}
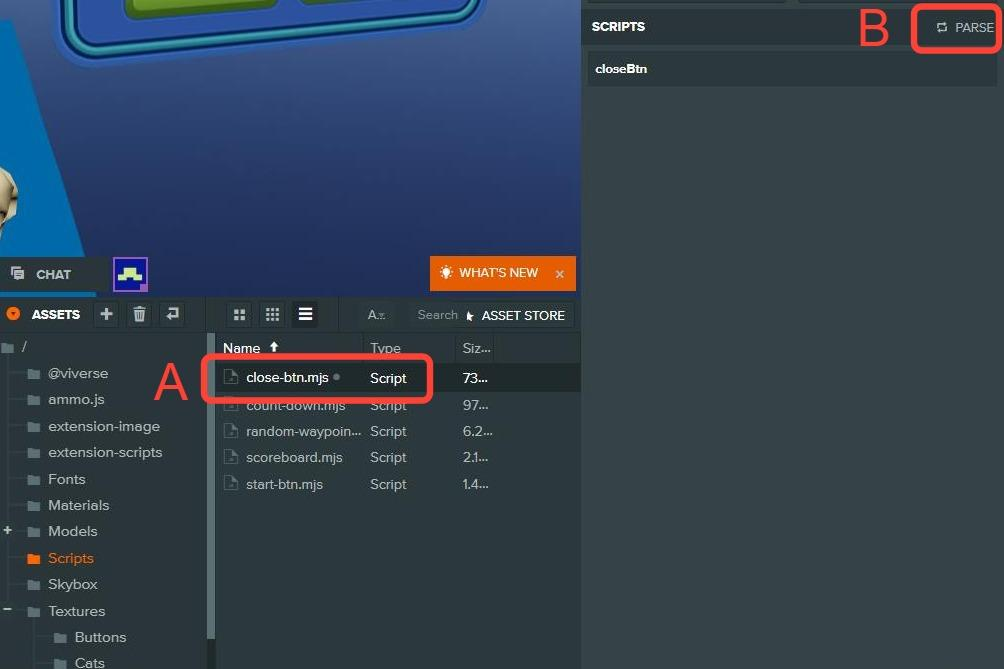
#### Add the **Close-Btn.mjs** script to the project
A. Drag the **Close-Btn.mjs** script to the **Assets** window.
B. Select the **Close-Btn.mjs** script and click the **Parse** button.
{% endstep %}
{% step %}
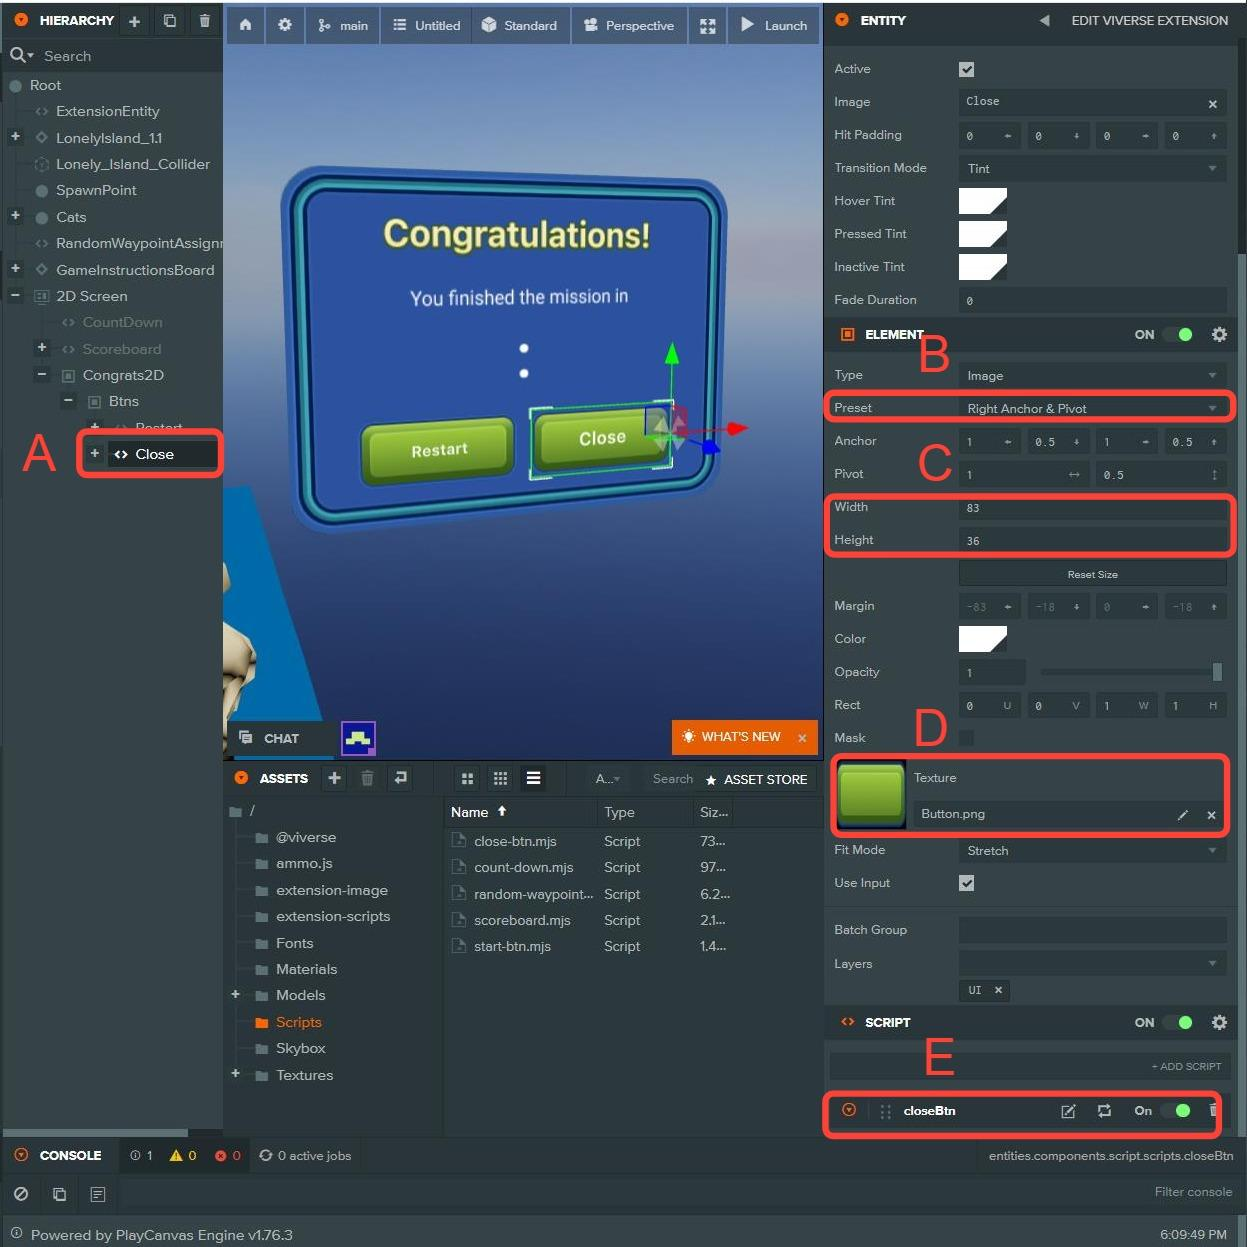
#### Create the close button
A. Create a new **Button** under the **Btns** entity and name it **Close**.
B. Change **Preset** to **Right Anchor & Pivot**.
C. Change the **Width** to **83** and **Height** to **36**.
D. Add the **Button.png** texture to the **Texture** slot.
E. Add the **Close-Btn.mjs** script to the **Close** button entity.
{% endstep %}
{% step %}
#### Update the close button text
A. Update the **Text** field to **Close**.
B. Change **Max Font Size** to **10** and **Line Height** to **32**.
C. Change **Color** to **FFFFFF**.
{% endstep %}
{% step %}
#### Add the timescore script to the project
A. Drag the **time-score.mjs** scrip to the **Assets** window.
B. Click the **Parse** button.
{% endstep %}
{% step %}
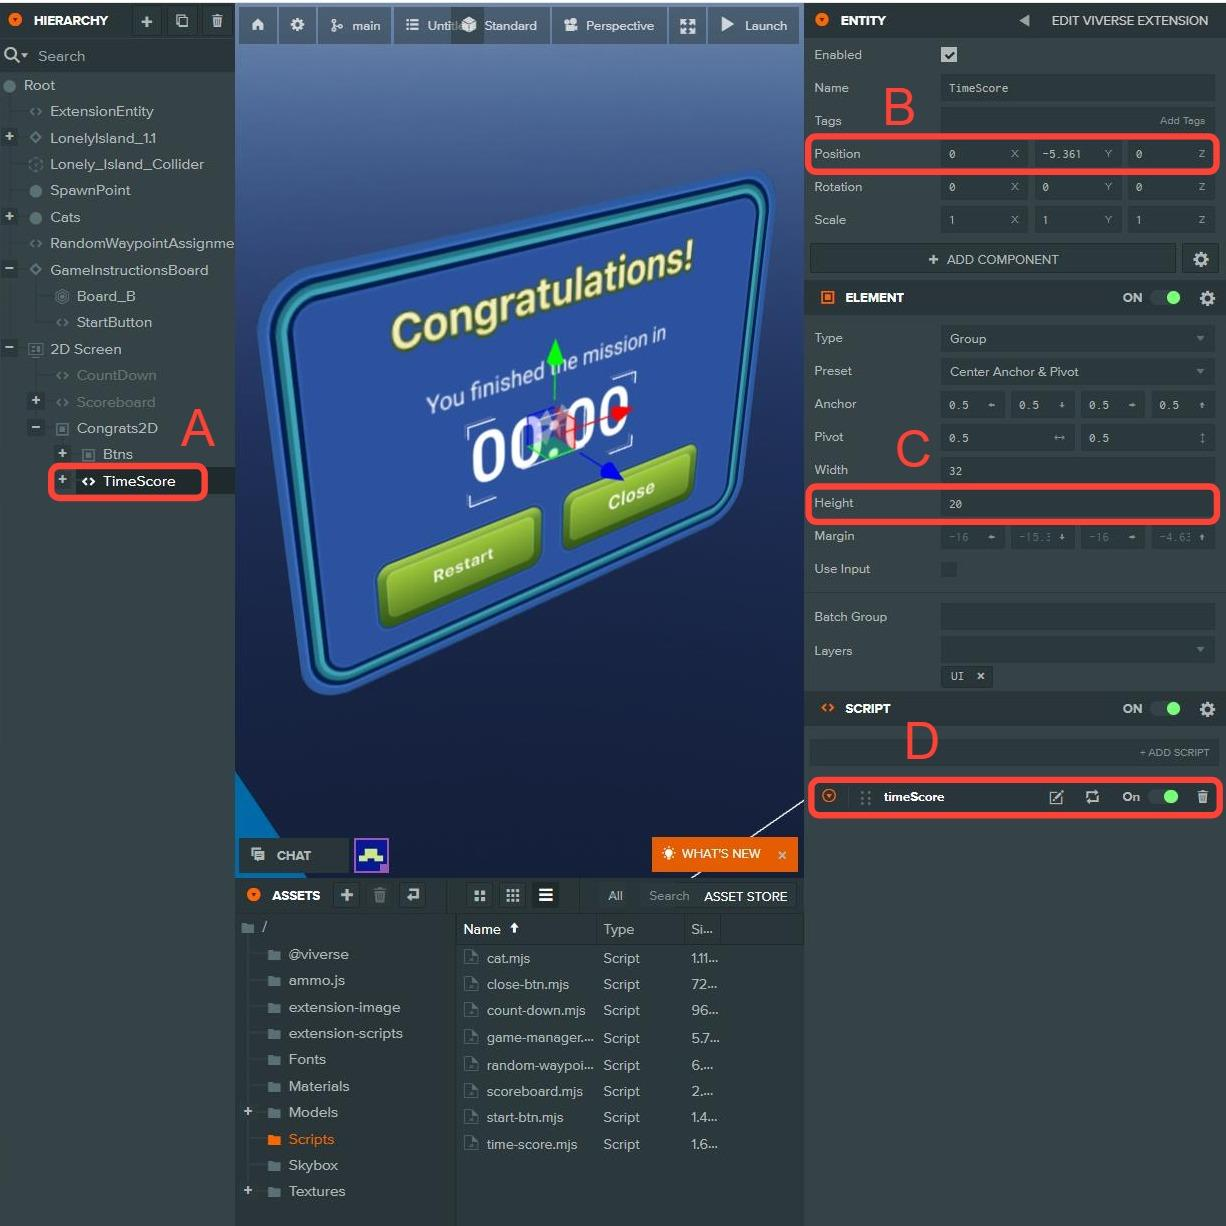
#### Create the time display text group
A. Create a new **Group Element** under the game over entity and name it **TimeScore**.
B. Change **Position** to **(0, -5.361, 0)**.
C. Update **Height** to **20**.
D. Add the **time-score.mjs** script.
{% endstep %}
{% step %}
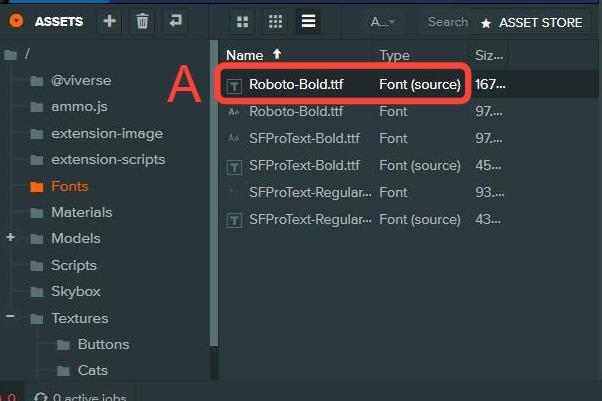
#### Add Roboto-Bold font to the project
A. Drag the **Roboto-Bold.ttf** font to the **Assets** window.
{% endstep %}
{% step %}
#### Create the text for minutes
A. Create a new **Text Element** under **TimeScore** and name it **Min**.
B. Change the **Position** to **(-23, 0, 0)**.
C. Add **Roboto-Bold.ttf** font to the **Font** slot.
D. Update the **Text** to **00**.
{% endstep %}
{% step %}
#### Create the text for seconds
A. Duplicate the **Min** entity under **TimeScore** and name it to **Sec**.
B. Change the **Position** to **(23, 0, 0)**.
{% endstep %}
{% step %}
#### Disable the GameOverUI entity
{% endstep %}
{% endstepper %}
## Setup GameManager
The GameManager object is already added to the template project and configured. The following steps show it was setup and configured.
{% stepper %}
{% step %}
#### Add the **GameManager** script to the project
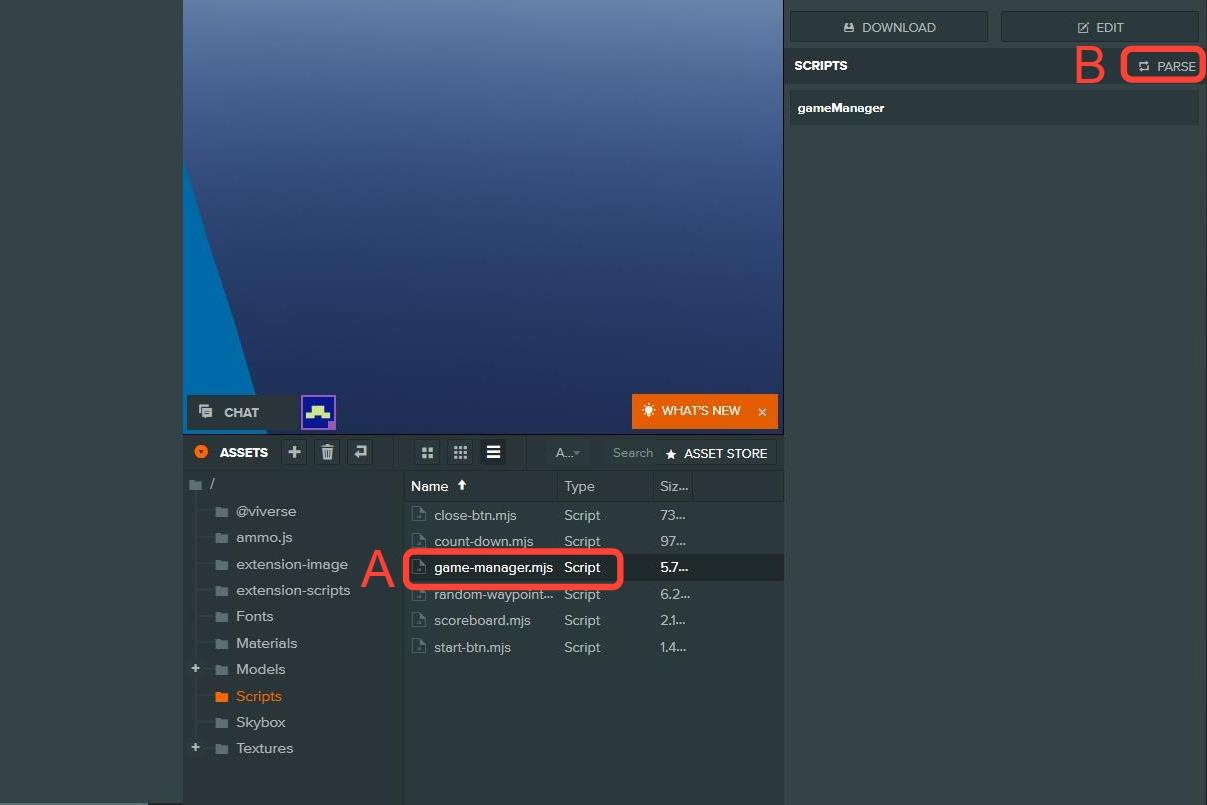
A. Drag the **game-manager.mjs** script to the **Assets** window.
B. Select the **game-manager.mjs** script and click the **Parse** button.
{% endstep %}
{% step %}
#### Create the **GameManager** entity
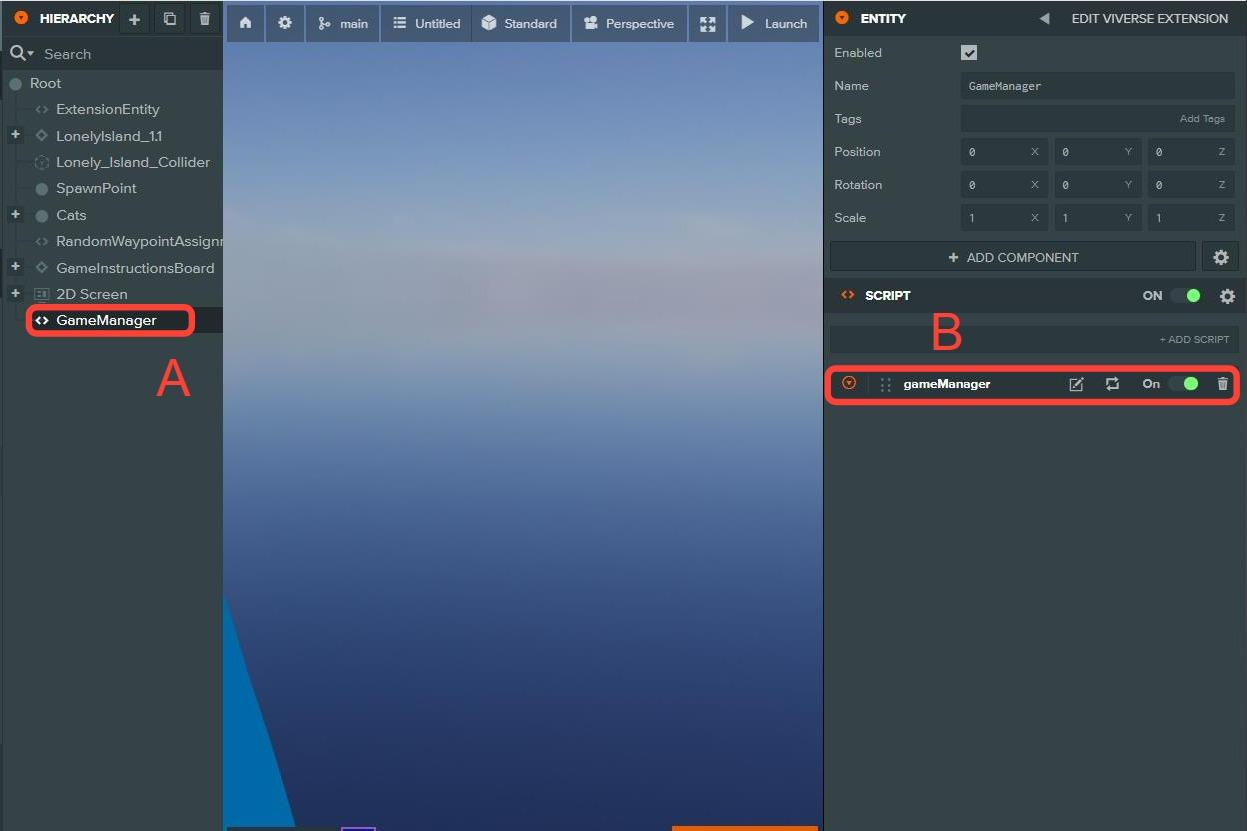
A. Create a new entity and name it **GameManager**
B. Add the **game-manager.mjs** script.
{% endstep %}
{% endstepper %}
## Setup Quest system
The quest system is already added to the template project and configured, but quest tasks can be modified, added or removed. The following steps show how it was setup and configured.
{% stepper %}
{% step %}
#### Open Viverse Scene Settings
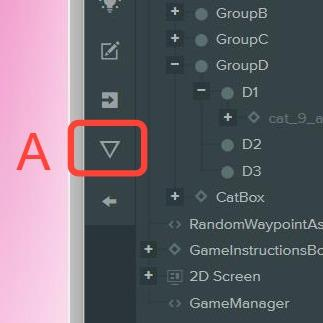
A. Click on the **Vivese Scene Settings** button
{% endstep %}
{% step %}
#### Create a quest
A. Add a new **Quest** and name it **Pet Rescue**.
B. For **Quest Description,** add the text:
**It's lunchtime, but the cats are still hiding around...Quickly find them, click them, and bring them back to their cat tree hideout.**
C. Add a new **Task** and for the description, add the text: **9 cats, how many can you find?**
D. Change the **Task type** to **progressBar**.
E. Update **Progress Steps** to **9**.
{% endstep %}
{% step %}
#### Starting the quest
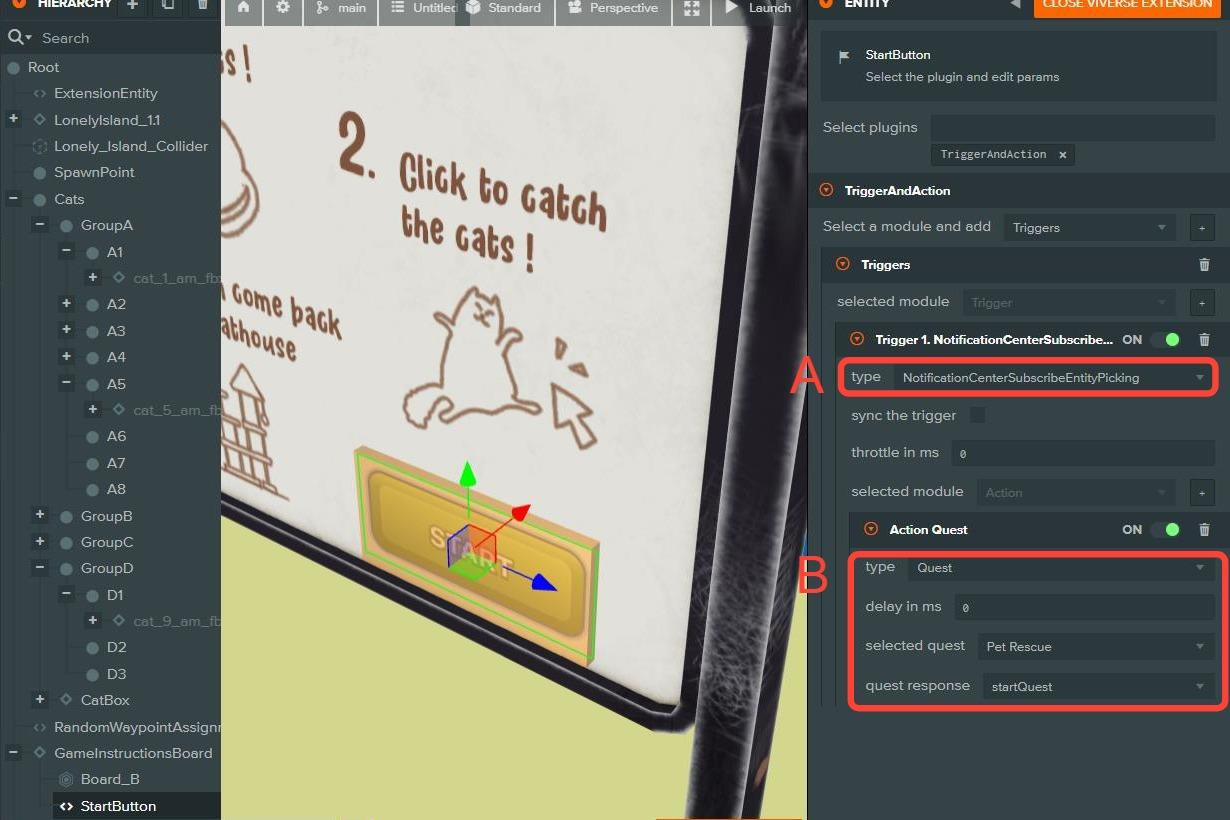
A. Select the **StartButton** and click **Edit Viverse Extension** button. Add the **NotificationCenterSubscribeEntityPicking** trigger.
B. Select the **Quest** action type with the **selected quest** set to **Pet Rescue** and **quest response** set to **startQuest**.
{% endstep %}
{% step %}
#### Add progress to the quest
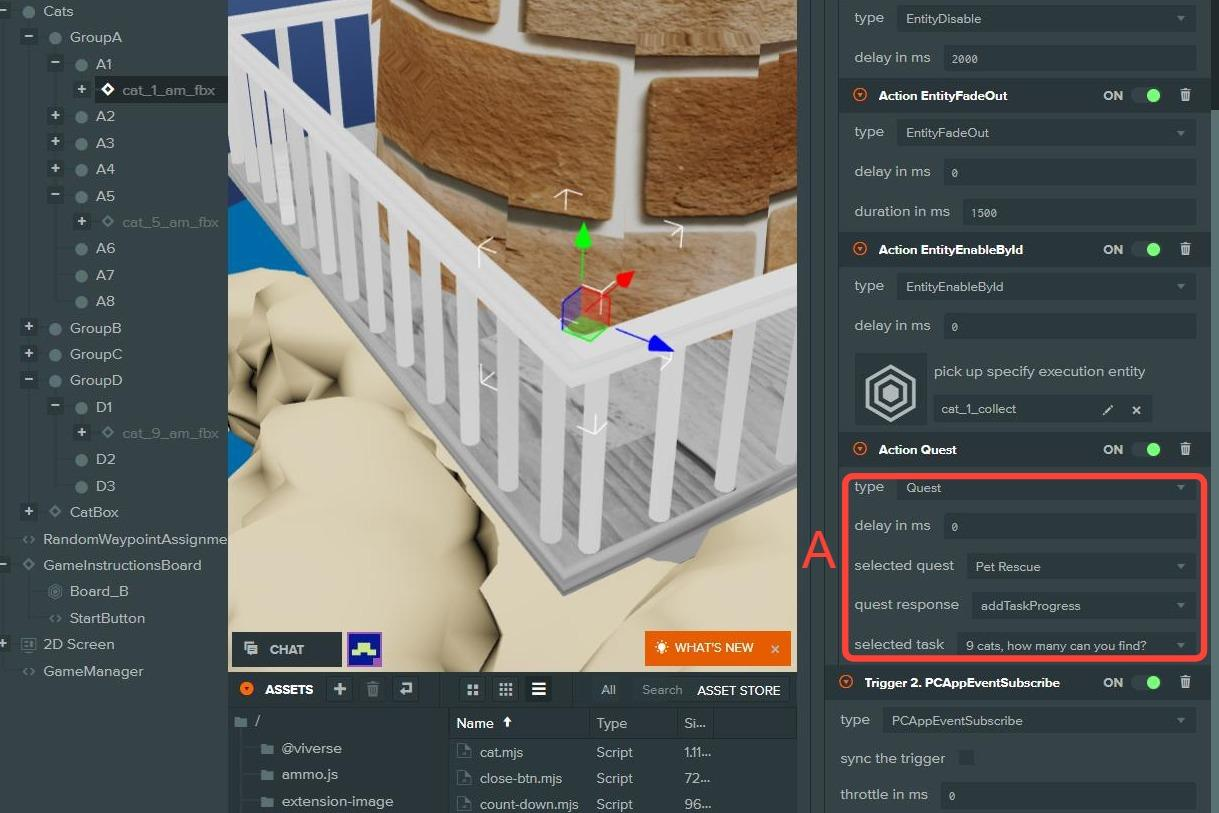
A. For each cat, add the **Quest** action under the **NotificationCenterSubscribeEntityPicking** trigger.
B. Change **selected quest** to **Pet Rescue**, change **quest response** to **addTaskProgress** and then change **selected task** to: **9 cats, how many can you find?**
{% endstep %}
{% endstepper %}
## Setup Animations
The animations are already added to the template project and configured. The following steps show how they were setup and configured.
{% stepper %}
{% step %}
#### Create the animation state graph
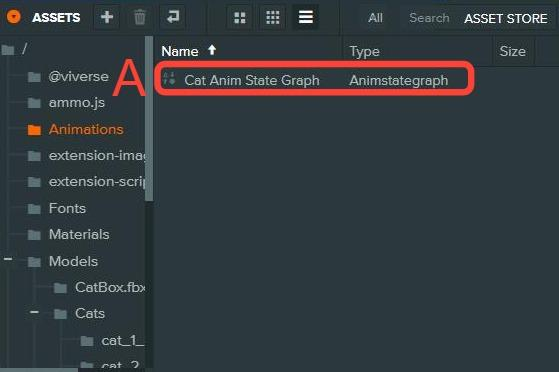
A. In the **Assets** window, right-click and create a new **Anim State Graph**.
{% endstep %}
{% step %}
#### Rename animation state
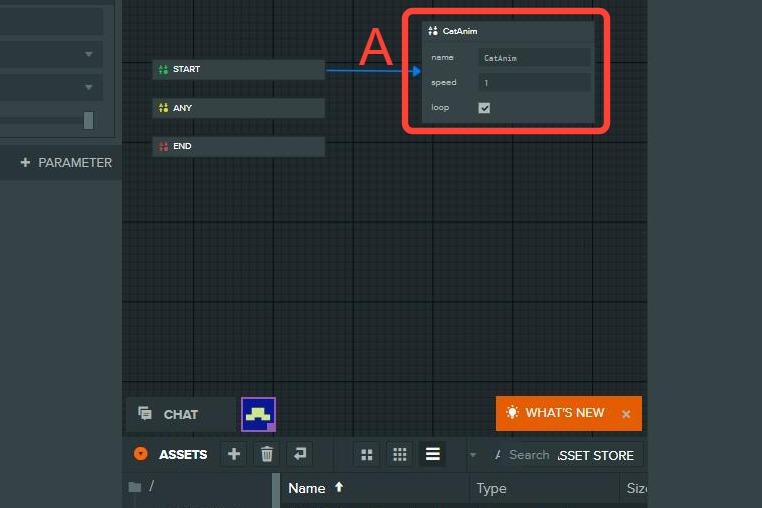
A. Rename the animation state to **CatAnim**.
{% endstep %}
{% step %}
#### Add animation to the cats
A. Add an **Anim** component to each cat.
B. Add the **Cat Anim State Graph** to the **State Graph** slot.
C. Locate the animation file inside the cat fbx.
D. Add the animation file to the **CatAnim** state slot.
{% endstep %}
{% endstepper %}
## Setup Audio
The audio files are already added to the template project and configured, but the project can be customized to play different sounds and music. The following steps show how they were setup and configured.
{% stepper %}
{% step %}
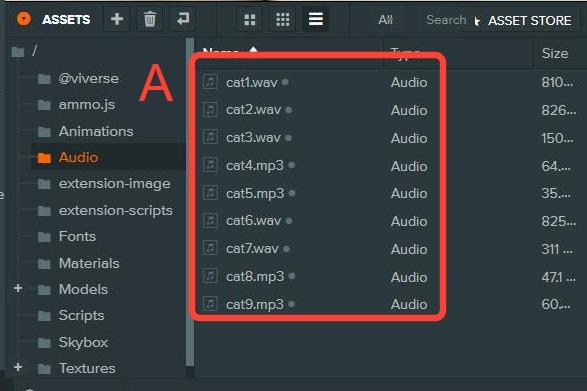
#### Add the cat audio files to the project
A. Drag the cat audio files to the **Assets** window.
{% endstep %}
{% step %}
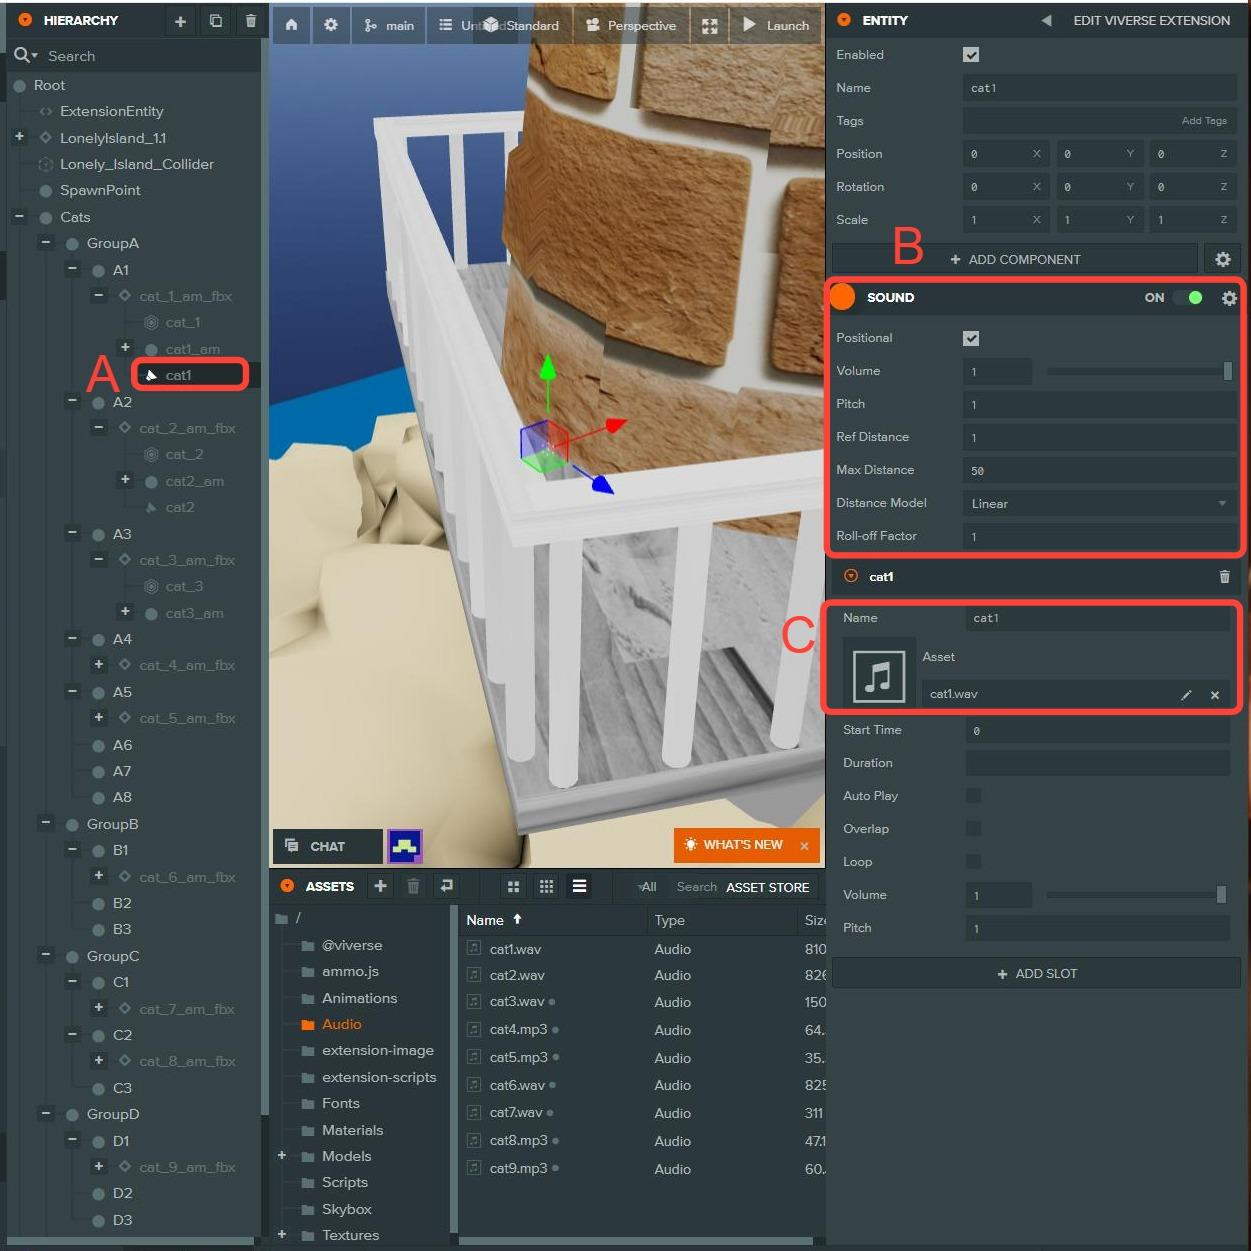
#### Create the sound entity
A. For each cat, create a new entity under it. Rename it to **cat1**, **cat2**, etc.
B. Add the Sound component and change **Max Distance** to **50**.
C. Rename the **Slot 1** to **cat1**, **cat2**, etc. Add the **cat1.wav**, **cat2.wave**, etc. to the **Asset** slot.
{% endstep %}
{% step %}
#### To add cat sounds
A. On each cat, locate the **NotificationCenterSubscribeEntityPicking** trigger.
B. Add the **EntityPlaySound** action under the **NotificationCenterSubscribeEntityPicking** trigger. Change **sound name to play** to cat1, cat2, etc. Add the cat1 **Sound** entity to the **pick up specify execution entity**.
{% endstep %}
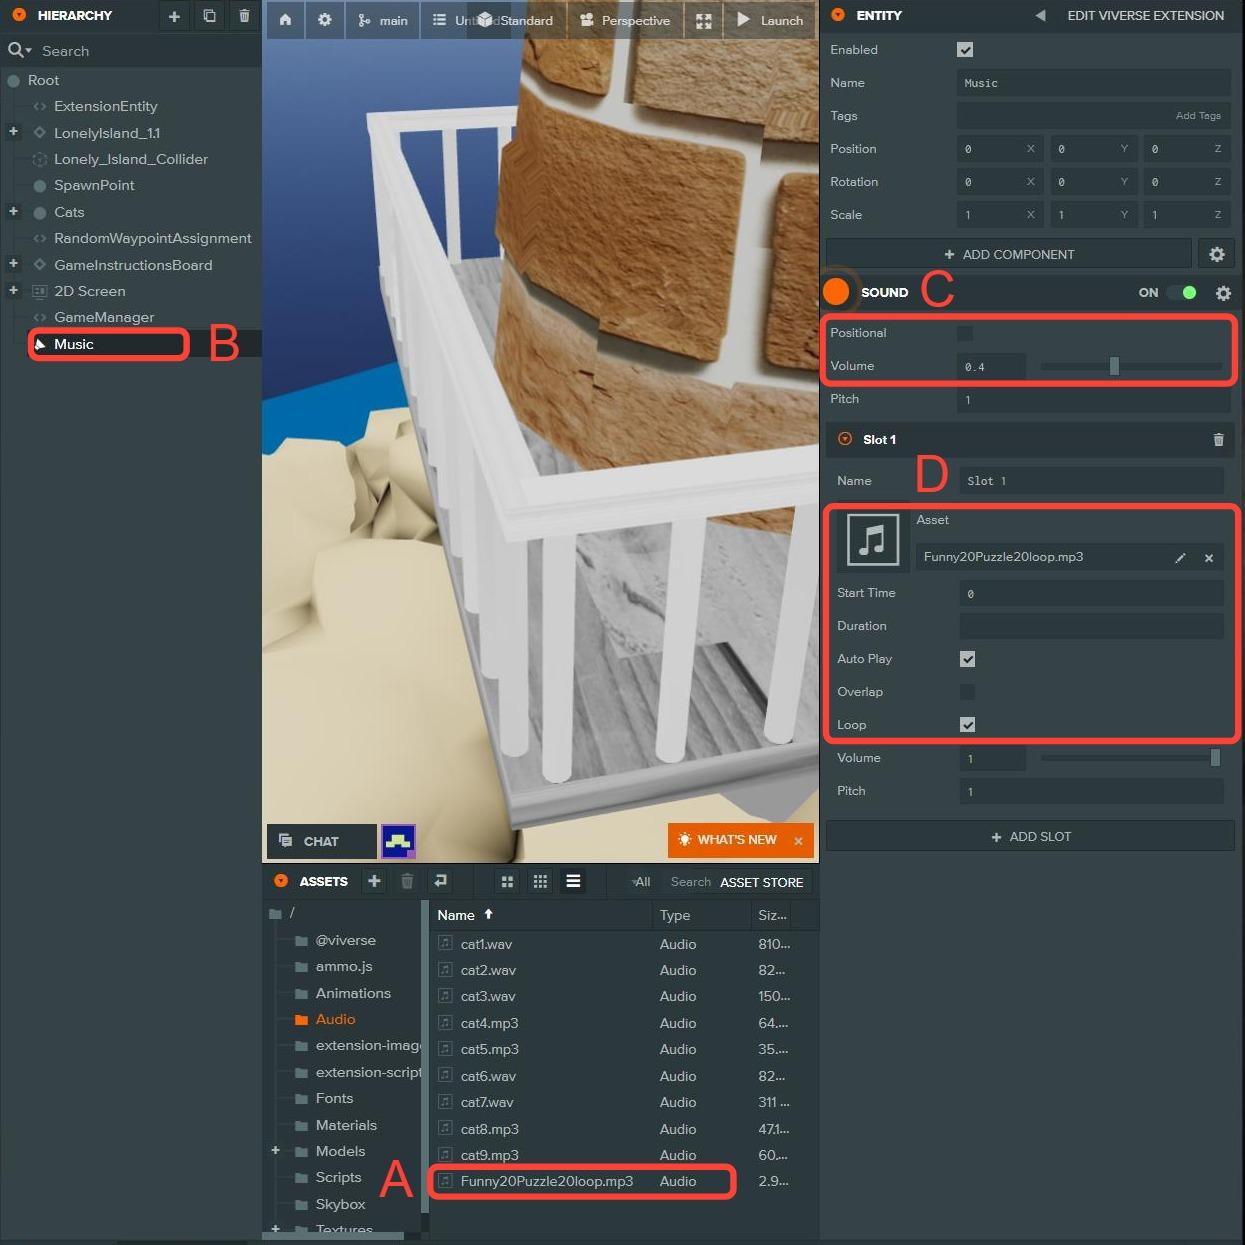
{% step %}
#### To add background music
A. Drag the **Funny20Puzzle20loop.mp3** to the **Assets** window.
B. Create a new **Sound** entity and name it **Music**.
C. Uncheck **Positional** and set **Volume** to **.4**.
D. Add the **Funny20Puzzle20loop.mp3** to the **Asset** slot, place a check on **Auto** Play and **Loop**.
{% endstep %}
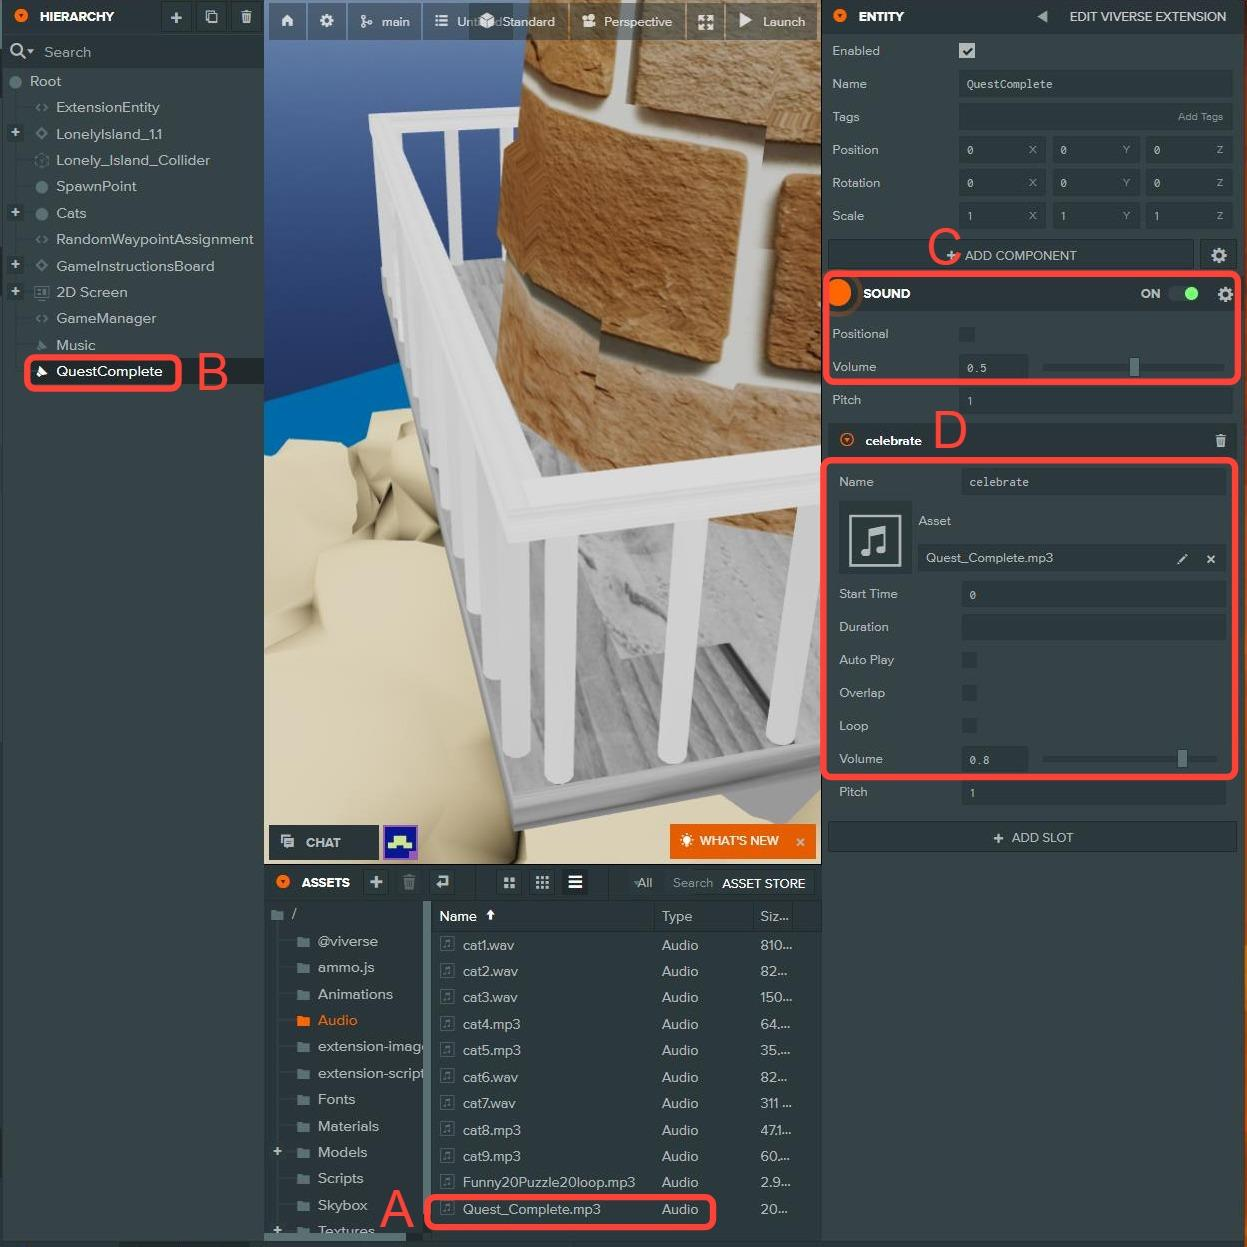
{% step %}
#### To add celebration music for completing the quest
A. Drag **Quest\_Complete.mp3** to the **Assets** window.
B. Create a new **Sound** entity and name it **QuestComplete**.
C. Uncheck **Positional** and set **Volume** to **.5**.
D. Update the **Name** slot to **celebrate,** add the **Quest\_Complete.mp3** to the **Asset** slot and change Volume to **.8**.
{% endstep %}
{% step %}
#### Add Viverse functionality for celebration music
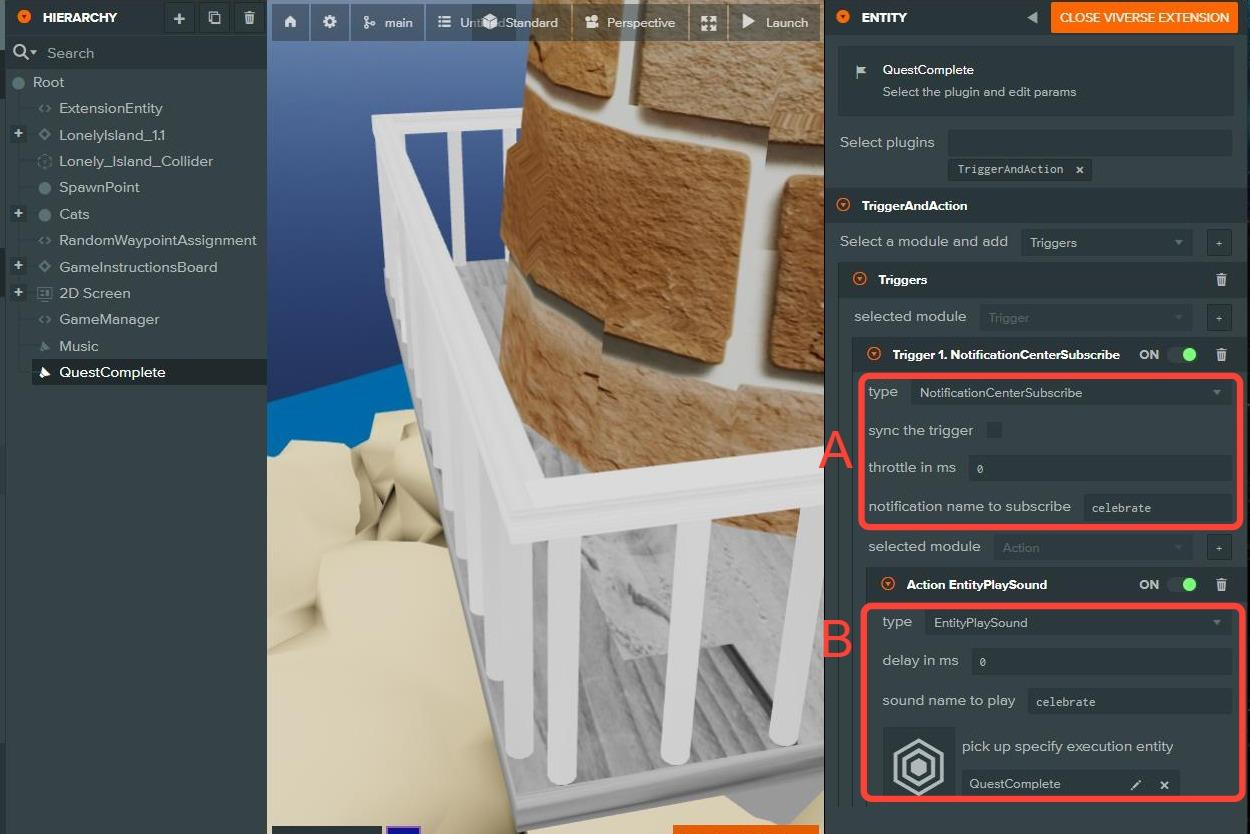
A. On the QuestComplete entity, add the **NotificationCenterSubscribe** trigger and **celebrate** to the **notification name to subscribe**.
B. Add the EntityPlaySound action, add **celebrate** to **sound name to play** and add the **QuestComplete** entity to the **pick up specify execution** entity.
{% endstep %}
{% endstepper %}
## Setup Particle Effects
The particle effects are already added to the template project and configured. The following steps show how they were setup and configured.
{% stepper %}
{% step %}
#### Add particles to the cats when clicked
A. Firework is a PlayCanvas Template (prefab) that can be copied from one project to another.
B. Add the **Firework** template to each cat.
{% endstep %}
{% endstepper %}
---
# Agent Instructions
This documentation is published with GitBook. GitBook is the documentation platform designed so that both humans and AI agents can read, navigate, and reason over technical content effectively. Learn more at gitbook.com.
## Querying This Documentation
If you need additional information that is not directly available in this page, you can query the documentation by asking a question.
Perform an HTTP GET request on the following URL with the `ask` and `goal` query parameters:
```
GET https://docs.viverse.com/examples/pet-rescue-template-project.md?ask=&goal=
```
`ask` is the immediate question: it should be specific, self-contained, and written in natural language.
`goal` is what the user is ultimately trying to achieve, the reason they need the answer. Sharing it helps GitBook give you a better, more relevant answer. A goal is most helpful when it describes the outcome the user wants rather than restating the question. For example, with `ask=how do I create an API token`, a goal like `automate deployments from our CI pipeline` lets GitBook tailor the answer to that use case.
The response will contain a direct answer to the question and relevant excerpts and sources from the documentation.
Use this mechanism when the answer is not explicitly present in the current page, you need clarification or additional context, or you want to retrieve related documentation sections.